For iOS Device
Discover the New iPhone Location Changer — iWhere Location Changer! You can enjoy a wonderful location simulation experience and completely change your iPhone's location. Whether you're exploring virtual worlds in games or posting the hottest locations on social media, iWhere is your preferred tool to achieve these goals. No need to jailbreak or anything complicated, just a few simple steps and you can trick games and social platforms into thinking you are anywhere in the world. iWhere will bring you unlimited possibilities.
Get Started with iWhere Location Changer for iPhone
Download and Install iWhere
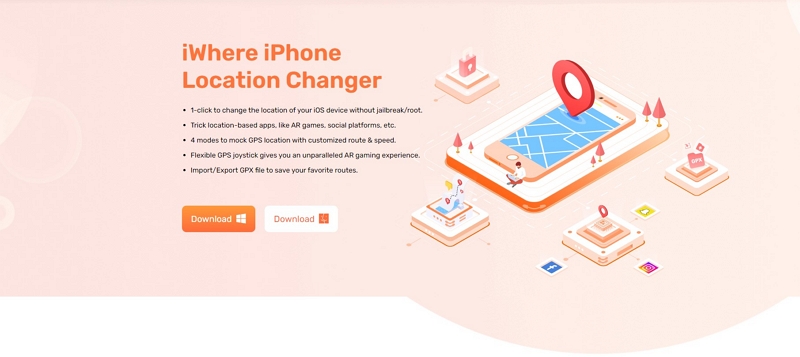
Welcome to open the iWhere official website and click Download to quickly install iWhere on your computer.
Buy and Register Program
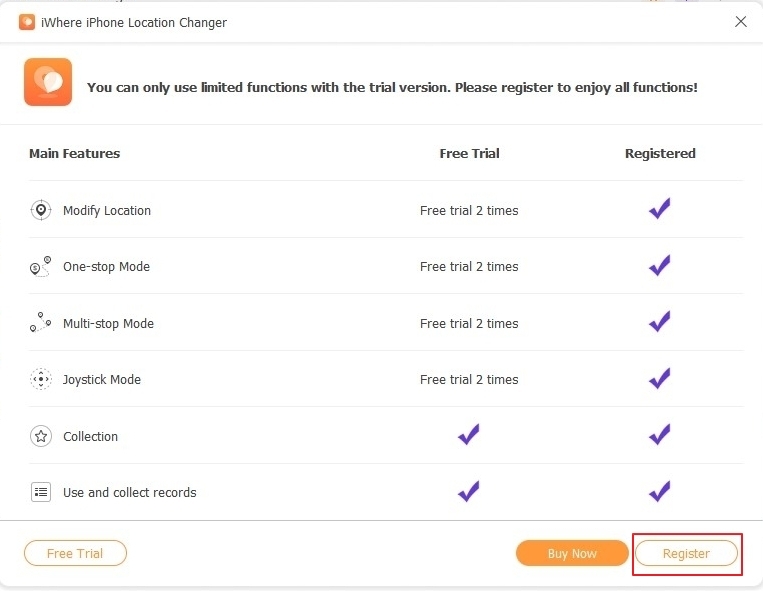
Enter your email address and passcode to log in. If you have not registered, you can click Register or Buy Now, follow the window instructions to register iWhere.
Connect Your iOS Device
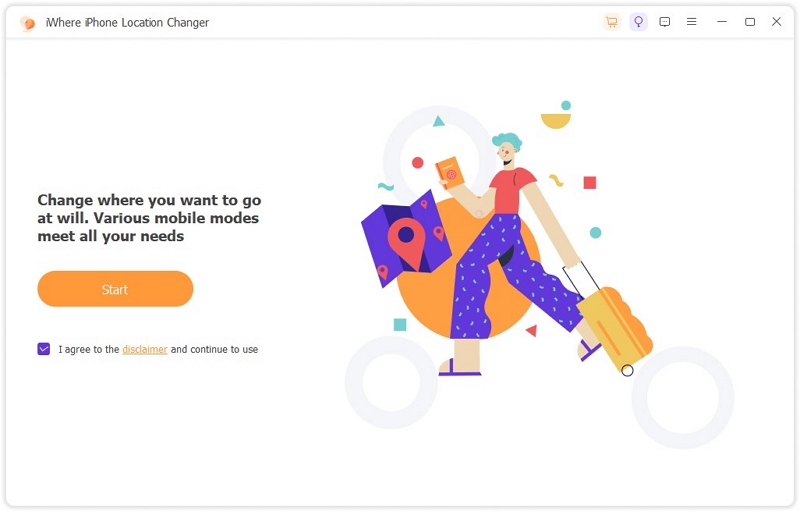
Once successfully logged in, read the customer agreement and click the Start button to link to your iOS device.
How to Change iOS GPS Location with 1 Click?
If you want to prevent others with whom you share your location from knowing your real location, Modify Mode is your best choice. iWhere provides the technology to change the GPS location of iOS with one click, allowing you to easily overcome the geographical limitations of Geo-Based applications.
Connect iOS device to the computer
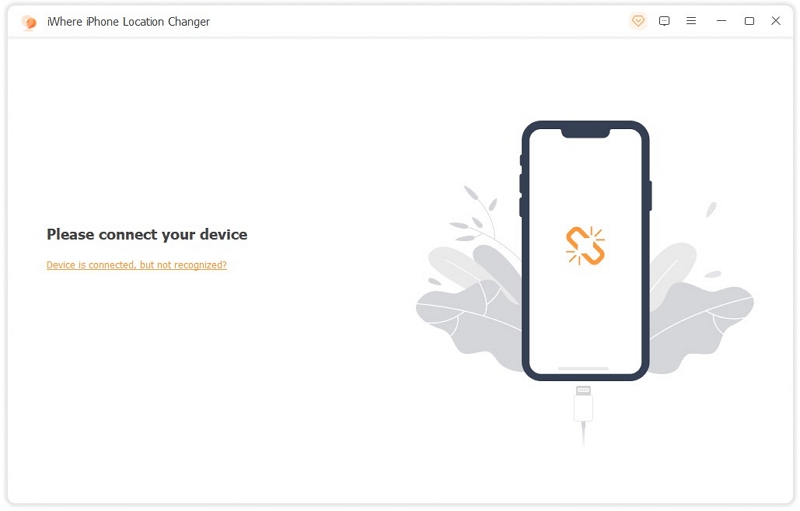
Please launch iWhere on your computer. Then connect the iOS device whose location needs to be changed to the computer.
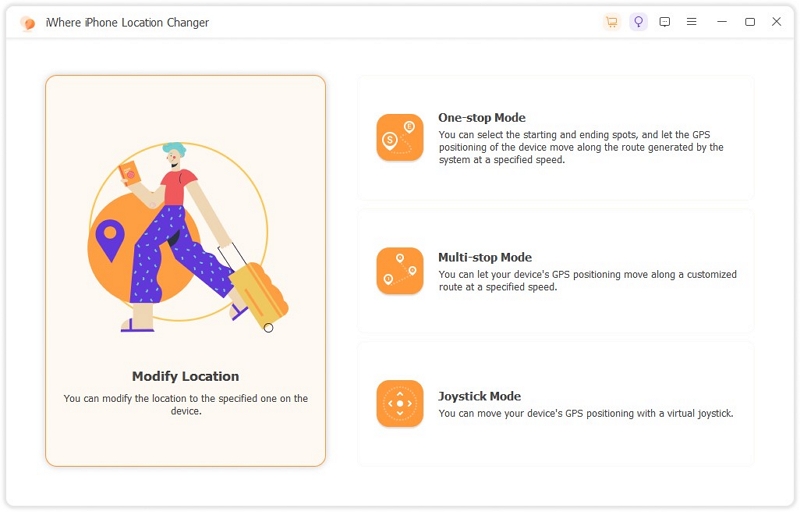
Choose the Modify Location
Click the Modify Location button on the left to simulate the location of the iOS device.
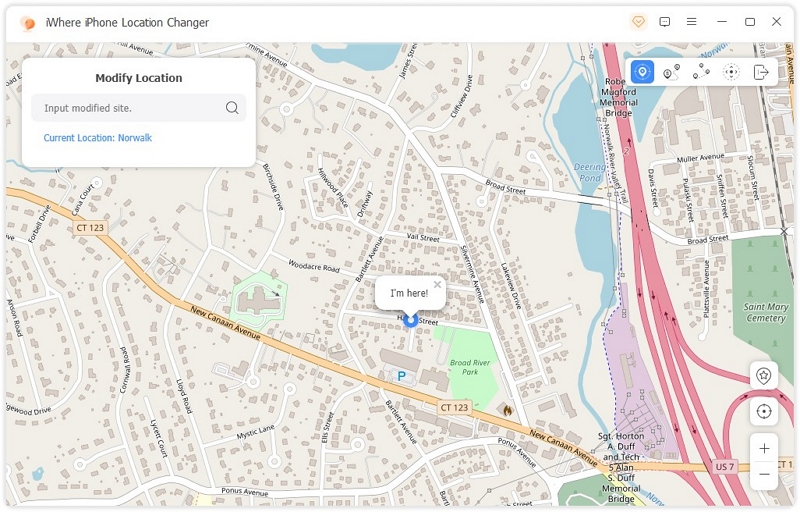
Check out other locations on the map
The window will display a map with your location. You can freely drag or use the “+/-” in the lower right corner of the map to automatically zoom in and out the map to view other locations on the map.
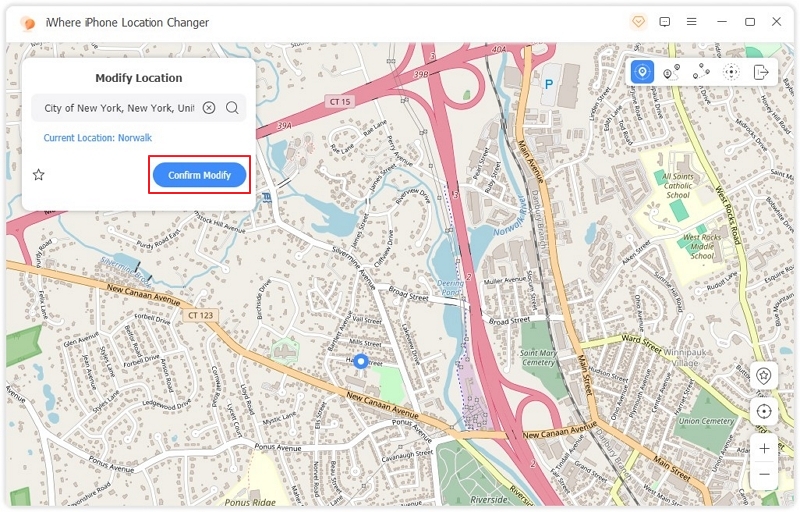
Input or search the destination
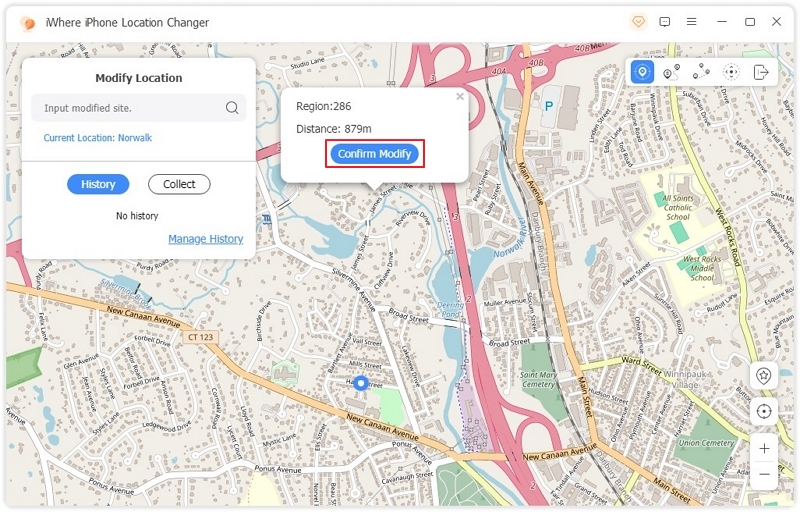
Input or search for any destination you want in the left navigation bar. Click the Confirm Modify button to complete the device location modification.
If you already know where your destination is on the map, you can select it by clicking on the map location. Then click Confirm Modify and change the location of your iOS device.
Use Fluctuations Mode to enhance the realism of your movement
1. Tap the icon in the top right corner to access Modify Location mode.
2. Search for your desired location.
3. Enable Fluctuations Mode by checking the box to subtly adjust the position from the selected point, enhancing the realism of your movement.
4. Go to the Modify tab to confirm your changes.
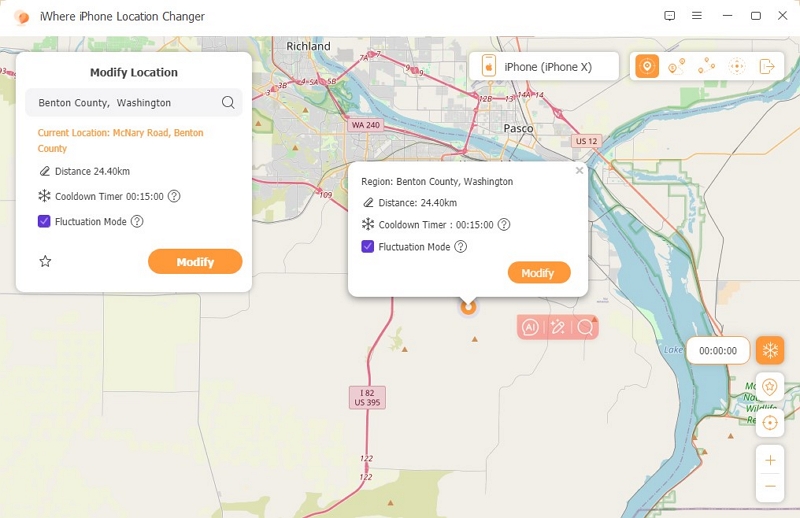
This feature helps simulate natural movement by creating a more seamless and authentic motion display, reducing the appearance of abrupt or unnatural shifts.
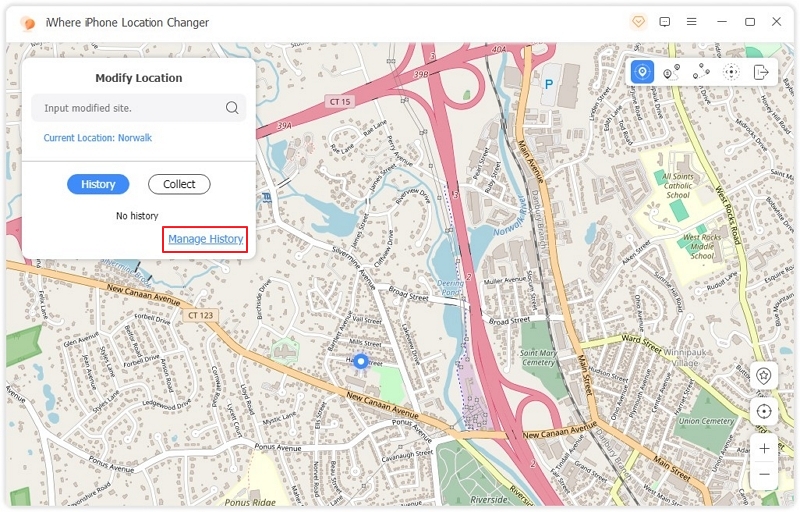
To manage your used locations, click on Manage History to view or modify your GPS location change records.
How to Simulate GPS Movement with One-stop Mode?
If you don't want to constantly enter new destinations, you can use iWhere's one-stop mode to make your GPS location follow the planned route.
Enter the One-stop Mode
Select the One-stop Mode in the first box on the right, and your device positioning will move at a specific speed along the generated route.
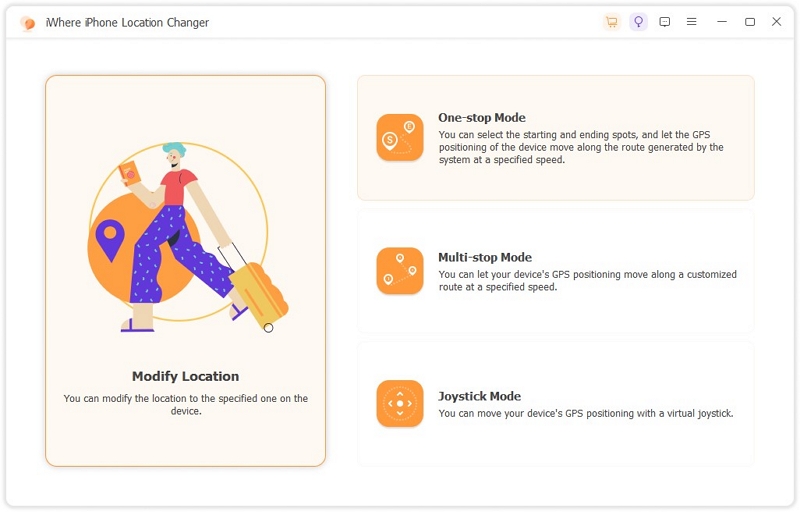
Another way to enter the One-stop Mode is to click the second icon in the top right corner.
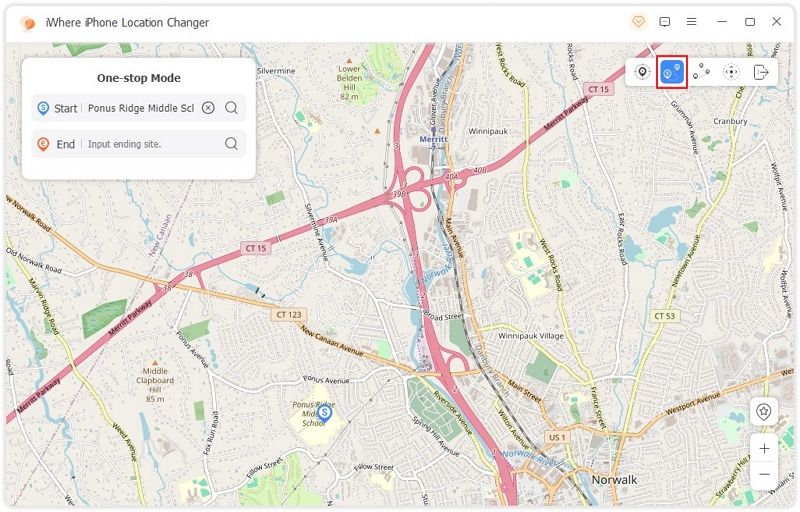
Type the starting point and the ending point
Then enter your desired start and end points for your route in the box. iWhere will automatically simulate a movement track for your device.
Additionally, you can click a site on the map and select Use the starting point/Use the ending point to convert this site into the starting site/destination of the device's virtual route.
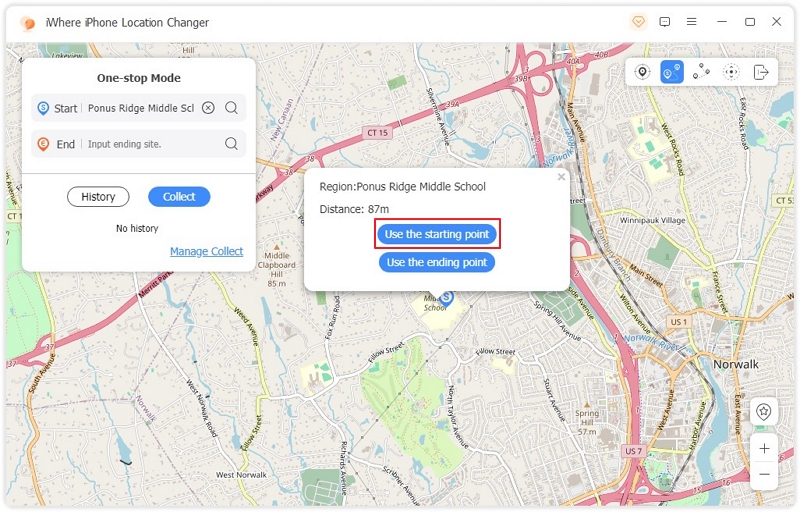
You can also go to History or Collect and select the routes you have performed.
Start moving
After selecting the starting and ending points, iWhere will automatically calculate the distance and time of the route. You can drag the points on the toolbar to customize the moving speed, and enter the number to design the moving time.
Finally, click to Start Move and enjoy your virtual tour.
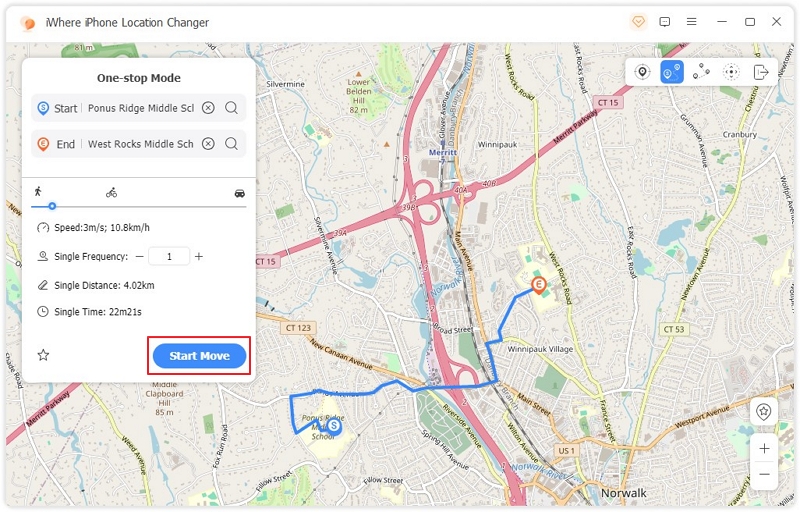
If you like this simulated route, please remember to light up the  on the map or ☆ icon in the
white box to bookmark it. Next time you need it, select Collect in the white box to apply
it directly.
The Realistic Mode in the One-stop Mode & Multi-stop Mode
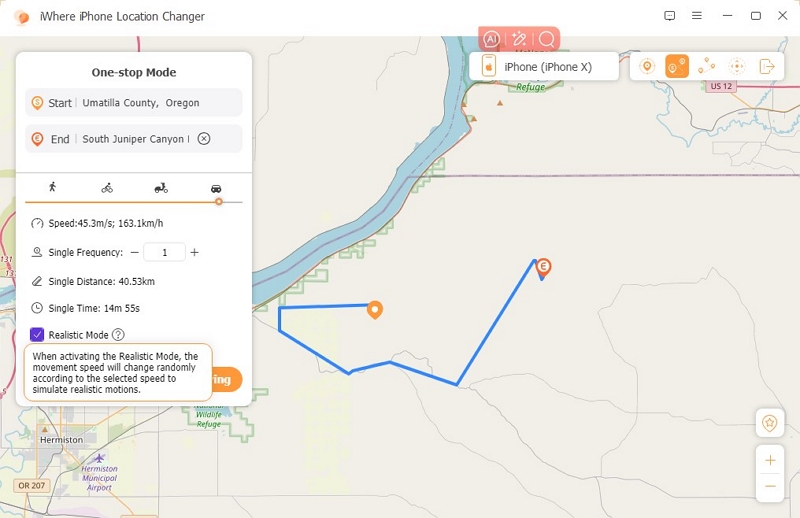
When activated, Realistic Mode randomly adjusts the motion speed based on your chosen settings to simulate natural movement, making it undetectable by third-party software.
1. Select Realistic Mode in the One-stop Mode or Multi-stop Mode.
2. Enter or tap on the map and select the starting point of the phone location you want to switch.
3. Click Start Moving to make sure you apply Realistic Mode while changing the position.
How to Simulate GPS Movement with Multi-stop Mode?
Want to pass specific places on simulated route of the device? iWhere Multi-stop Mode helps you solve this problem easily.
Select Multi-stop Mode
Choose Multi-stop Mode in the second box on the right of interface.
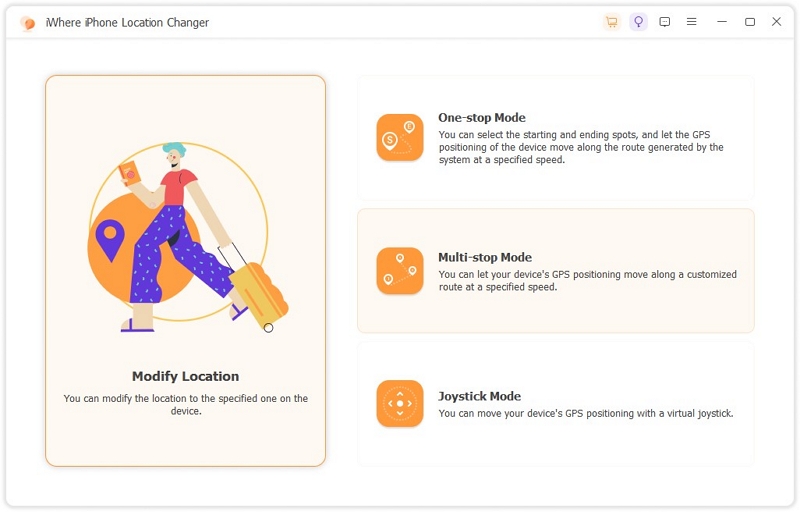
Or click the Multi-stop mode icon in the upper right corner of the map.
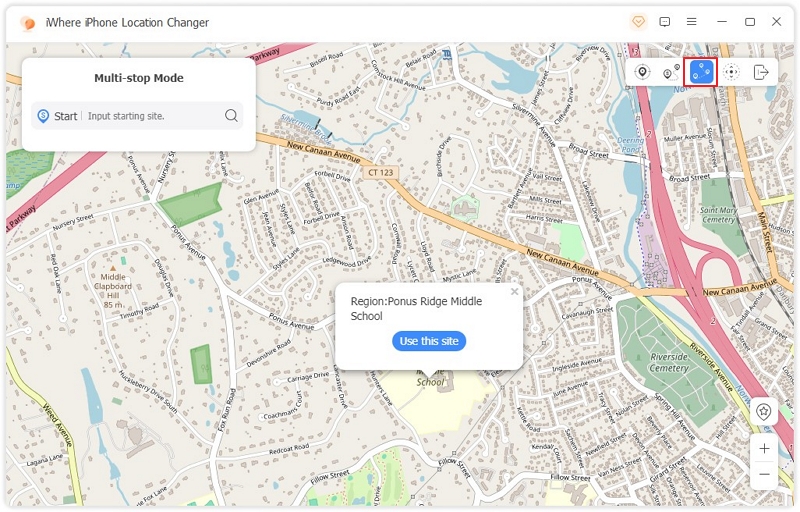
Add specific sites
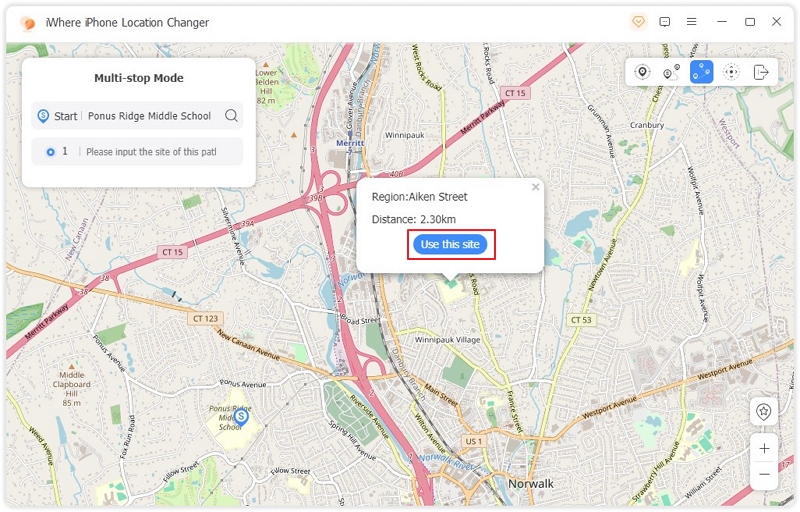
Later, add the sites you want to pass by entering the place name or clicking on the site with your mouse on the map, then click Use this site.
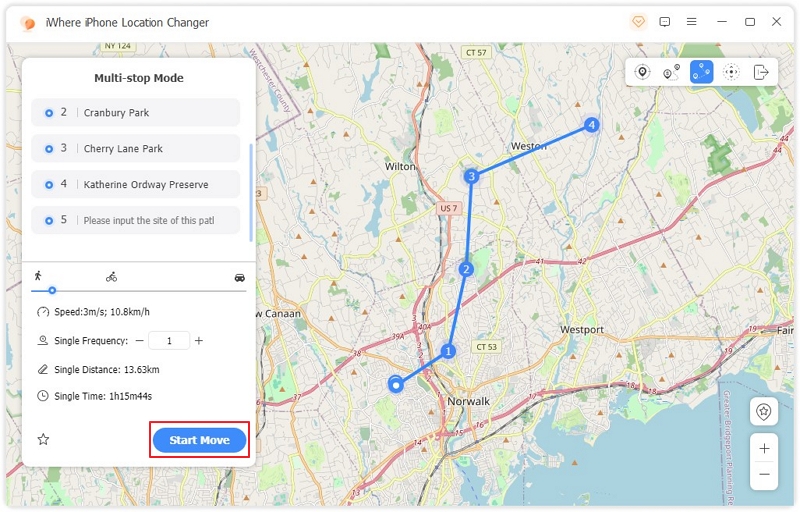
Start to move the GPS location
Click the Start Move button, and the device's GPS location will move according to the set route.
How to Simulate GPS Movement with Joystick Mode?
If you want to freely simulate your device's GPS movement without specifying routes, iWhere has designed the Joystick Mode to meet your needs.
Select Joystick Mode
Select Joystick Mode and flexibly change the GPS position of your device through a virtual joystick.
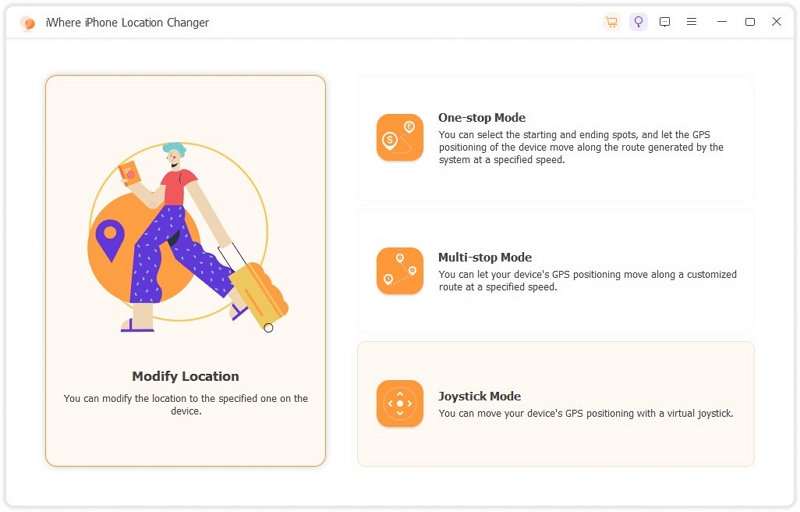
You can also select the Joystick Mode icon on the map.
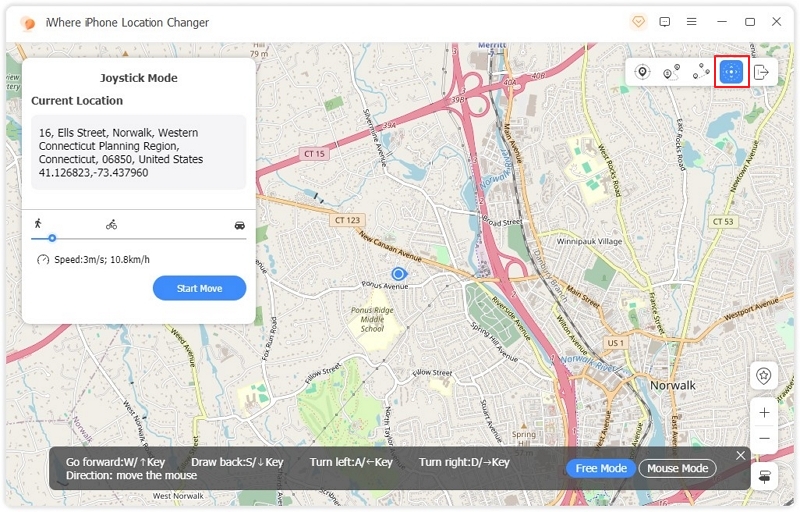
Use Free Mode or Mouse Mode
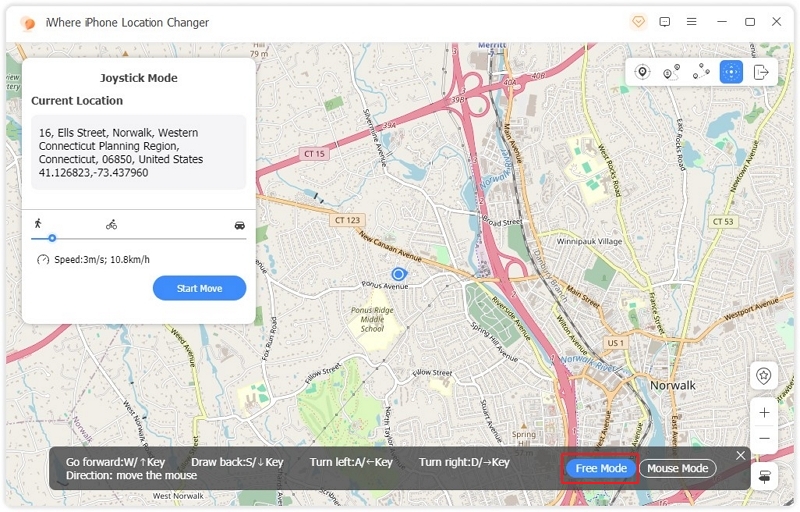
Select the Free Mode or Mouse Mode to change the direction and position of the device positioning movement.
Free Mode: Use the keyboard to control the GPS movement.
Mouse Mode: Use mouse to control the movement of your iOS device location.
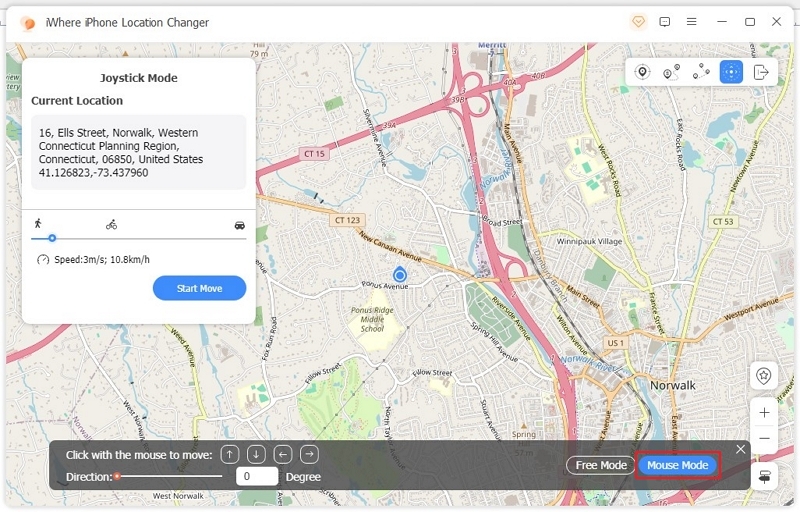
If you want to adjust the speed of GPS position movement, slide the small circle to select walking speed, cycling speed or driving speed.
After the operation is complete, click Start Move. Now you can change the location of the device at will!
For Android Device
Transform your Android experience with iWhere Location Changer, the ultimate tool for effortless location simulation. Whether you’re navigating virtual worlds in popular games or sharing trendy spots on social media, iWhere makes it incredibly easy to modify your device's location without the hassle of jailbreaking or complex setups.
With just a few simple steps, you can trick games, apps, and platforms into thinking you’re anywhere in the world, unlocking endless possibilities for creativity and convenience.
Get Started with iWhere Location Changer for Android
Registration and Account Setup
1. Download and Launch the App
Install and open the iWhere Location Changer app on your PC.
2. Purchase the iWhere
Tap the shopping cart icon at the top to visit the official iWhere Location Changer website and purchase the product.
Alternatively, skip to Step 2 to start the 30-day free trial.

3. Retrieve Your Registration Code
Once you’ve completed your purchase, a confirmation email containing your Registration Code will be sent to your registered email address.
4. Activate Your Product
a. Open the app and tap the purple key-shaped button.
b. Enter the email address you used for your purchase.
c. Paste the Registration Code from the email.
d. Tap "Register" to complete activation.
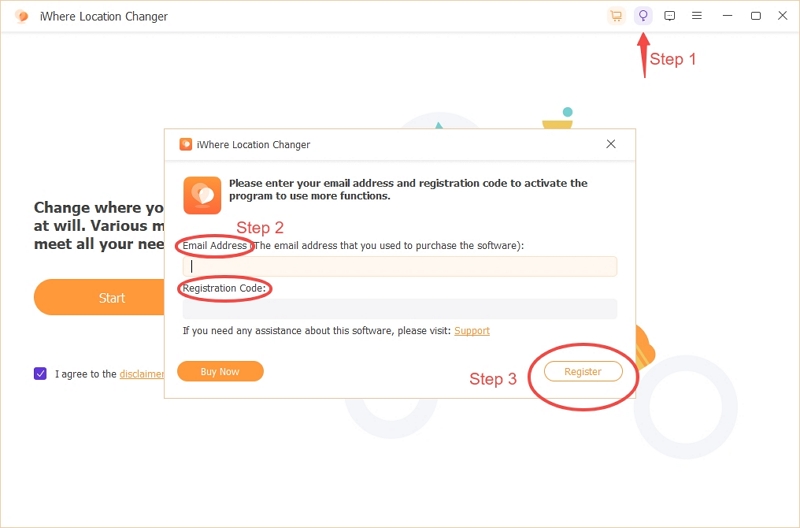
After seeing the "The activation was successful" confirmation, return to the app's home screen.
Tap “Experience Now” to unlock the full potential of iWhere and begin your unlimited location spoofing journey!
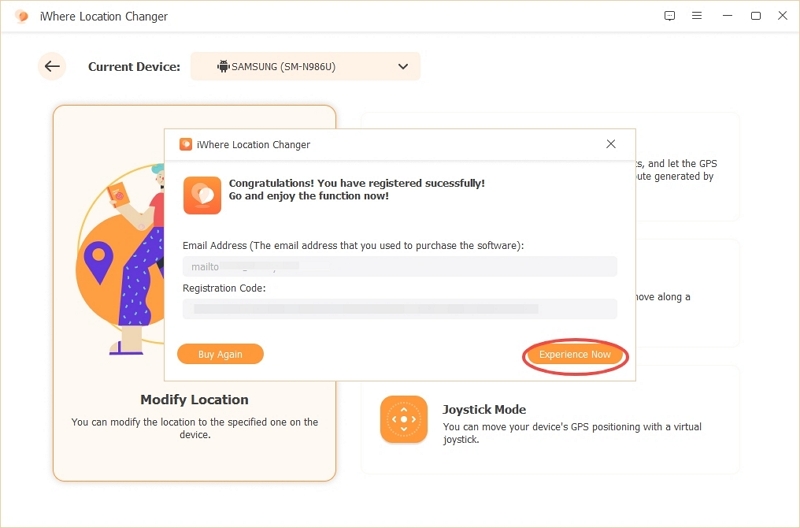
Connecting Your Android Device
1. Start the Connection Process
Launch the iWhere Location Changer app on your computer and tap "Start" on the home screen to begin.

2. Choose Your Connection Method
You can connect your Android device to your computer via:
Opt 1. USB Connection
Opt 2. Wireless Connection
Click on "Android Wireless Connection" for detailed instructions on the wireless option.
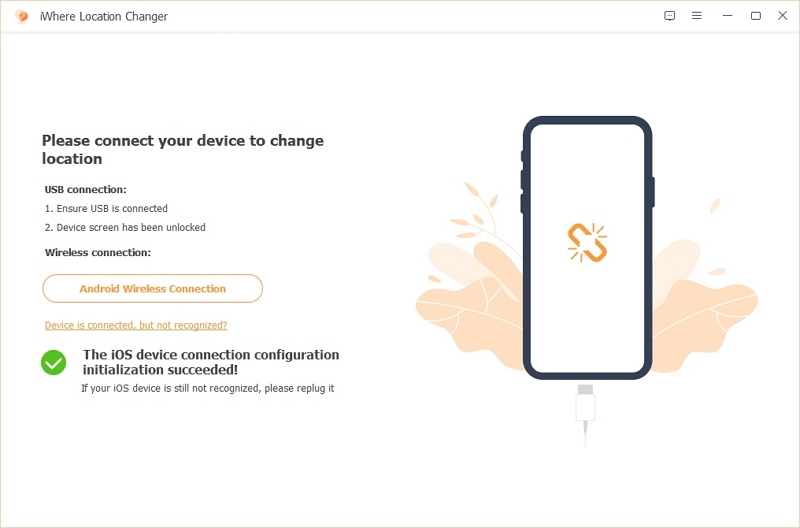
3. USB Connection
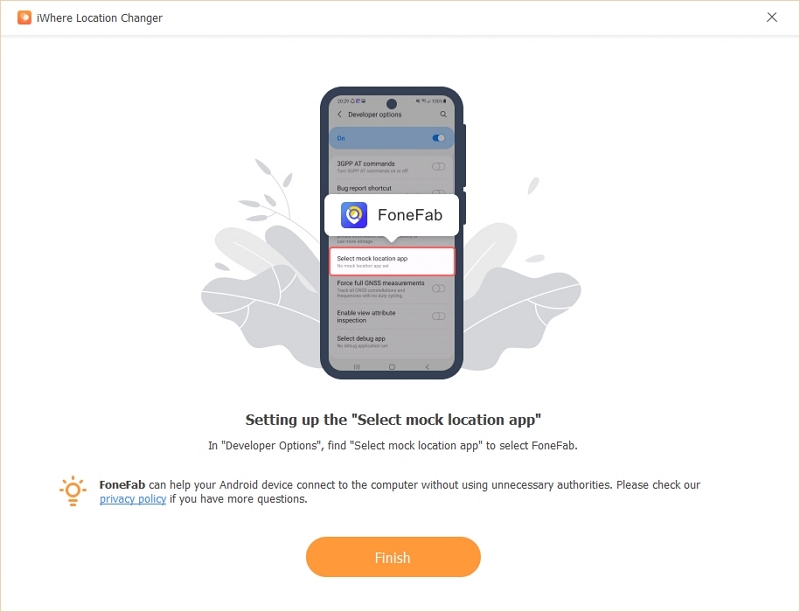
Use the cable to connect your Android phone to your computer. Follow the on-screen instructions to enable Developer Mode on your Android device.
Once enabled, iWhere will automatically install the required software—FoneFab and configure your device.
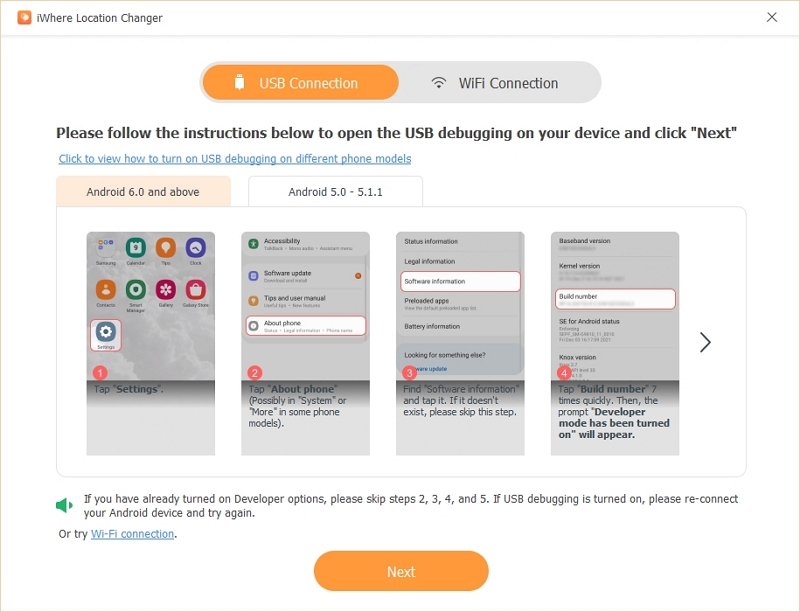
Find and turn on the "Select Mock Location App" in Developer mode. Then click "Finish".
4. Wireless Connection
If you prefer a wireless connection:
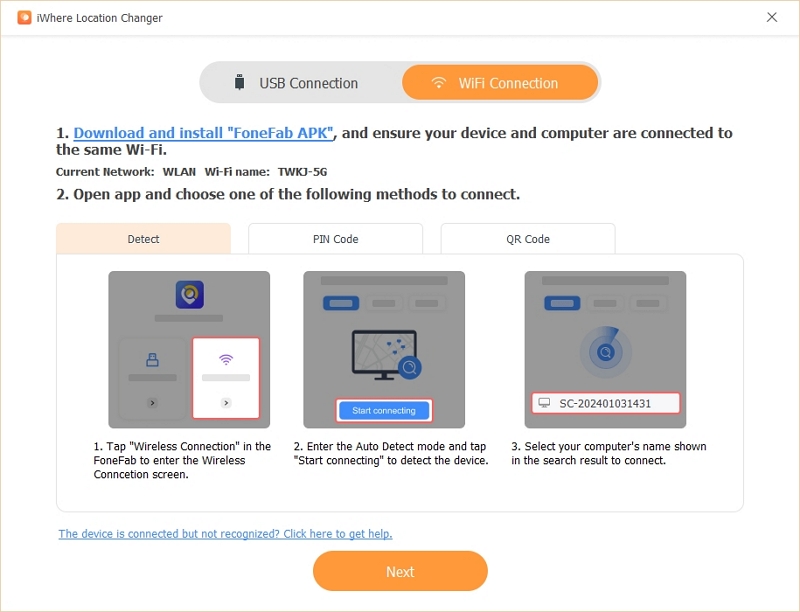
First, download and install the FoneFab APK on your Android phone.
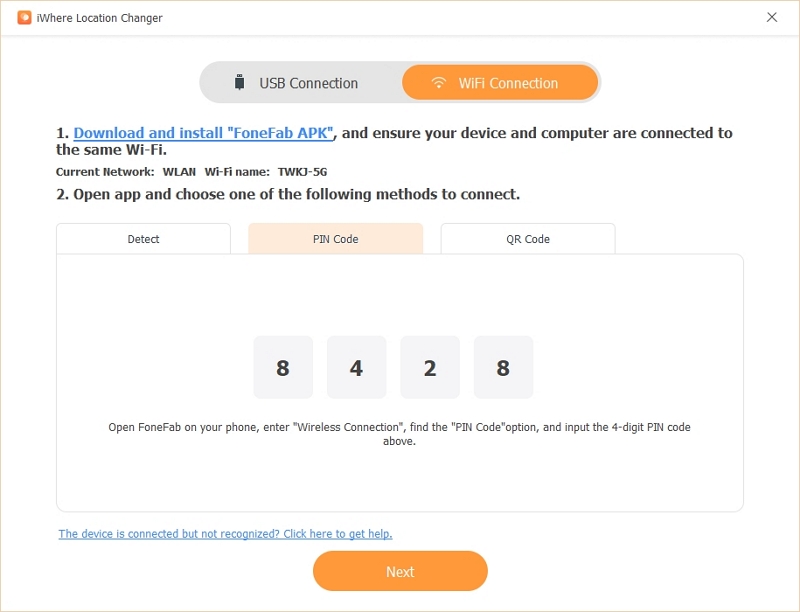
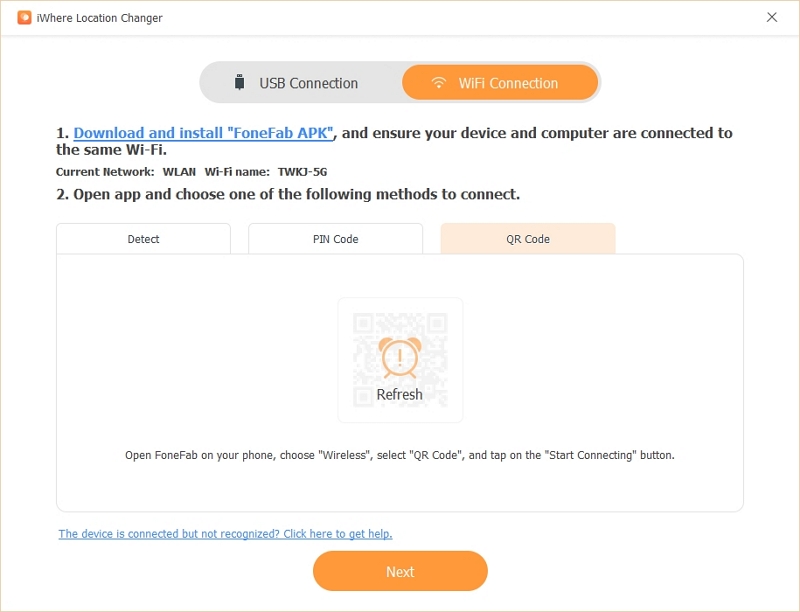
Next, use one of the three options to connect your device wirelessly:
a. Connect both devices to the same Wi-Fi network.
b. Enter the PIN Code displayed on iWhere into FoneFab.
c. Scan the QR Code shown in the iWhere app using FoneFab.
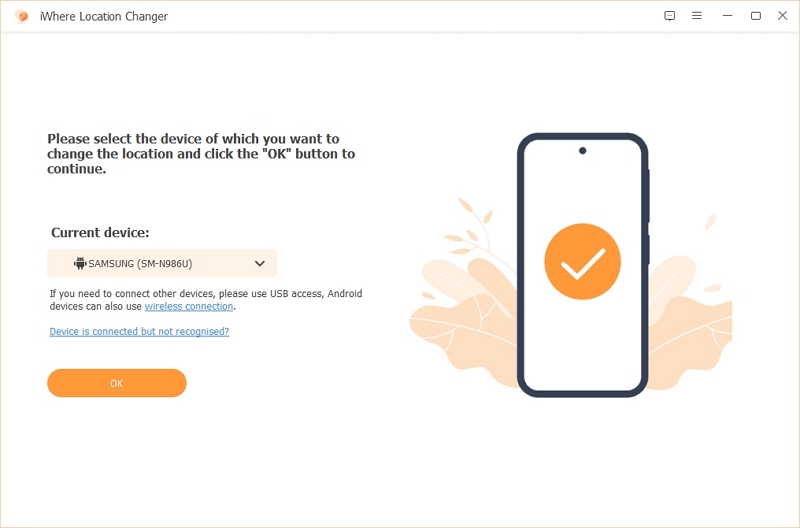
5. Verify Your Device
Once the connection is successful, confirm that the displayed device is the one you want to modify the GPS location for. Tap "OK" to proceed to the main feature dashboard.
How to Fake Android GPS Location with One Click?
Access the Modify Location Panel
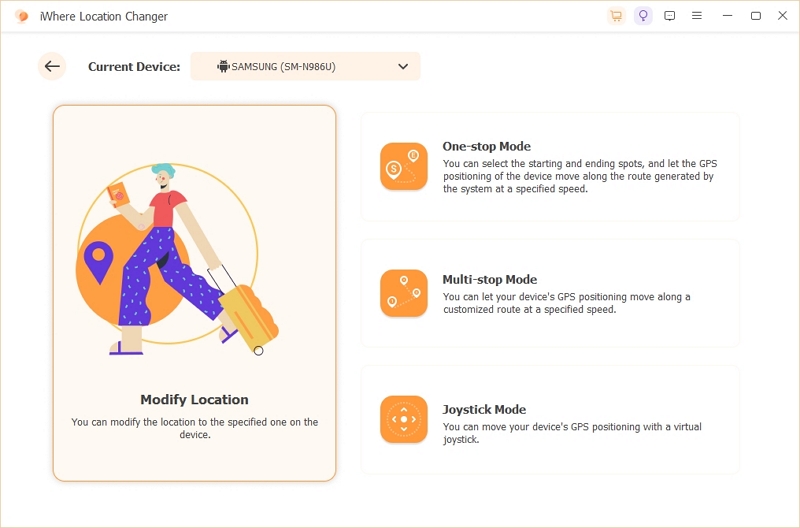
The Modify Location Mode is the core feature of iWhere Location Changer, allowing you to instantly change your device's location in 1 click. This works seamlessly with apps like Google Maps, Life360, and other GPS-based software.
Tap the Modify Location section on the left sidebar of the app.
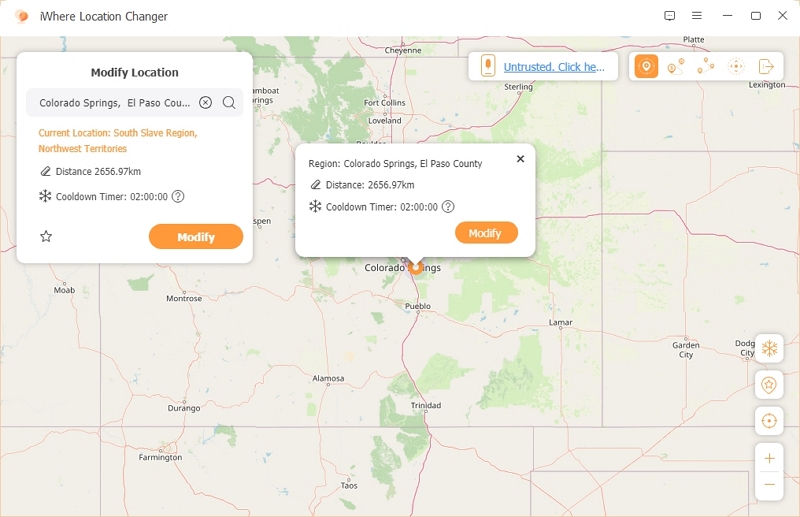
Adjust and Set Your Location
1. The map will display your Android device's current location.
2. Use the + and - buttons in the bottom-right corner to zoom in or out of the map.
3. Drag the map to pinpoint your desired location or enter the address in the search bar on the left.
4. Click "Modify" to spoof your location.
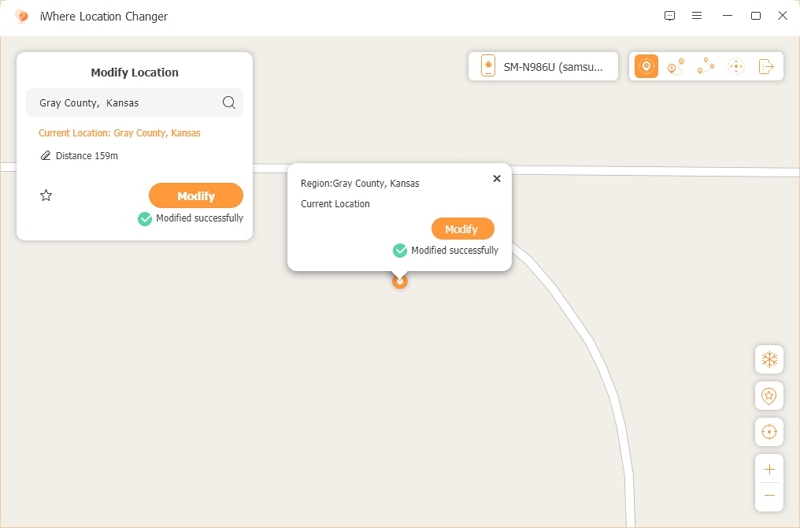
Confirm Successful Modification
When the location has been successfully changed, you'll see a green √ indicating success.
Cooldown Timer for Enhanced Security
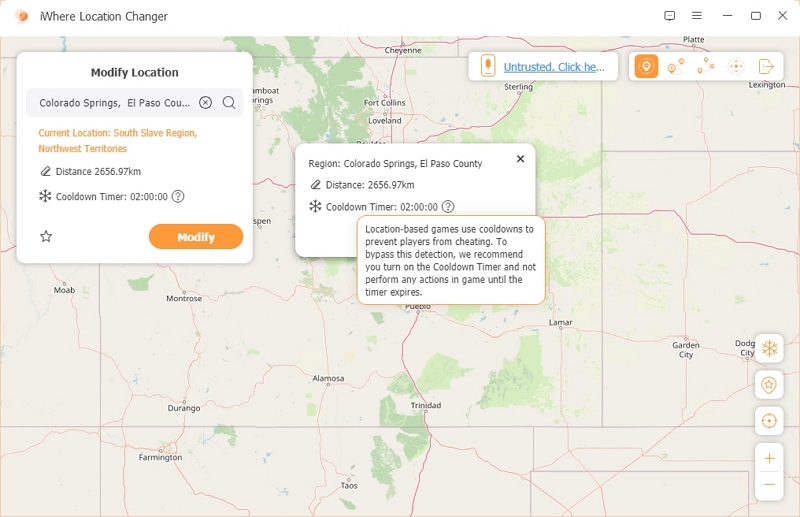
The Cooldown Timer feature prevents location-based games from detecting sudden changes in your GPS.
1. To activate it, click the snowflake icon in the bottom-right corner.
2. This simulates natural movement by calculating the optimal time it would realistically take to travel from your starting point to your destination.
3. This feature is particularly useful for avoiding detection in games or tracking apps.
How to Change Android GPS Movement with One-stop Mode?
Access One-stop Mode
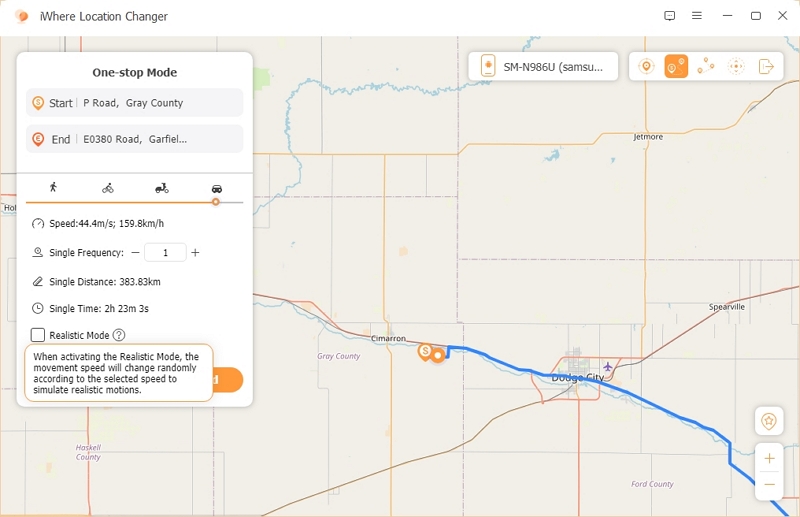
The One-stop Mode simulates GPS movement along a predefined route and speed (ranging from 0.5m/s to 50m/s), making your location changes appear more realistic. This is ideal for creating a natural movement pattern for apps that monitor GPS behavior.
1. Tap the second icon in the top-right corner to switch to One-stop Mode.
2. Alternatively, return to the home screen and select One-stop Mode.
Set Your Destination
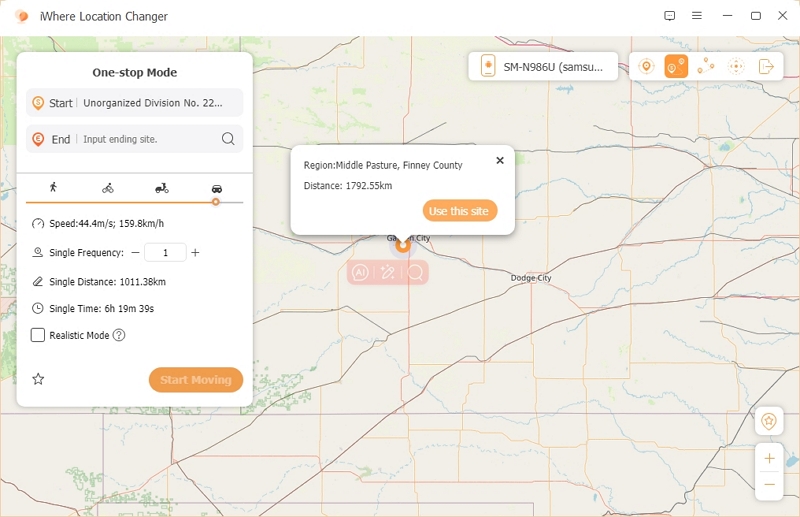
1. Click on the map to mark your desired destination, then tap "Use this site" to set it as the endpoint.
2. Alternatively, type the destination address into the "End" field in the sidebar.
Adjust Movement Speed
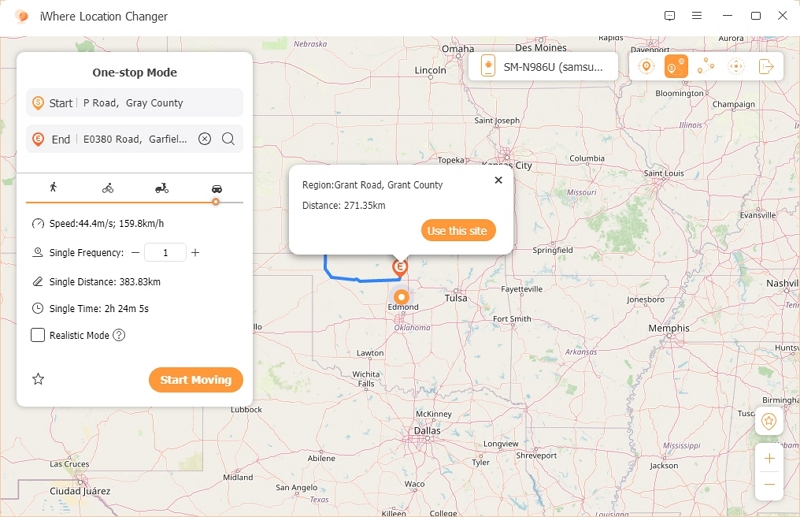
1. Use the slider on the left to set your preferred speed. Four speed levels are available, simulating walking, biking, driving, or fast-moving vehicles.
2. Speed ranges from 0.5m/s to 50m/s, designed to mimic realistic movement patterns and avoid detection by location-monitoring apps or trackers.
Start Moving
1. Click "Start Moving" to begin the simulation.
2. Your GPS coordinates will move along the planned route in real-time.
Enable Realistic Mode
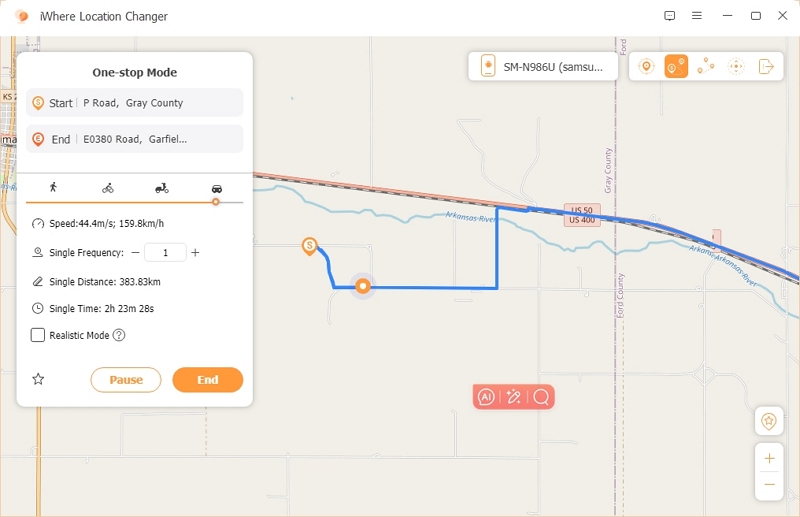
1. For added realism, activate the Realistic Mode by checking the small box next to the option.
2. This mode introduces random acceleration and deceleration along the route, simulating natural movement patterns since no one moves at a constant speed in real life.
How to Mock Android GPS Movement with Multi-stop Mode?
Access Multi-stop Mode
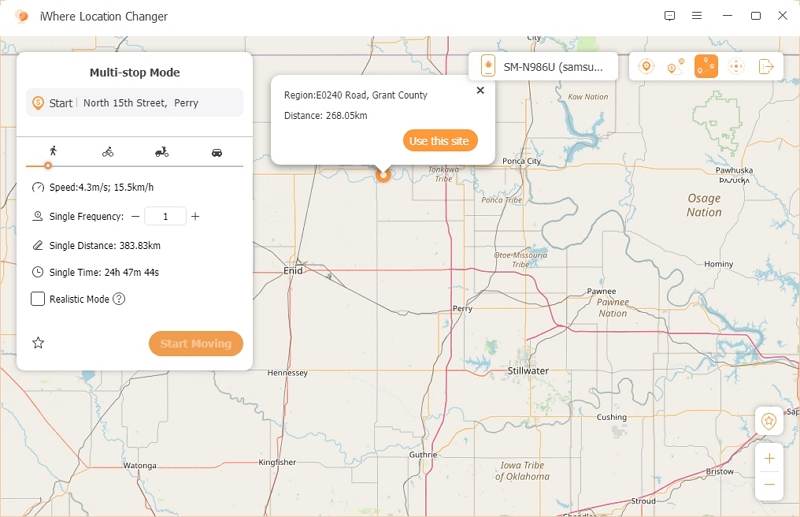
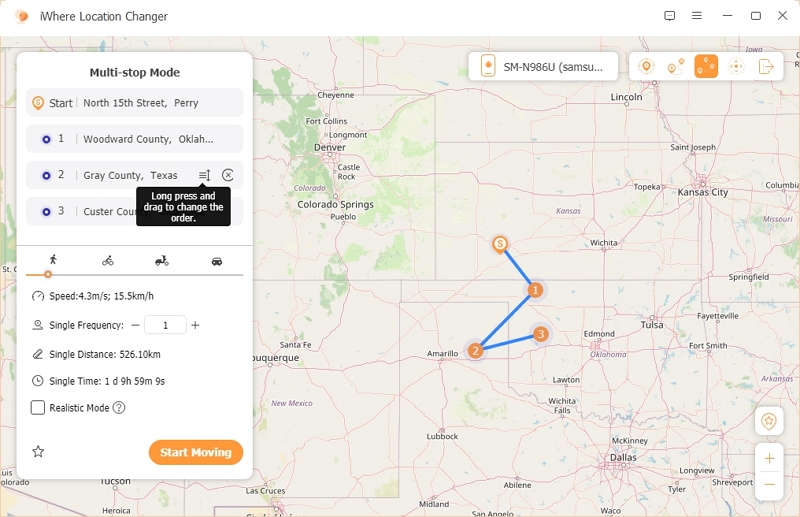
The Multi-stop Mode allows you to set multiple waypoints for your GPS movement, making it ideal for gamers collecting multiple items or creating realistic movement patterns for tracking avoidance.
1. Tap the Multi-stop Mode icon in the top-right corner to switch modes.
2. Alternatively, go to the iWhere Location Changer home screen and select Multi-stop Mode.
Set Waypoints and Destination
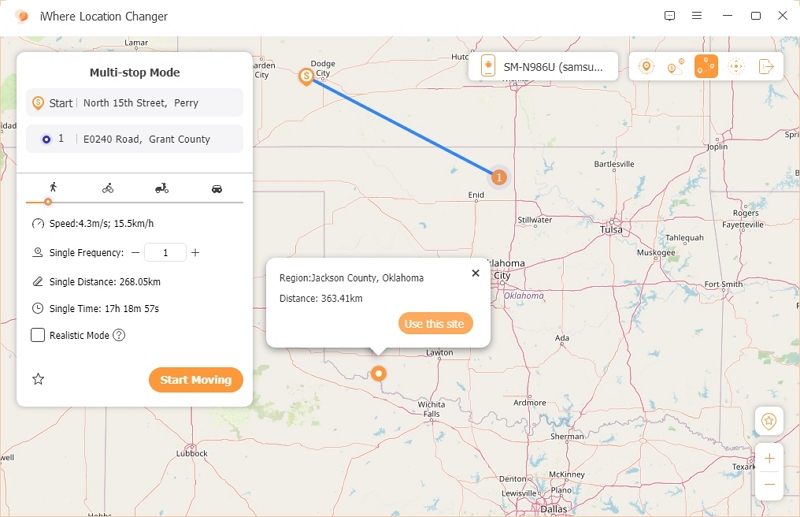
1. Click on the map to select your desired locations, then tap "Use this site" to confirm each waypoint.
2. Alternatively, choose multiple random points on the map, then adjust or refine the waypoints and destination in the left sidebar.
Plan Your Route and Speed
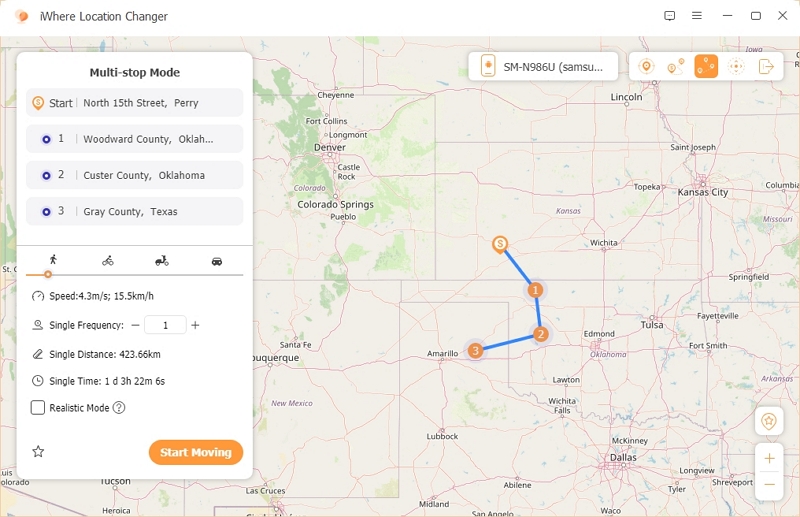
1. After setting the locations, the app will automatically generate a sequential route.
2. Adjust the movement speed using the slider on the left (speed range: 0.5m/s to 50m/s).
3. For realistic movement, enable Realistic Mode by checking the box. This option introduces random acceleration and deceleration for more natural GPS behavior.
Start Moving
1. Click "Start Moving" to begin your route.
2. Your Android device's GPS location will follow the planned route at the specified speed.
Reorder Waypoints (Optional)
If you're unhappy with the waypoint order, simply drag and rearrange the points in the sidebar to change the sequence.
How to Fake Android GPS Movement with Joystick Mode?
Access Joystick Mode
The Joystick Mode lets you dynamically control your GPS location in real-time using a virtual joystick. This feature is particularly useful for games like Pokémon GO or Monster Hunter Now, where exploration and precise location control are key.
1. Tap the Joystick Mode icon in the top-right corner to switch to this mode.
2. Alternatively, go to the iWhere Location Changer home screen and select Joystick Mode.
Choose a Control Mode
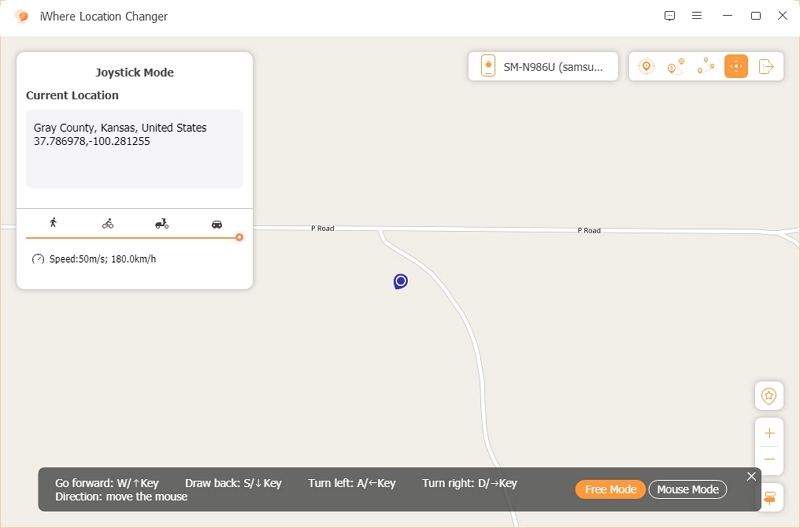
The control panel at the bottom allows you to switch between:
A. Mouse Mode: Use the on-screen arrow keys (↑ ↓ ← →) to control your location.
Perfect for navigating games or apps that require precise movement.
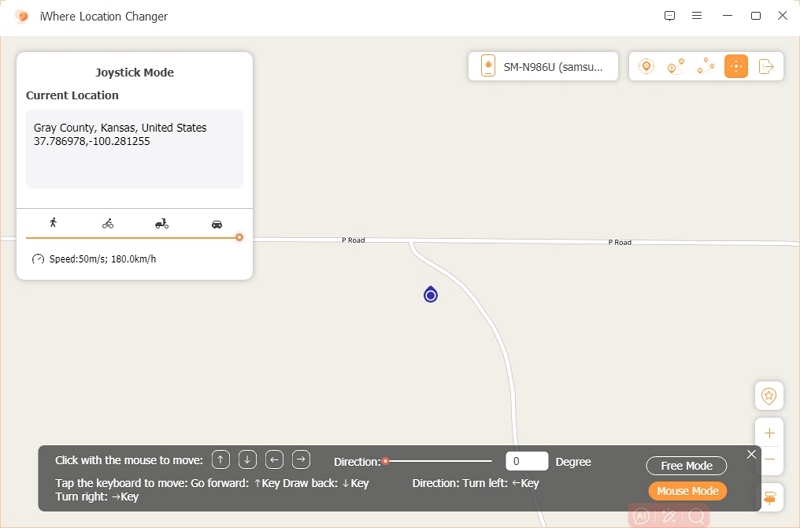
B. Free Mode: Use your keyboard's arrow keys to move your GPS location directly.
Set Your Movement Speed
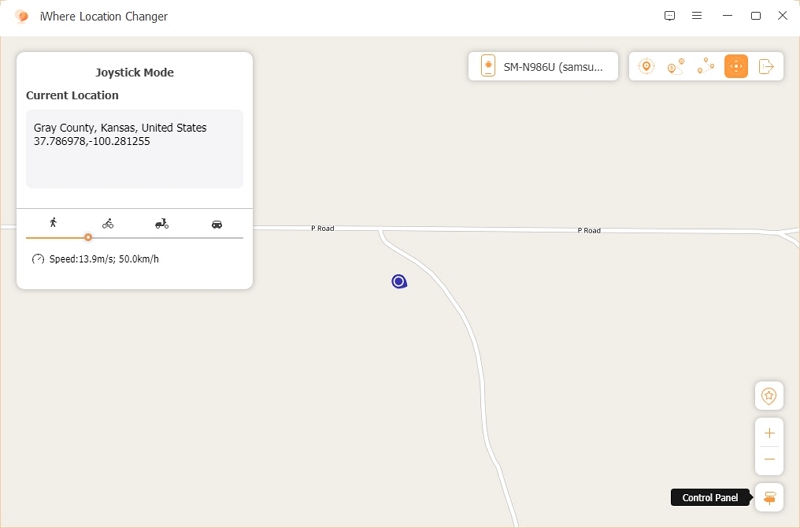
1. Adjust the speed slider to switch between walking, biking, e-scooter, or car speeds.
2. The selected speed will apply to your next move, ensuring smooth and realistic transitions.
Optimize Your Joystick Experience
1. Once you're comfortable with the joystick, you can hide the control panel by clicking the x in the top-right corner of the black panel.
2. To bring the panel back, click the joystick icon in the bottom-right corner of the app.
FAQs (For iPhone & Android)
Discover the New iPhone Location Changer — iWhere Location Changer! You can enjoy a wonderful location simulation experience and completely change your iPhone's location. Whether you're exploring virtual worlds in games or posting the hottest locations on social media, iWhere is your preferred tool to achieve these goals. No need to jailbreak or anything complicated, just a few simple steps and you can trick games and social platforms into thinking you are anywhere in the world. iWhere will bring you unlimited possibilities.
Technical Support and FAQs (For iPhone & Android)
How can I use this location as my destination again in the future?
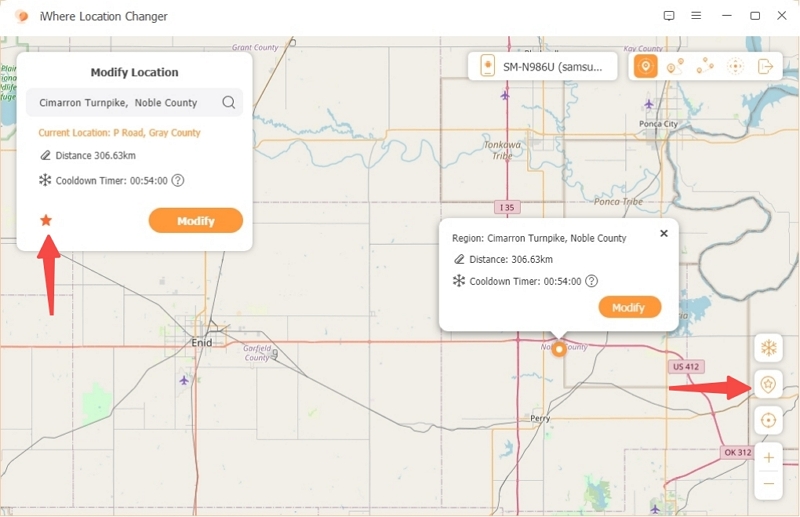
To save a location for future use, follow these steps:
1. Save the Location
After setting the location as your destination, tap the star icon in the bottom-right corner to save it.
2. Access Saved Locations
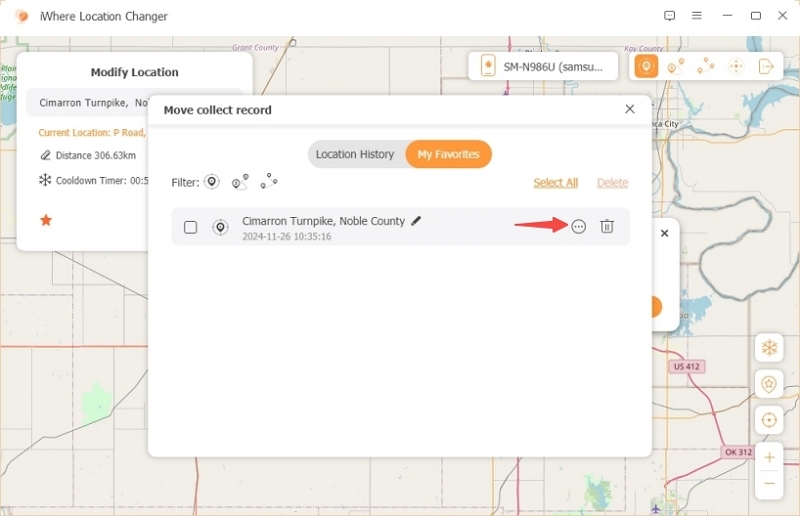
To view your saved locations, click the star button below the snowflake icon in the bottom-right corner. This will display all your favorite places and route history.
3. Reuse a Saved Location
To use a saved location or route again, tap the three dots icon next to the saved location.
In the pop-up window, click "Use" to set it as your destination once more.
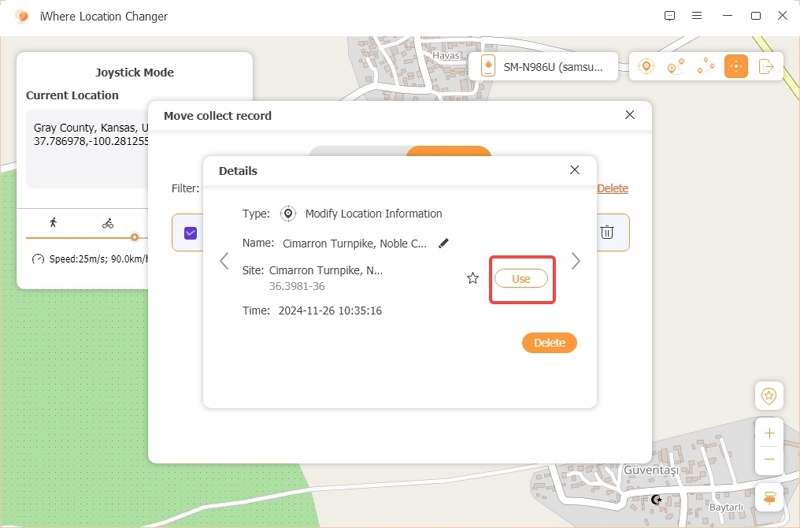
This allows you to quickly revisit frequently used locations without having to search for them again.
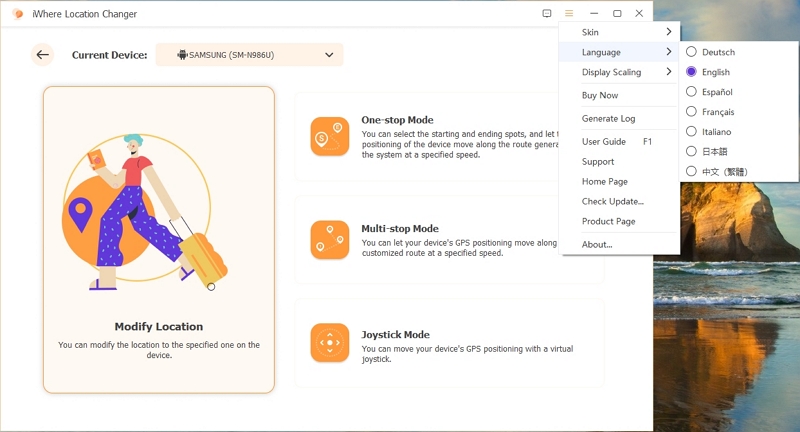
How can I switch the language in the app?
To change the language in iWhere Location Changer:
1. Tap the three horizontal lines icon in the top-right corner to open the menu.
2. Hover over Language to see the list of supported languages.
3. Select your preferred language from the options provided.
This will instantly change the app’s language to your selection.
What should I do if I have questions or suggestions for product improvements?
If you have any questions or suggestions for iWhere Location Changer:
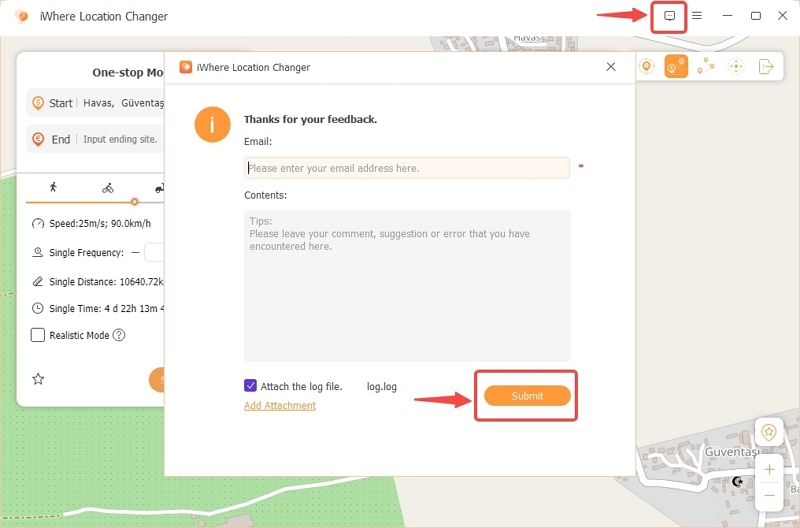
Click the message icon to submit your valuable feedback.
We will do our best to address your concerns and consider your suggestions for future updates.
