Updated on 2024-06-21
8278 views
5min read
AirTags are innovative tracking devices introduced by Apple to help users locate their belongings, such as keys, wallets, and bags. However, just like any other technological innovation, AirTags are prone to encountering occasional problems, and the “AirTag not updating location” error is one.
While there is no specific reason AirTag won’t update its location, our article will give you insight into some of the possible causes of the problem and show you the ten best methods to fix it on various iOS versions, including iOS 17 and earlier. Read on to find out more!
Part 1: What Is Airtag?
AirTag is a small, button-sized device designed by Apple that utilizes Bluetooth technology to help you track and locate your belongings. By attaching an AirTag to your valuable items, you can use the Find My app on your iPhone to keep tabs on their whereabouts. The AirTag relies on a network of nearby Apple devices to update its location automatically. It is important to note that AirTags do not have a built-in GPS and instead rely on the proximity of Apple devices for tracking.
Part 2: Causes of Airtag Not Updating Location
| Issue | Operating Difficulty | Solution |
|---|---|---|
| Low battery power |  |
Fix 1 |
| iPhone’s location services are turn off |   |
Fix 2 |
| Find My iPhone is disable |    |
Fix 3 |
| Connectivity issues (Bluetooth/WiFi) |    |
Fix 4 |
| Other system issues |      |
Fix 6-10 |
Part 3: How to Fix Airtag Not Updating Location on iPhone 15 and Earlier [10 Fixes!]
Now that you have a basic understanding of AirTags and the reasons it might not update location on iPhone, let’s dive into the methods to resolve the issue on iPhone 15 and earlier iPhone modes.
Fix 1: Check AirTag Battery
One of the primary reasons for AirTag location not updating is a dead battery. Although the average battery life for an AirTag is approximately two years, other factors like high usage intensity, environmental temperature, and lots more can affect its battery life.
You should try checking your AirTag’s battery level by doing the following:
Step 1: Open the Find My app on your iPhone and navigate to the “Devices” tab.
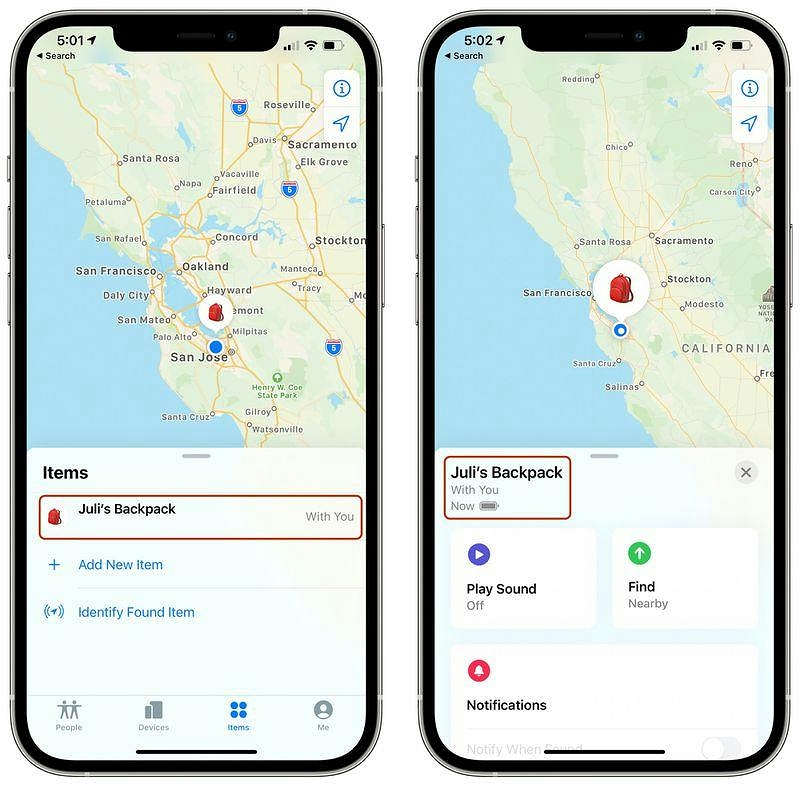
Step 2: Locate your AirTag and check the battery status. If the battery is low, replace it with a fresh one.
Fix 2: Turn on Location Services
If the battery is working perfectly, there’s a high chance that you’ve disabled location services on your iPhone. AirTags needs this feature to be able to update their location accurately. Follow these steps to enable location services on your iPhone:
Step 1: Go to Settings on your iPhone.
Step 2: Scroll down and tap on Privacy & Security.
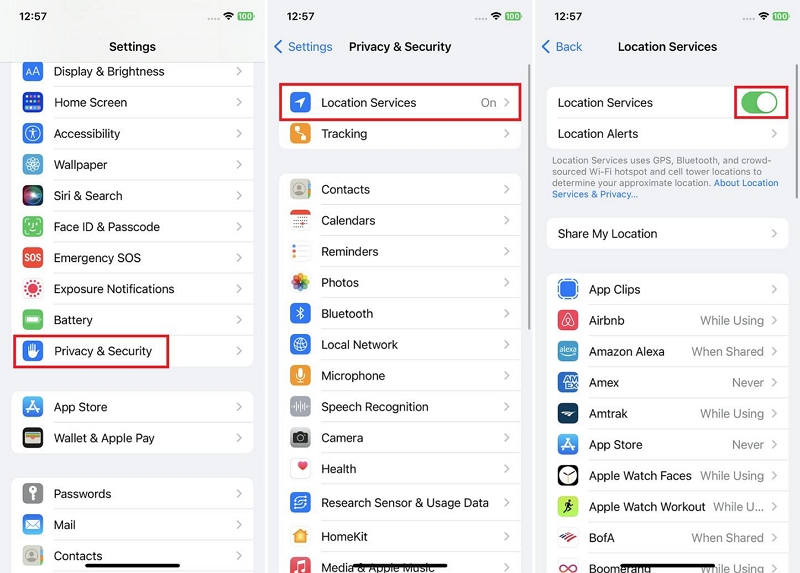
Step 3: Tap on Location Services and ensure the toggle switch is turned on just as shown in the screenshot below.
Fix 3: Enable Find My iPhone
AirTag location still not updated? Then, you might have to check your Find My settings. Perhaps you’ve disabled the Find My feature on your iPhone. The following steps explain how to check and enable Find My on iPhone:
Step 1: Open the “Settings” app and tap on your “Apple ID” banner.
Step 2: Scroll down and select “Find My”.
Step 3: Turn on “Share My Location”.
- Select “Find My iPhone” and turn on its toggle and the toggle next to other features under it.
Fix 4: Reset Network Settings
If the above method does not work, resetting your network settings can help resolve network problems that can affect AirTag location updates. To reset your network settings, do the following:
Step 1: Go to Settings and navigate to General.
Step 2: Scroll to the bottom and tap on “Transfer or Reset iPhone”.
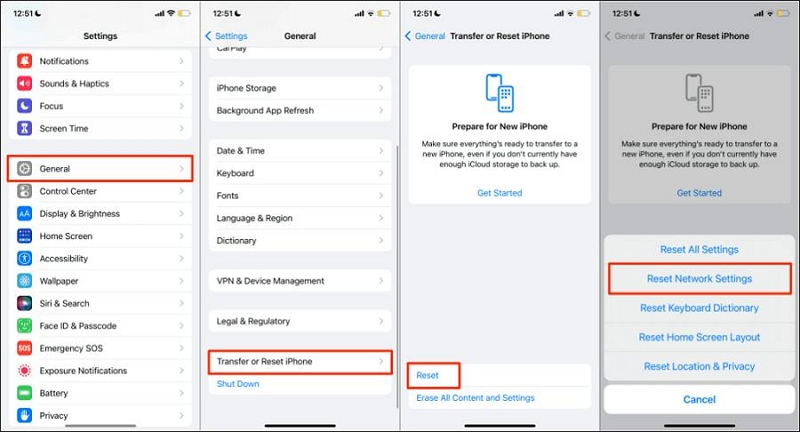
Step 3: Tap on Reset and select “Reset Network Settings”.
Fix 5: Refresh Bluetooth and Wi-Fi Settings
Another possible reason why AirTag won’t update its location is poor Bluetooth or WiFi settings. As we all know, AirTags rely on Bluetooth and Wi-Fi connections to update their location. Try to refresh your Bluetooth and WiFi settings using the steps below:
Step 1: Open the Control Center on your iPhone.
Step 2: Long-press the Wi-Fi and Bluetooth icons.
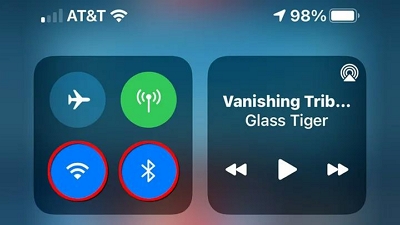
Step 3: Disable both Wi-Fi and Bluetooth.
Step 4: Wait for a few seconds, then enable Wi-Fi and Bluetooth again.
Fix 6: Remove and Re-add AirTag on Find My App
Another reliable trick you can try is to remove and re-add the AirTag on your iOS or iPadOS Find My app. This can help fix glitches or errors that could be compromising AirTag on the Find My app.
Step 1: Open the “Find My” app and tap on the “Devices” tab”.
Step 2: Ensure you’ve signed in Find My using the same Apple ID linked to the AirTag. Then, tap on the “AirTag” and select “Remove” to disconnect it from your Find My app.
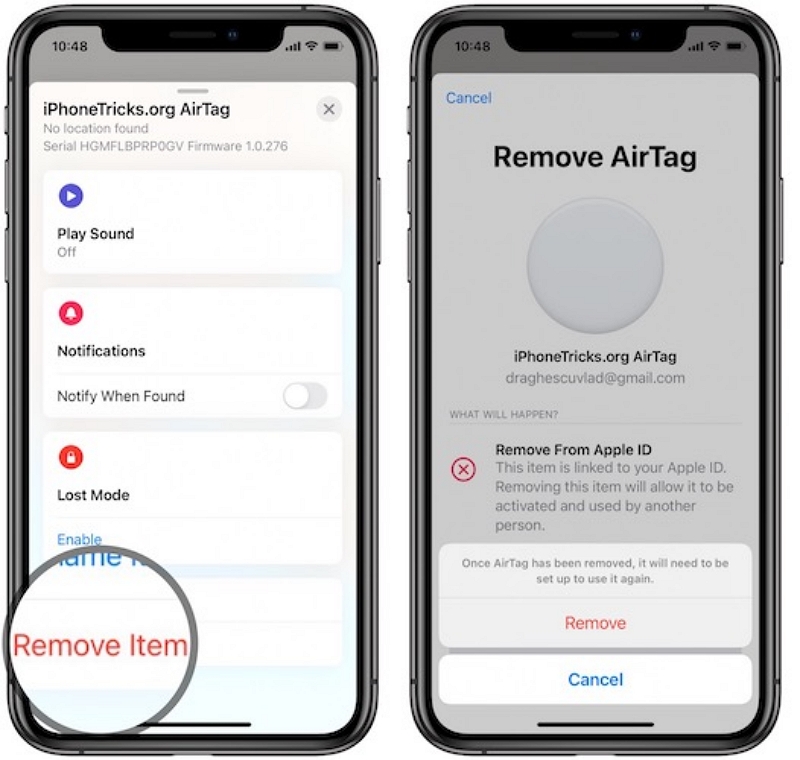
Step 3: Confirm the removal and set up the AirTag again to see if the problem gets resolved.
Fix 7: Factory Reset AirTag
If none of the previous solutions have worked, performing a factory reset on your AirTag might help resolve the location update issue. Here’s how to factory reset your AirTag:
Step 1: Remove the battery cover of your AirTag.
Step 2: Replace the AirTag battery. Then, press and hold the button on the AirTag for about 15 seconds until you hear a sound.
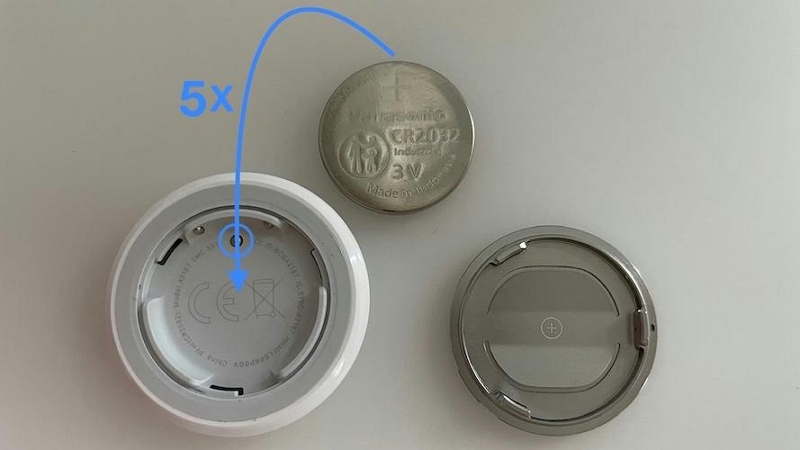
Step 3: Release the button and repeat the process at least four times, replacing the battery. Then, on the fifth attempt, you should hear a different sound. This means your AirTag has been reset and is ready to be paired.
Fix 8: Register AirTag to Your Personal ID
If you are using a managed Apple ID, you may not be able to connect your AirTag properly. Switching to a personal ID and registering your AirTag can help resolve this issue. Here’s how:
Step 1: Sign in with your personal ID on your iPhone.
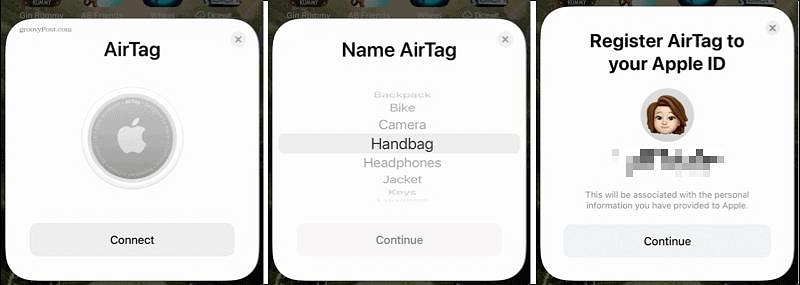
Step 2: Hold the “AirTag” next to your iPhone.
Step 3: Tap on “Connect” once the “AirTag” screen appears on your iOS device.
Step 4: Select a preferred name for the “AirTag” and tap on “Continue”.
Step 5: Finally, confirm your “Apple ID” and tap “Continue” to finish.
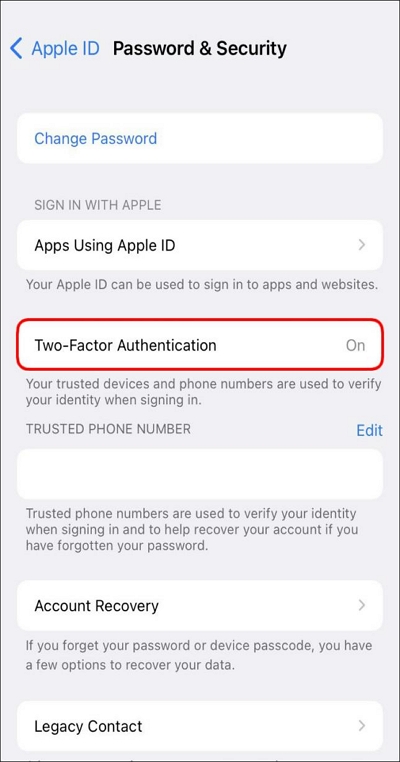
Fix 9: Enable Two-Factor Authentication
Enabling two-factor authentication adds an extra layer of security to your Apple ID and can help establish a connection with your AirTag. Here’s how to enable two-factor authentication:
Step 1: Go to Settings on your iPhone.
Step 2: Tap on your Apple ID.
Step 3: Scroll down and tap on Sign-In & Security.
Step 4: Tap on Two-Factor Authentication and follow the prompts to enable two-factor authentication.
Fix 10: Turn to Apple Support

If all else fails, reaching out to Apple Support can help you troubleshoot and resolve any persistent issues with AirTag location updates. They can provide personalized assistance and guide you through the process of getting your AirTag to update its location.
Part 4: Ultimate Fix iPhone Not Updating Location
Besides AirTag, there are certain situations where you might experience iPhone location not updating problems. In such situations, a location spoofing app like the iWhere iPhone Location Changer app can come to your rescue.
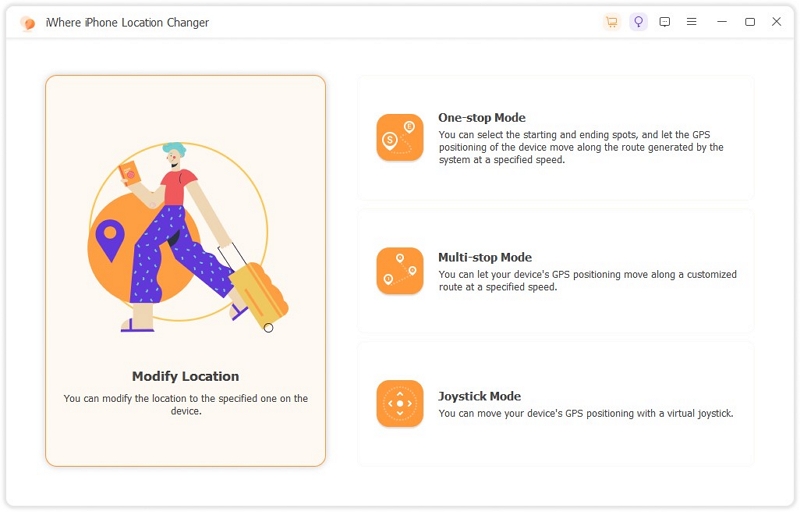
The iWhere iPhone Location Changer app allows you to change your iPhone’s location using an advanced location spoofing algorithm. It allows you to utilize various spoofing modes, such as a multi-stop mode that allows you to choose multiple spots simultaneously, a one-stop mode to move in a specific route, and a joystick mode to move freely using your computer’s mouse.
Whether you’re gaming, using a dating app, or more, iWhere Location Changer app allows you to enjoy your experience by changing to different locations to explore various features and connect with new people without having to leave your current location. All it takes is only a few clicks.
Key Features
- Customizable speed ranges from 1 m/s to 50 m/s.
- Change your location with high accuracy and fast speed using advanced features like one-stop mode, multi-stop mode, and joystick mode.
- Save and bookmark your favorite locations on the map to be able to visit them anytime.
- Easily spoof location while playing your favorite AR game like Pokemon Go to catch rare Pokemon and special gems.
- Spoof location on all iPhone/iPad models without jailbreaking your device.
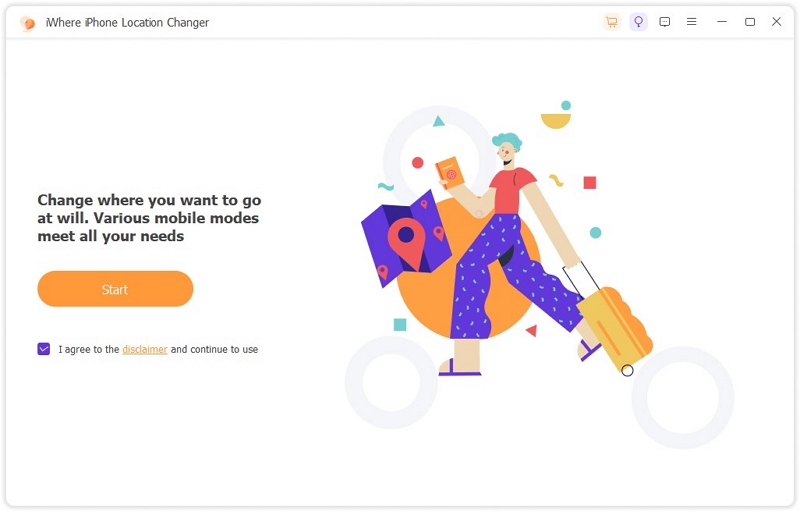
Step 1: Start the iWhere iPhone Location Changer app and click “Start” to begin the process.
Step 2: Connect your iPhone to the computer and authorize the connection by tapping “Trust” in the pop-up that appears on your iPhone. Then, click on “Modify Location” from the software interface .
Step 3: Drag your cursor around the screen to navigate the map that appears on your screen and view available regions.
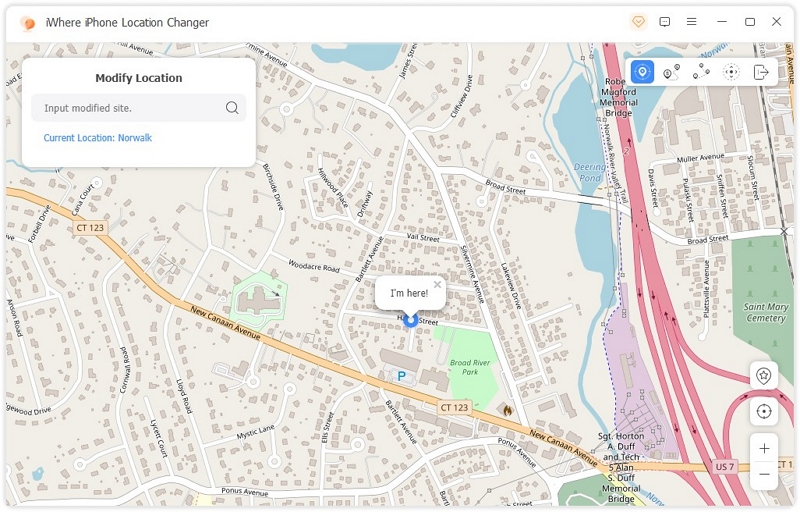
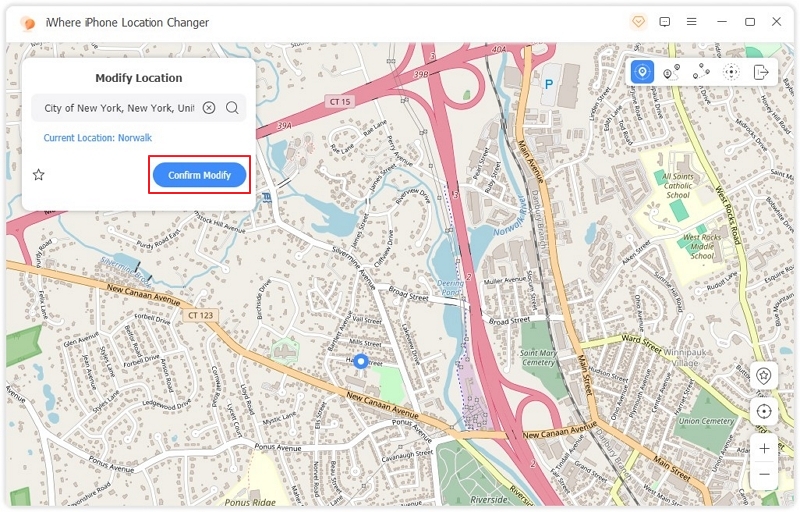
Step 4: Finally, type the location you want to teleport into the “Search Box” in the upper left corner. Then, click on “Confirm Modify” to complete the operation.
FAQs
1. Why is AirTag Not Showing Location?
There can be several reasons why your AirTag is not showing its location. Some common causes include low battery, disabled location services, connectivity issues,and disabled Find My feature. You should use the troubleshooting methods mentioned in this article to address these issues and get your AirTag to show its current location.
2. How Do You Get AirTag to Show Current Location Now?
To get your AirTag to show an item’s current location, ensure that the battery is charged, location services are enabled, and Find My iPhone is turned on. Then, do the following:
- Open “Find My” > “AirTag” under the “Devices” tab.
- Tap on the device whose current location needs to be viewed.
- You should see the item’s current location and timestamp below its name.
Conclusion
AirTags are powerful tracking devices that can help you locate your valuable items. However, if your AirTag is not updating its location, it can be frustrating. By following the 10 fixes mentioned in this article, you can address the issue and get your AirTag back on track. Remember to check the battery, enable location services, and ensure Find My iPhone is turned on. If all else fails, consider reaching out to Apple Support for personalized assistance. Don’t let a non-updating AirTag hold you back from keeping track of your belongings!
