Updated on 2024-07-04
3300 views
5min read
Pokémon GO is the most engaging and widely played game worldwide, offering unmatched joy in gameplay. The integration of Augmented Reality (AR) technology elevates this excitement, making the game’s virtual landscape indistinguishably blend with our reality. This immersive feature allows players to truly feel part of the Pokémon world. However, a significant hurdle some players encounter is a frustrating bug related to AR functionality.
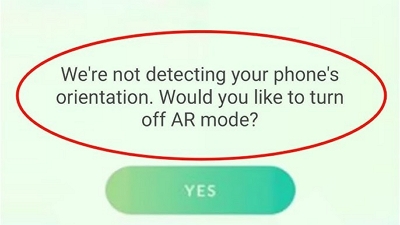
A standard error message received is: “We’re not detecting your phone’s orientation. Would you like to turn off AR Mode?” This error is a signal that the Pokemon Go AR mapping tasks are not working, preventing the use of AR mode in Pokémon GO.
Our guide dives into the heart of these AR mapping issues, providing you with insightful solutions and techniques to troubleshoot them so you can smoothly return to capturing Pokémon in the rich, augmented environment in which Pokémon GO is celebrated.
Part 1: Full Details on AR Mapping Pokemon Go Not Working Issue
AR (Augmented Reality) Mapping tasks in Pokémon GO offer players an immersive experience by allowing them to interact with the Pokémon universe through the lens of their smartphone cameras.
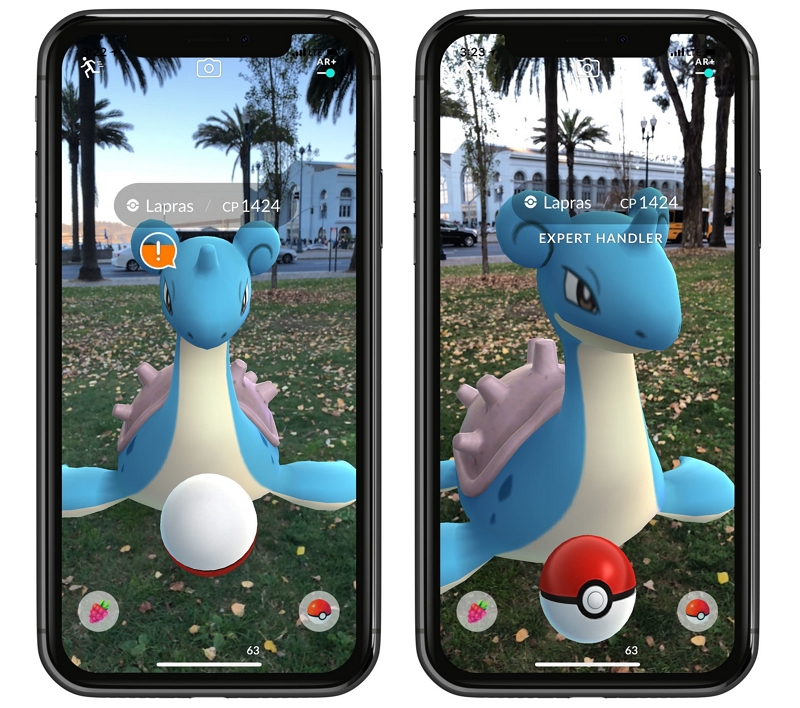
However, players often encounter issues where the AR mapping does not work as intended, disrupting the gameplay. This problem can stem from a variety of sources, including hardware limitations, outdated software, improper app permissions, or even glitches within the game itself.
WhenPokemon Go AR mapping tasksnotworking, the issues often boil down to:
- Faulty Gyro Sensor: Essential for orientation, a defective sensor disrupts AR.
- Camera Permission: If disabled, the game can’t overlay Pokémon in the real world.
- Missing Hardware Sensor: Some phones lack the gyro sensor, key for AR tasks.
Part 2: How to Fix AR Mapping Pokemon Go Not Working?
Are you having trouble using Pokémon GO’s AR feature? Don’t stress—most issues have straightforward solutions.
Method 1: Check Permissions for Camera
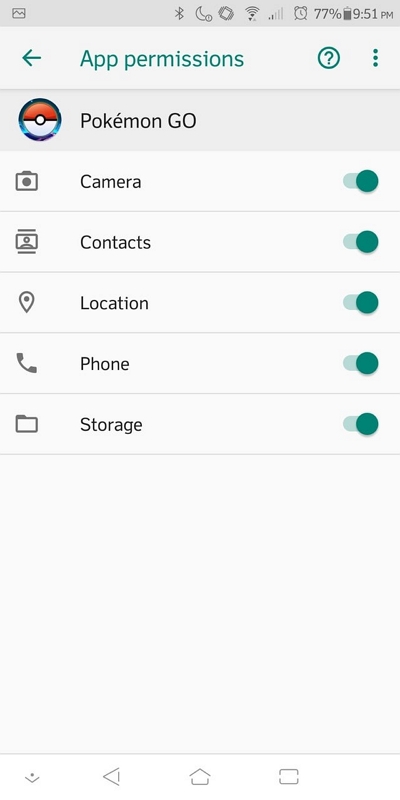
A common reason for Pokemon Go AR mapping not working is restricted access to your smartphone’s camera. AR tasks require camera usage to map the natural world and place Pokémon within it. If permissions are not granted, the game cannot perform these functions. Here’s how you can ensure Pokémon GO has the necessary permissions:
For Android Users:
Step 1: Go to Settings on your phone. Scroll down and tap on Apps or Application Manager (this may vary depending on your device).
Step 2: Find and select Pokémon GO from the list of installed apps.
Step 3: Tap on Permissions, and then make sure the Camera permission is enabled.
For iOS Users:
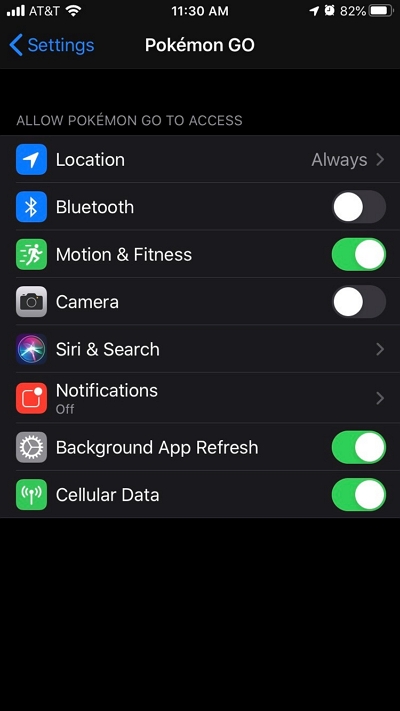
Step 1: Open the Settings app. Scroll down and tap on Privacy.
Step 2: Select Camera from the list.
Step 3: Find Pokémon GO in the list of apps and toggle the switch to the green position to enable camera access.
Method 2: Check for Gyro Sensor (Android only)
Another potential issue causing AR mapping pokémon go not working could be that your Android device doesn’t have a gyro sensor. AR mode needs the gyro sensor to accurately track how you move and turn your phone.
If your phone doesn’t have this sensor, Pokémon GO might not be able to give you the whole AR experience. Here’s how you can check if your device has a gyro sensor:
Step 1: Download and install a sensor testing app from the Google Play Store. Many free options are available that can provide detailed information about your device’s sensors.
Step 2: Open the sensor testing app and look for a “Gyroscope” sensor in the list.
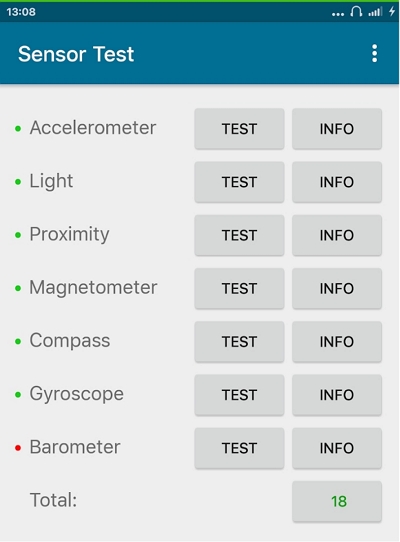
Step 3: If the app shows that your device has a gyroscope and it’s functioning correctly, then the problem lies elsewhere. However, if the app indicates that your device lacks a gyroscope or it’s not working, then unfortunately, your device may not be compatible with Pokémon GO’s AR features.
Method 3: Log out and Log in Pokémon GO
Sometimes, a simple log out and log back into Pokémon GO can solve the AR mapping issues you’re facing. This method refreshes your game’s session and can often rectify minor glitches or errors that might be causing problems with the AR functionality.
Here’s a step-by-step guide to effectively log out and then log back in:
Step 1: Open Pokémon GO on your device.
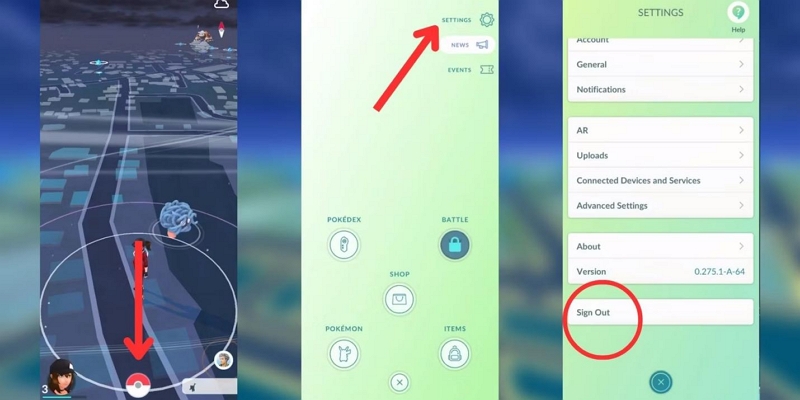
Step 2: Tap on the Poké Ball icon at the bottom of the screen to open the main menu.
Step 3: Tap on Settings (the gear icon) located in the top right corner.
Step 4: Scroll down to the bottom of the Settings menu and find the Sign Out option. Tap on it.
Step 5: After successfully signing out, close the Pokémon GO app.
Step 6: Re-launch Pokémon GO and sign back in with your credentials.
Method 4: Update iOS Version
Updating your iOS version can rectify many of the issues related to AR mapping in Pokémon GO, especially if you’re using an older version of iOS that may not fully support the latest AR technologies.
Apple regularly releases updates that improve the overall functionality of devices, including the compatibility with augmented reality features. Here’s how you can check for and install an iOS update:
- Open the Settings app on your iPhone.
- Tap on General, then select Software Update.
- Your device will check for updates. If an update is available, you’ll see an option to download and install it.
- Tap Download and Install. If prompted, enter your passcode.
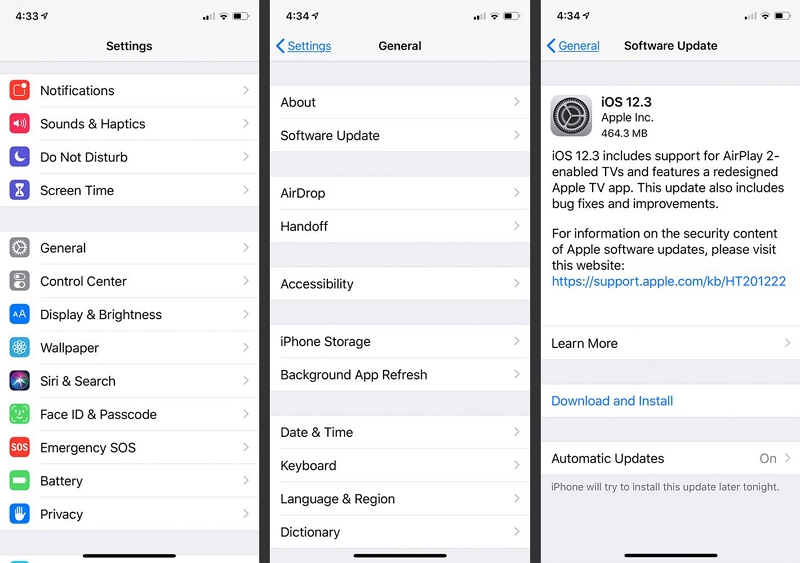
- Your device will download the update and prompt you to approve the installation. Tap Install to proceed with the iOS update.
- Your iPhone may restart several times during the update process. Once updated, log back into Pokémon GO to check if the AR mapping issues have been resolved.
Method 5: Clear Pokémon GO Data (Android only)
Clearing the cache and data for Pokémon GO can often solve persistent AR mapping issues by removing corrupted files or data that may be causing the problem. This method resets the app to its initial state without removing the app from your device, but be aware that it will erase your login and preference settings within the app.
Here’s how to clear Pokémon GO data on an Android device:
- Go to Settings on your phone.
- Scroll down and tap on Apps or Application Manager (this may vary depending on your device).
- Find and select Pokémon GO from the list of installed apps.
- Tap on Storage.
- You will see two options: Clear Storage and Clear Cache. Tap Clear Cache first, then tap Clear Storage.
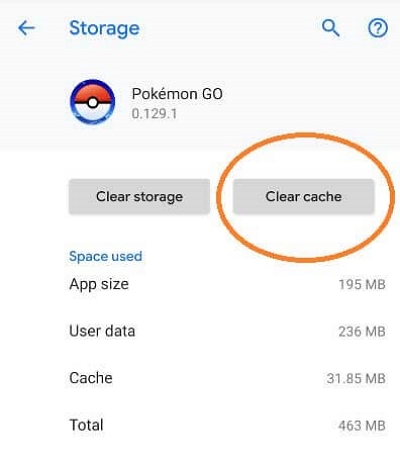
- Confirm the action if prompted.
After clearing both the cache and data, reopen Pokémon GO and log back in with your account details. Note that you might need to go through some initial setup steps again, like granting permissions for camera and location services.
This method can help resolvePokemon Go AR mapping not workingissues and improve app performance by giving Pokémon GO a fresh start on your device.
Pro Tips: Catch Pokemon from Pokemon Go Without Going Out!
For Pokémon GO players looking to enhance their gameplay experience by accessing Pokémon from different locations without physically travelling, the iWhere iPhone Location Changer emerges as a powerful tool.
This innovative software allows users to effortlessly change their device’s GPS location, thereby unlocking the ability to catch Pokémon that are region-specific or otherwise out of reach. It boasts impressive features that enhance your device’s location capabilities.
By simulating your iPhone’s location to anywhere in the world, iWhere iPhone Location Changer enables you to explore distant PokéStops and gyms and engage in raids that would be otherwise inaccessible. This not only adds excitement to your Pokémon GO adventures but also significantly expands your Pokédex without leaving the comfort of your home.
Key Features:
- App Deception: Fool location-based apps, including AR games and social platforms, into thinking you’re elsewhere.
- GPS Joystick: Enjoy a flexible and immersive AR gaming experience with a joystick that lets you navigate virtually.
- GPX File Support: Conveniently import or export GPX files to keep track of your preferred routes.
- Multiple Mocking Modes: Four different modes allow you to simulate GPS movement with your choice of route and speed.
- One-Click Location Change: You can easily switch your iOS device’s location with just one click; no jailbreak or root is required.
How to Use iWhere iPhone Location Changer to Catch Pokémon:
Using iWhere iPhone Location Changer is an efficient way to broaden your Pokémon GO experience without the need to physically travel. This section guides you through the steps to change your location and strategically catch Pokémon from around the globe right from your iPhone. Here’s how you can do it:
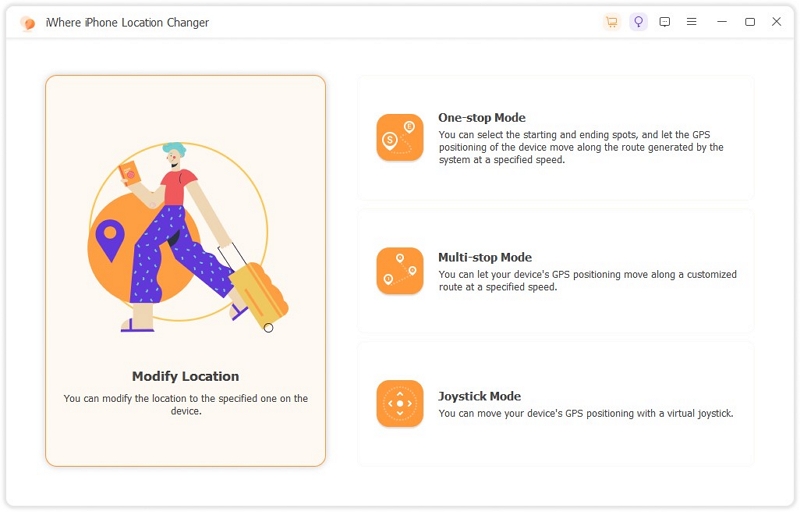
Step 1: Open iWhere iPhone Location Changer on your computer and click “Modify Location” Mode.
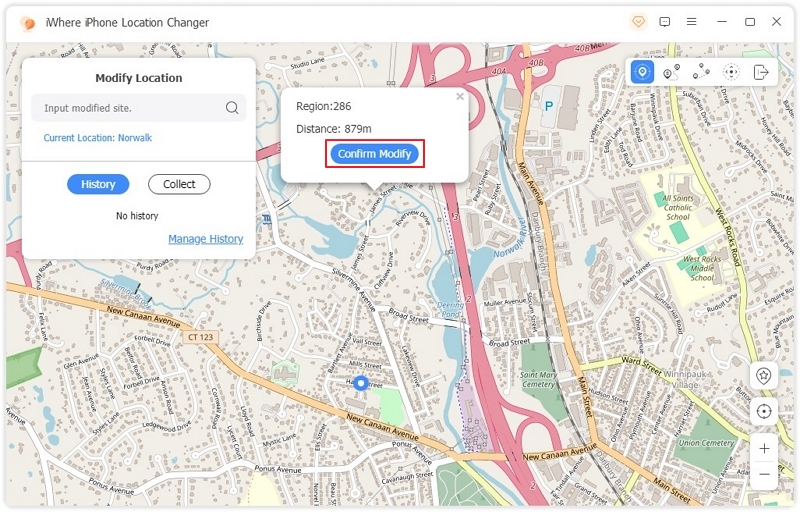
Step 2: On the main screen, you’ll find a map interface. Use this to search for or select the new location you wish to simulate. This could be a location where a rare Pokémon is known to spawn or simply an area you want to explore virtually.
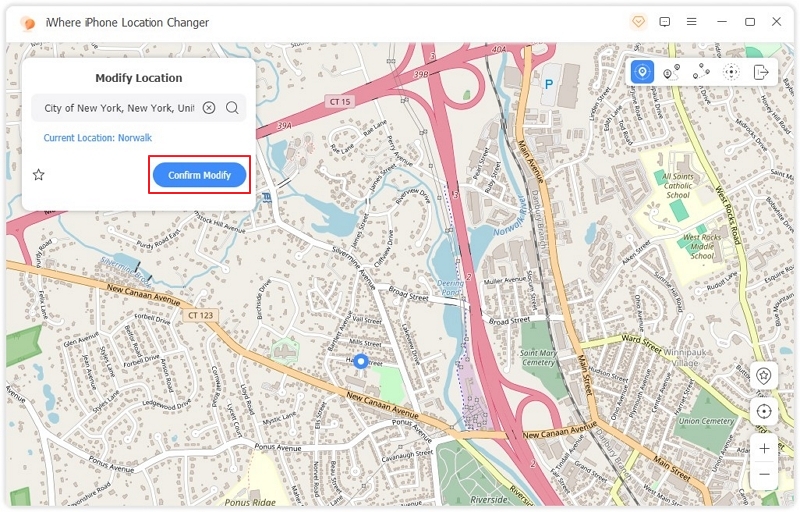
Step 3: After selecting your desired location on the map, click on the ‘Confirm Modify’ button in iWhere. The software will update your iPhone’s GPS to the new location, instantly transporting your in-game character within Pokémon GO to that location.
Finally, launch Pokémon GO on your iPhone. You will notice that your location in the game matches the simulated location set via iWhere. Now, you can begin exploring the area, visiting PokéStops, participating in Gym battles, and catching Pokémon that are specific to that region or otherwise difficult to find in your actual location.
FAQs
1. How to Perform an AR Scan in Pokémon GO?
To perform an AR Scan in Pokémon GO, follow these steps as outlined by Brandon Gaming:
- Find a PokéStop or Gym: Look for PokéStops or gyms that allow scanning. Not all will have this feature, but some may offer AR mapping tasks.
- Initiate the Scan: Click on the PokéStop or gym. If the option is available, you’ll see an icon or a button to start an AR scan. Click on this to begin.
- Conduct the Scan: Position yourself so that the object you’re scanning (like a statue or landmark) is clearly visible. Start moving around the object, ideally in a circular path. If it’s a mural or something flat, you can move from one end to the other.
- Be Respectful and Safe: While scanning, be mindful of your surroundings and respect others’ privacy. Avoid unsafe areas or capturing personal information.
- Finish the Scan: Once you’ve covered the necessary angles, the scan button will turn red, indicating you can stop. You can choose to upload the scan immediately or save it to upload later when connected to Wi-Fi.
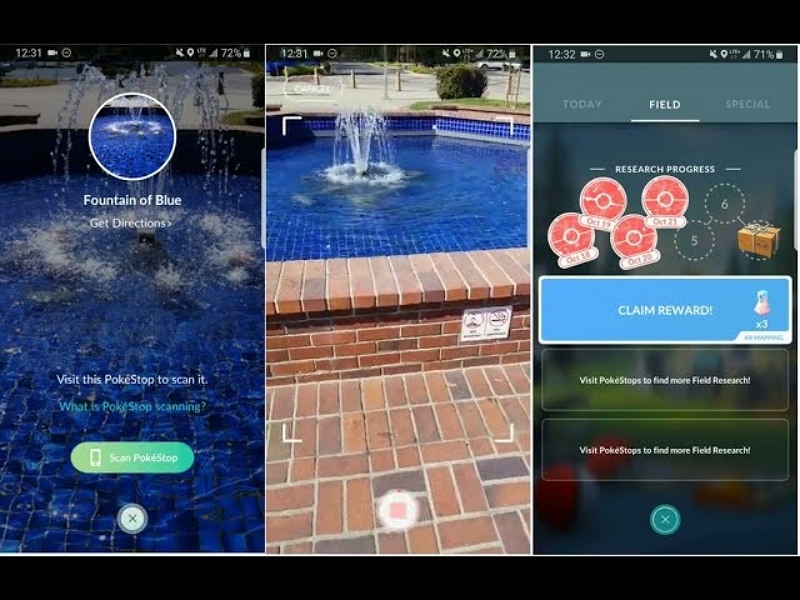
- Upload and Receive Rewards: After uploading, you can receive rewards like items or upgrades to the PokéStop or gym, enhancing the benefits you get from it in future visits.
2. Can you battle other players in AR Pokémon GO?
Yes, you can battle other players in Pokémon GO. This feature is accessible through the ‘Battle’ option in the ‘Friends’ tab or by scanning QR codes at nearby locations to engage in PvP battles. AR mode can be used during these battles to enhance the visual experience.
3. What does AR+ do in Pokémon GO?
AR+ mode in Pokémon GO makes the game look more authentic. It lets Pokémon stay in one place so you can move around them, and they know if you get close, which makes catching them feel like they’re really there.
4. How to Turn on/off AR Mode in Pokemon Go?
To turn on or off AR mode in Pokémon GO, just tap on a Pokémon to try to catch it. Then, look for the AR button at the top right of the screen. Tap it to switch AR mode on or off. If it’s green, AR mode is on.If it’s not, AR mode is off.
Conclusion
Absolutely! Let’s start a Pokémon GO AR mode adventure, where you can see Pokémon in the real world. But if AR mapping pokémon GO not working, don’t worry! This guide will show you how to fix it. And if you want to catch those hard-to-find Pokémon from home, “iWhere iPhone Location Changer” is just what you need. It’s like having a unique map that brings the Pokémon to you!
