Updated on 2024-08-06
2507 views
5min read
Pokemon Go is one of the location based games that’s packed with many interesting features for players to take their gaming experience to the next level. But the introduction of the Routes feature have been a really big game changer for many players.
Routes is a feature that allows players to explore different path in Pokemon Go and discover in-game benefits (including special bonuses and rare pokemons). However, some players find it difficult to navigate the Routes map and use it to their advantage.
If you’re one of such players, this comprehensive guide will teach you the best way to find, create, and follow Pokemon Go Routes map without any hassle.
Part 1: What is Pokemon Go Routes Map?
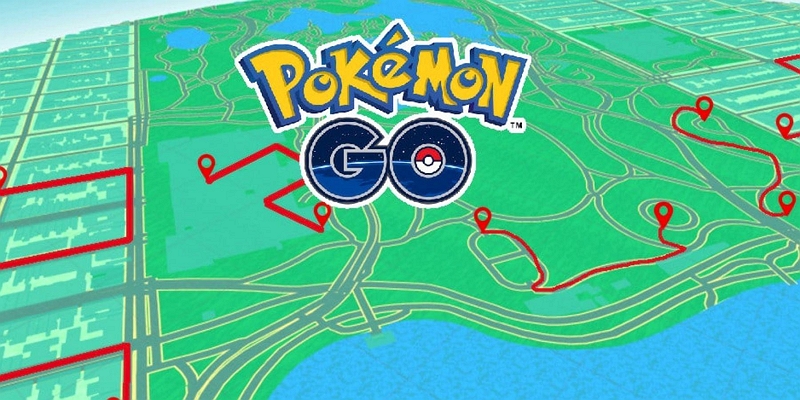
The Pokémon Go Routes feature allows trainers to create and share pre-defined paths with special rewards. These paths, known as Routes, are designed to guide layers through specific areas, and they often feature unique Pokémon spawns, PokeStops, and Gyms.
When you create a route on Pokemon Go, the game automatically tracks and maps your path as you walk, allowing you to share your recorded Route with the community. When creating a Route, trainers can provide details such as a title, description, and tags to help others find and follow their path.
Part 2: How to Find Routes on Pokemon Go Map
Learning how to find routes on Pokemon Go Map is very important to help you navigate the game more effectively. In this part, we’ll discuss two reliable methods you can use to find routes quickly.
Method 1: Via Nearby Menu
One of the popular ways to find routes on Pokemon Go map is via the Nearby Menu feature. You can use the Nearby Menu feature to find and create routes usig the following steps.
Step 1: Open Pokemon Go app on your Android or iPhone and click on the “Nearby Pokémon” menu at the bottom right corner.
Step 2: Select the Routes tab and tap on “See Nearby Routes.”
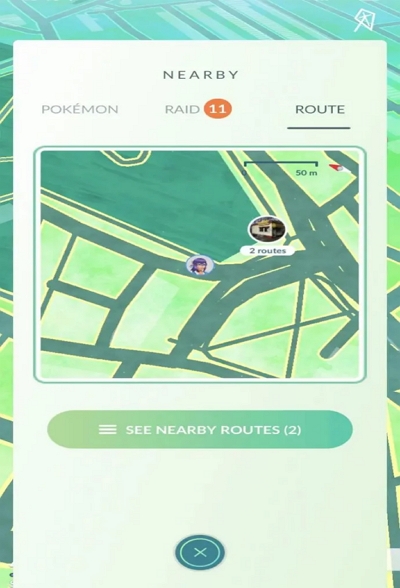
Step 3: Choose a “Nearby Route” and to see its details.
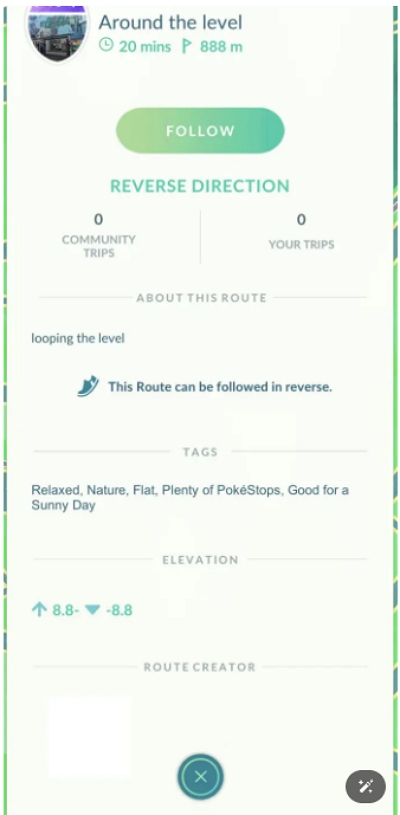
Step 4: Head to the route’s starting point and tap “Follow” to start exploring the route.
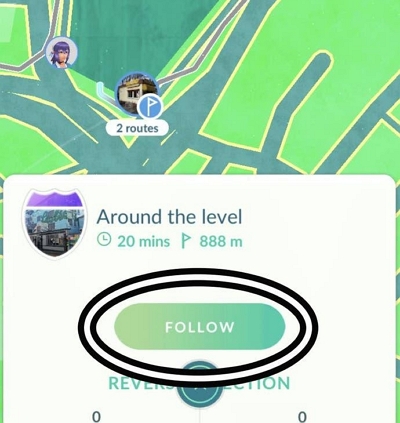
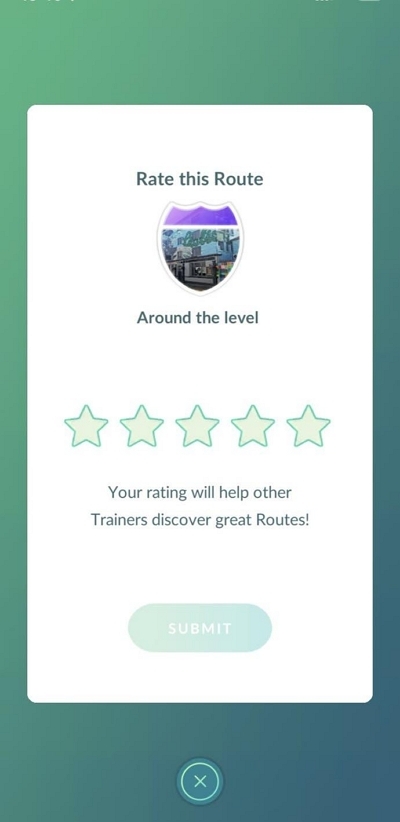
Once you walk the entire Route to the red endpoint marker you’ll be able to earn a badge and rate the Route out of 5 stars, recommending more trainers to use the route together.
Method 2: Via Campfire
Another method to find Pokemon Go routes is via the Camp Fire app.
Campfire is a social platform that connects Pokemon Go players to one another. This platform has a dynamic map that allows players to discover places within your surrounding and game experiences/activities from friends and other players dropped in specific locations nearby.
Here is a quick guide on how you can use Campfire app to find route in Pokemon Go:
Step 1: Open the “Campfire” app on your device and head to the “Nearby Routes” section under “Happening Soon”.
Step 2: In the “Nearby Route” section, you’ll see a selection of routes near you that you can follow. Other information like the routes distance from your current location, title, distance, estimated time, etc., will also be displayed on your screen.
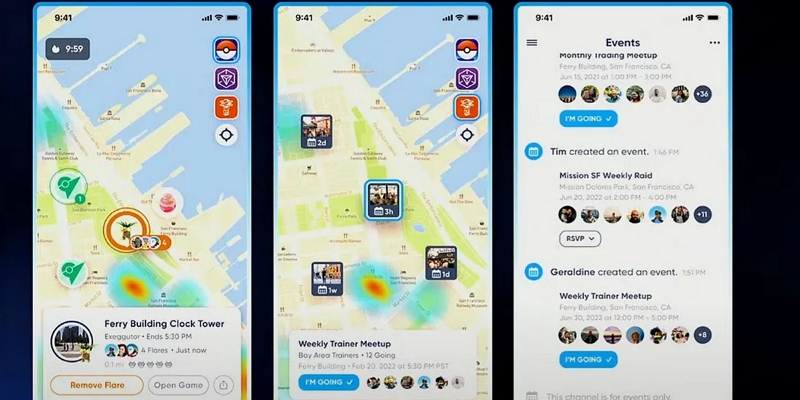
Step 3: Finally, tap on “View All” at the left-hand side of “Nearby Routes” section to view all routes within your region on the map.
Part 3: How to Create Routes in Pokemon Go Map
If you are an avid player, you would like to help more Pokemon Go trainers to find various items more efficiently. You can create a good route yourself and share it with more players. Here’s a guide on creating Routes in Pokémon Go when the feature becomes available to you:
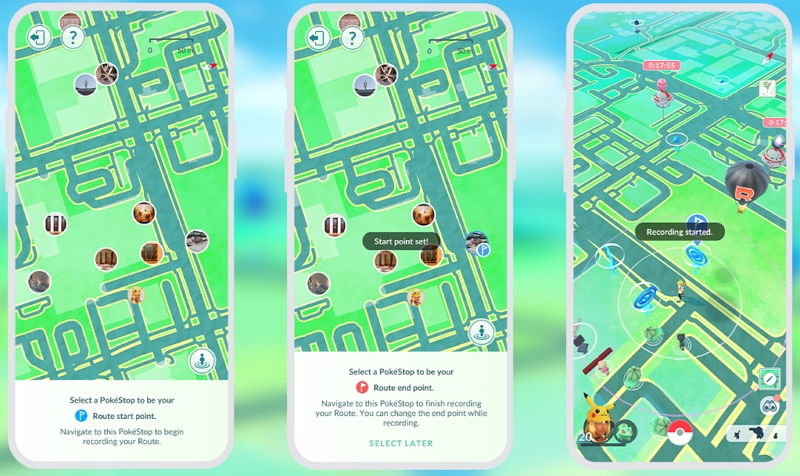
Step 1. Access the ‘ROUTE’ tab from the same menu as ‘NEARBY’ and select “CREATE NEW ROUTE”.
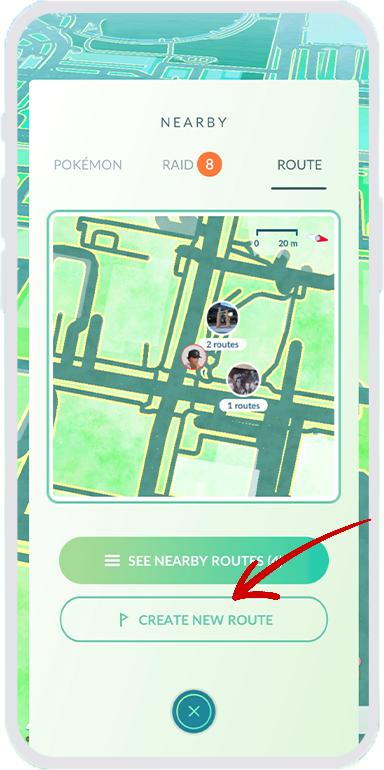
Step 2. Next, you’ll be prompted to select a Start Point for your Route.
Step 3. Then choose your desired end point for the Route (or tap”Select Later”). Keep in mind that Route Start & End Points must be either PokéStops or Gyms.
Step 4. Initiate route mapping by pressing ‘Record’ at the chosen PokéStop or Gym.
Step 5. Travel to the selected end point to complete the recording.
Step 6. Provide details about your Route and submit it for review.
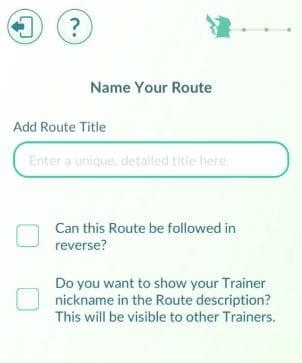
It’s important to note that, according to insights shared by POGOFan808 on TheSilphRoad subreddit, there’s a maximum allowance of four Routes per week. However, approval isn’t guaranteed for all submissions.
Step 8. Stay updated on the status of your Routes by accessing your avatar picture, then navigating to the Routes section. Check beside your Badge collection for the latest information.
Remember, creating Routes can add a unique dimension to your Pokémon Go experience, but it’s essential to adhere to the game’s guidelines and respect the community’s guidelines.
Additional Tip: Automatically plan your route in Pokemon Go
If you want a more convenient way to create and navigate your routes in Pokemon Go map, you need the iWhere iPhone Location Changer. Yes, with iWhere, you can automatically plan your routes on Pokemon Go and walk through them without having to leave your home. Thanks to its built-in multi-stop mode feature, you can easily create routes using different spots in any location around the world.
Besides, the iWhere iPhone Location Changer is not limited to just the Multi-stop mode feature, it also supports one-stop mode to help you fake location when moving from one point to another and the joystick mode to freely move around different regions on the Pokemon Go map.
Key Features
- Import and export your favorite locations on the Pokemon Go map using GPX files.
- Supports customizable movement speed within the range of 1 m/s to 50 m/s.
- Allows modification of location on all popular location based games and apps, including social media apps and dating apps.
- Flexible joystick features enables you to freely move while faking your location on the Pokemon Go map.
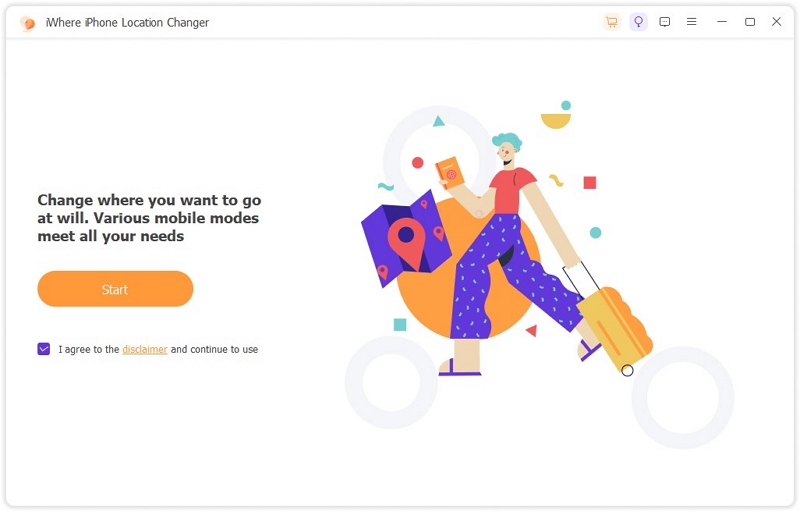
Step 1: Run the iWhere iPhone Location Changer software in your computer and click the “Start” button to begin the operation.
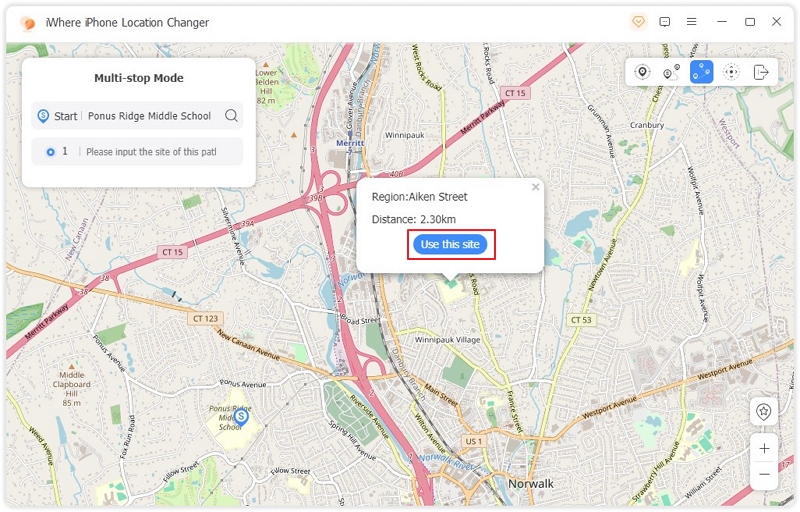
Step 2: Choose the mode for faking your location. We used “Multi-Stop Mode” in this case.
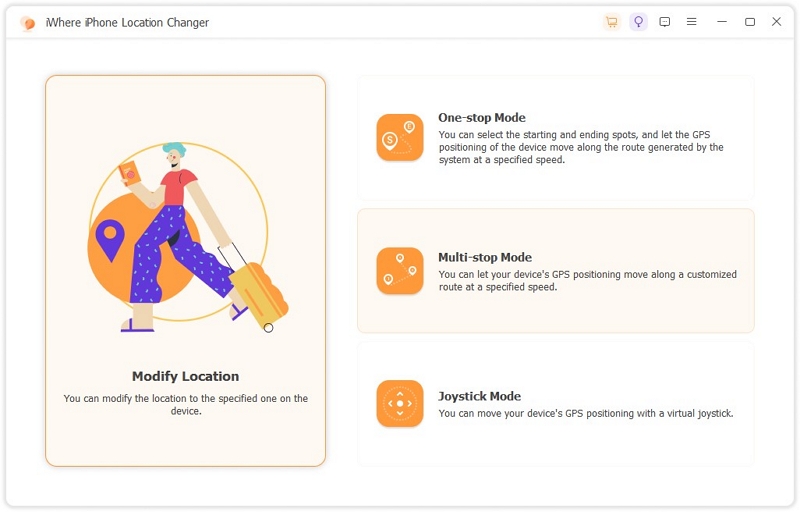
Once iWhere loads its Map, click on the ,Multi-stop mode icon at the top-right corner and select the “Spots” to fake your location. Ensure to click “Use This Site” to confirm every selection.
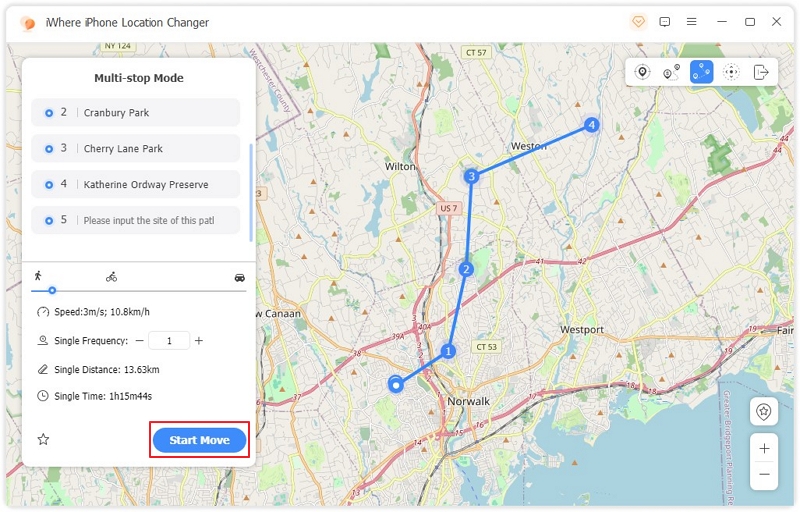
Step 3: Once you choose the spots, iWhere will create a route that you can follow virtually while faking your location. Click “Start Move” to finish.
FAQs
What Are the Rewards for Completing Pokemon Go Route?
- Special Items and Route Badge: Upon finishing a Route, players receive special items and a unique Route Badge. This badge features a photo of the starting or ending PokéStop/Gym.
- Experience Points (XP): Completing Routes also grants you XP, which contributes to increasing your Route Badge level. Also, you can level up your Route Badge by completing the same Route multiple times.
- Candy and XP Multipliers: While traveling Routes, players can earn bonuses like Candy and XP multipliers, enhancing their gameplay experience.
- Zygarde Cells: Routes provide an opportunity to collect Zygarde Cells, which are used to power up the Pokémon Zygarde.
- Buddy Pokémon Bonuses: Traveling Routes with a Buddy Pokémon out can accelerate the earning of walking Candy and Souvenirs.
- Event-Specific Rewards: During specific events like the “Along the Routes” event, players can complete timed research quests and event-exclusive field research tasks for additional rewards. These rewards include encounters with specific Pokémon like Wooloo, Pawmi, and Hisuian Sneasel, as well as items like Pinap Berries, Incense, and Great Balls.
- Tiered Route Badges: Players can earn tiered Route Badges similar to Gym Badges. These badges progress from Basic to Bronze, Silver, and Gold as players complete more Routes. The rewards for these badges may include better items at higher badge tiers, although the improvement is reported to be slight
Conclusion
That’s all for today. With the tips in the above guide, you should be able to use the Pokemon Go routes map efficiently. Besides, routes are also a source of reward. So, don’t hesitate to explore them.
Also, if you want a stress free way of exploring routes in Pokemon Go, we recommend using the iWhere iPhone Location Changer to soof your location. It’s 100% risk free.
