Updated on 2024-06-21
4663 views
5min read
The location services feature plays a crucial role in GPS operations, such as geotagging on photos, navigation on mapping tools, provision of real-time GPS data to location-based apps, and more, on any mobile device, including iPhone. For this feature to offer the required services, you have to enable it and grant the necessary permission.
Despite satisfying this requirement, the location services feature may still fail to work. This could stem from wrong configuration settings, software issues, etc. We will look at these reasons and discuss the possible solutions to fix location services not working on your iPhone.
Part 1. Possible Reasons Location Services Isn’t Working on iPhone
Just before we get into the solutions, a brief about the potential causes of location services not working would be highly appreciated to help you get familiar and avoid the underlying issue in the future. Check out the reasons below:
Poor Internet Services
The strength of your internet service has a significant effect on how location services would work on your iPhone. If the service is poor, you should expect the underlying issue to stem up.
Disabled Location Services
When location services are disabled on your iPhone, there’s no way any GPS operation would work. Thus, you will likely experience location services not working issues on your device.
Wrong Date and Time
For your iPhone to display the correct location in real time, your date and time must be correct. Should your device read the wrong date and time, your location services won’t function properly.
Battery Optimization
Is the low power mode feature active on your iPhone? If so, it could be the reason why your device’s GPS service isn’t working.
iOS Issues
Another reason why location services not working could happen on your iPhone is iOS issues. When there are iOS errors or bugs, it tends to malfunction and the underlying issue could occur.
Problem with Apps
Sometimes, the app you are using could be the one with the problem. For instance, when you run an outdated version of an application, it wouldn’t function at optimal level and issues of this nature may pop up.
Screen Time Restrictions
In case you’ve activated Screen Time on your device and disabled GPS services underneath, your location won’t work.
Data Limitation
If you have the low data mode enabled on your iPhone, you may experience location services not working on your device.
Part 2. Quick Fixes for iPhone Location Services Not Working
Here are some quick solutions you could use to clear iPhone location services not working issue on your device, check and apply accordingly:
Fix 1: Turn on Location Services
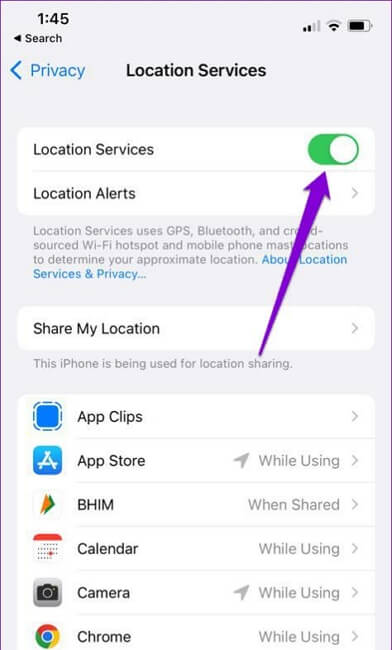
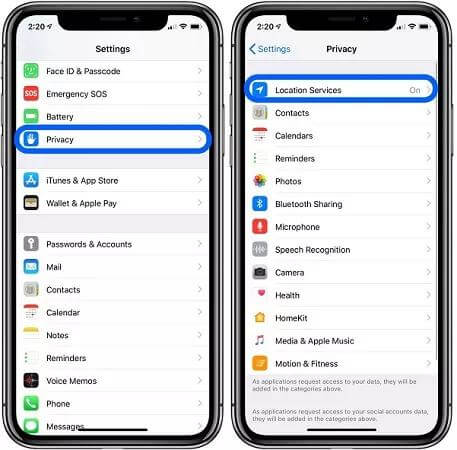
Enabling the location services feature on an iPhone is necessary for the optimal functioning of all GPS operations. In case you haven’t enabled the feature and you are experiencing the underlying issue, follow the steps below to turn it on.
- Open Settings on your iPhone.
- Swipe down and hit the Privacy & Security button.
- Next, tap on the Location Services icon to proceed.
- On the subsequent screen, toggle the slider beside Location Services in the correct direction to turn it on.
Fix 2: Check Internet Services
Checking and switching between internet sources will be helpful to resolve the issue. Here are some handy tips you could use to get this done:
- Change from Cellular network to WiFi and vice versa.
- Contact your network provider to help you check your connection.
Fix 3: Force Restart iPhone
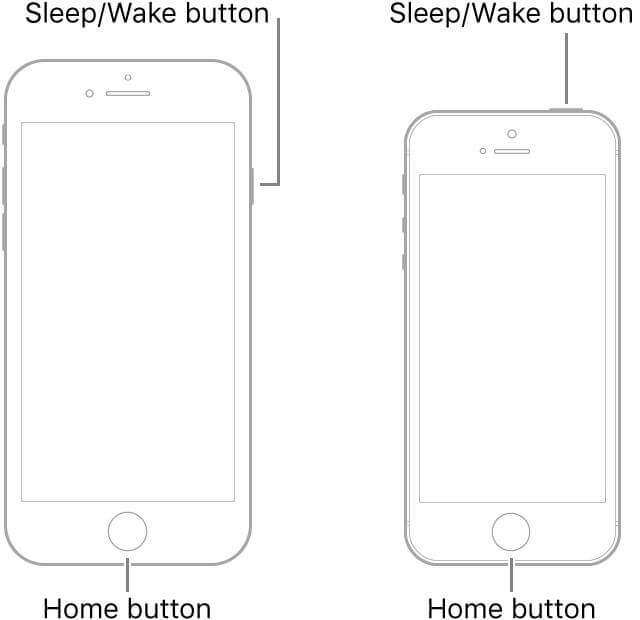
With a quick force restart, you can refresh your iPhone and clear all junk files that are eating up the RAM storage and causing location not working issue. There are different procedures to follow when force restarting your device, depending on your iPhone model. Follow the instructional guide that matches your device type from the procedures below:
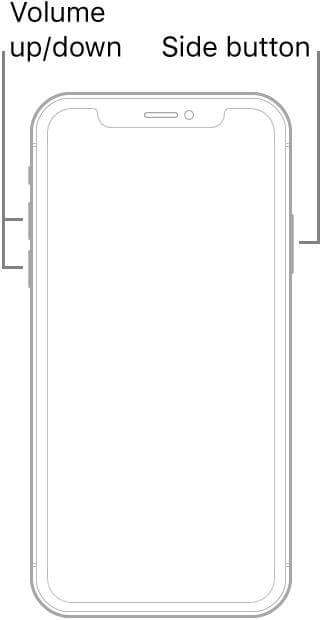
iPhone 8/X/11 and Later Models
- Press down the Volume Up button and release.
- Proceed to do the same for the Volume Down button.
- Afterwards, press down the Side button till your device shows the Apple logo on its screen.
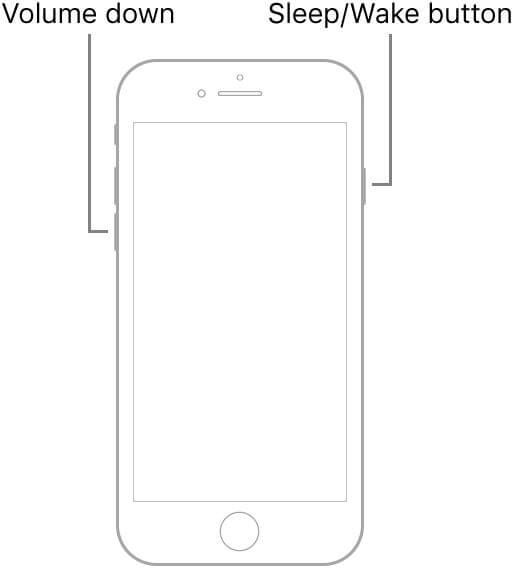
iPhone 7/7 Plus
- At the same time, hold down the Volume Down + Side buttons.
- Continue holding till your iPhone shows the Apple logo.
iPhone 6/6s or Later
- Press down the Top/Side button and Home button concurrently.
- Release both buttons when you find the Apple logo on your screen.
Fix 4: Adjust Date and Time Settings
As earlier stated, the wrong date and time set up can cause iPhone location services not to work. The best thing to do in this case is to adjust your date and time to that of your current location so the underlying issue can be resolved.
Here is how to adjust your date and time settings on your iPhone:
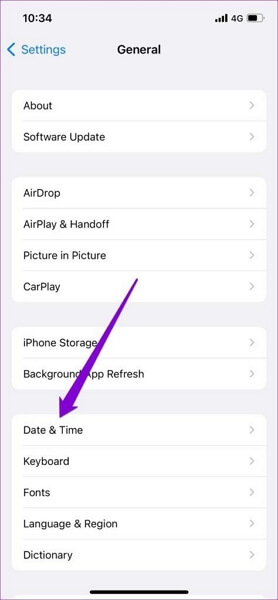
- Launch the Settings menu.
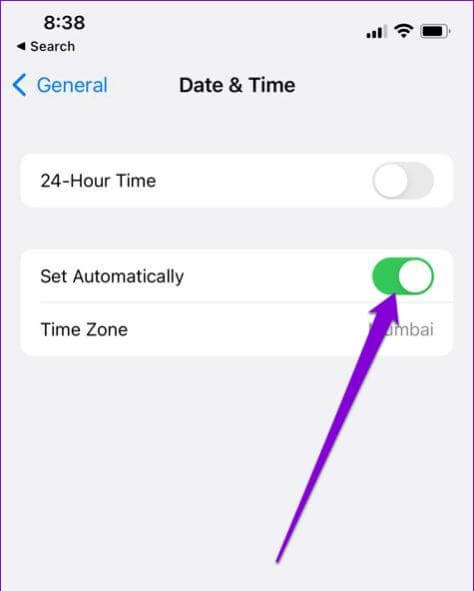
- Hit the General icon and select Date & Time on the subsequent screen.
- Next, tap on Set Automatically and your iPhone will quickly update your date and time to that of where you are currently.
Fix 5: Disable Low Power Mode/Low Data
The low power mode is designed to slow down the operations of a device so as to optimize the battery life. Since it has been listed as one of the reasons for location services not working, disabling the feature will be helpful to resolve it.
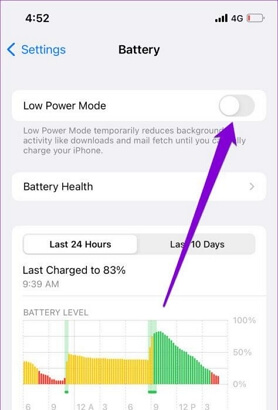
Here’s how to disable low-power mode:
- Initiate the Settings menu launch by tapping the appropriate icon.
- Select Battery on the subsequent screen.
- Next, toggle the Low Power Mode icon to disable the feature.
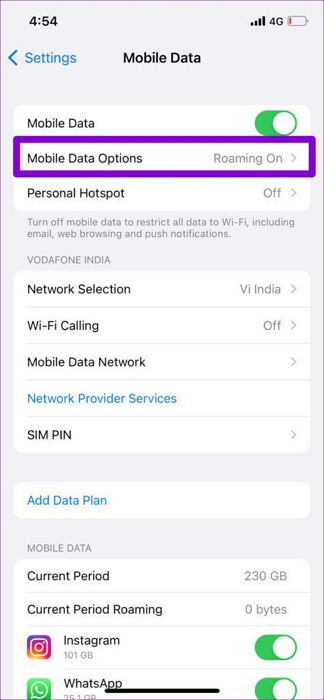
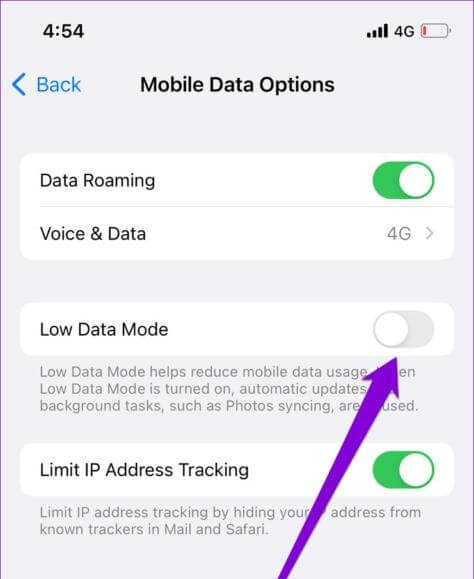
However, if the issue is caused by low data mode, then you need to disable the corresponding feature so location services can start working. Follow these steps to turn off low data mode:
- Launch Settings on your iPhone.
- Scroll through the options and hit Mobile Service (also known as Cellular Data on some iOS devices).
- Next, click on Mobile Data Options.
- Lastly, toggle the icon beside Low Data Mode in the direction that turns it off.
Fix 6: Enable Airplane Mode and Then Disable It
This solution aims to refresh your network connection. When you enable Airplane mode, all radio networks are turned off, and once you disable it, the network connection is restored.
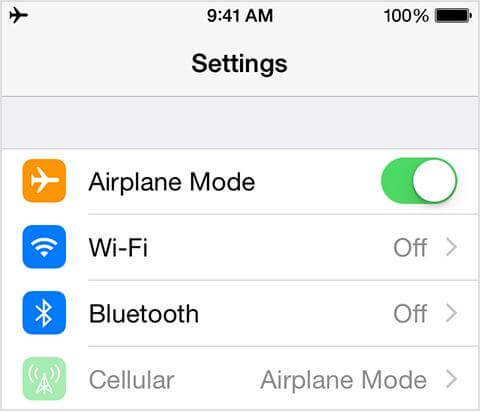
Below we have the guide on how to enable and disable Airplane mode on your iPhone:
- Go to Settings on your iPhone.
- Slide the toggle beside Airplane Mode to turn green and you’ve successfully enabled the feature.
- Wait a few seconds and toggle the icon to turn off Airplane Mode.
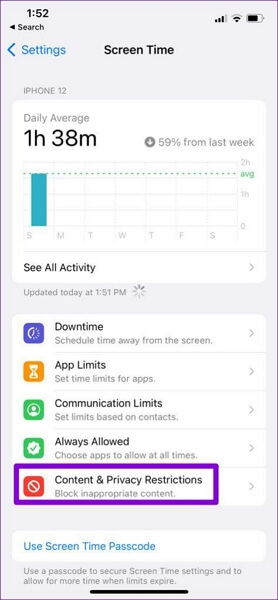
Fix 7: Check Screen Time Settings
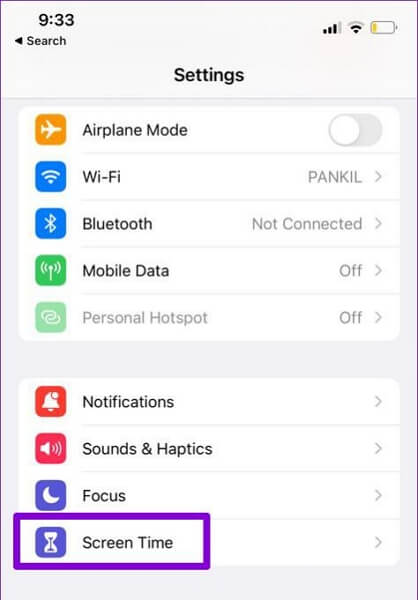
Lastly, checking Screen Time settings and enabling location services underneath could fix the underlying issue on your iPhone. To do this, follow the stepwise guide down here:
- Run the Settings menu.
- Tap on Screen Time > Content & Privacy Restrictions.
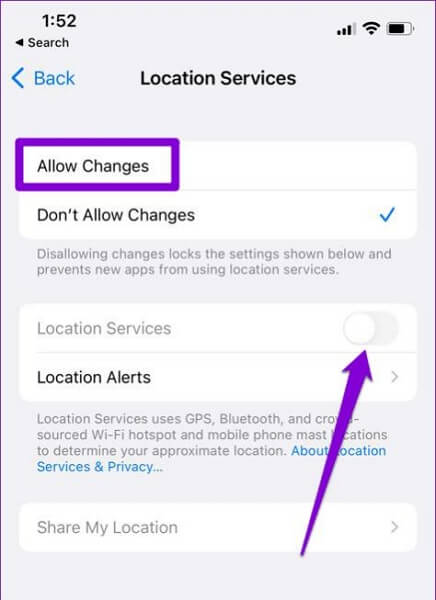
- On the next screen, select Locations Services.
- Now, toggle the icon next to Location Services to display green.
Part 3. Further Fixes for Location Services Not Working [iOS]
If the quick fixes above don’t resolve the underlying issue on your iPhone, here are some advanced solutions you could implement:
Fix 1: Update Location with Third-Party Tools
Perhaps, the location services feature isn’t updating or reporting the accurate GPS on some specific apps on your iPhone, it’s time to get a location mocking software like iWhere iPhone Location Changer to help you adjust the GPS algorithm to read the correct location.
With iWhere iPhone Location Changer, you can easily fix location not working issues on an iDevice. The software changes the GPS information reported by an iPhone or iPad to your preferred location without having to switch your positions from one region to another.
Moreover, you can use it to change the GPS details of any location-based apps you have on your iPhone. It doesn’t matter whether the app is preinstalled or downloaded from the Apple Store. iWhere works effectively with apps such as Find My, Snapchat, Facebook, WhatsApp, Tinder, Bumble, and more. One fascinating thing about this software is privacy protection as it performs all operations without notifying anyone.
Key Features
- 1-click to update your iOS GPS location to any precise location of your choice.
- It powers a friendly UI and works with all iDevices, whether new or old models.
- Suitable for Pokemon GO and other popular AR gamers looking for a location spoofer to customize routes and speed at which their GPS will operate.
- No jailbreak is needed for you to use this software to change your iPhone GPS.
Stepwise Guide to Update Location with iWhere
Start with visiting the official website for iWhere, then click on the appropriate buttons to download a suitable version of the software on your macOS/Windows. Afterwards, follow the steps below to update your iPhone location:
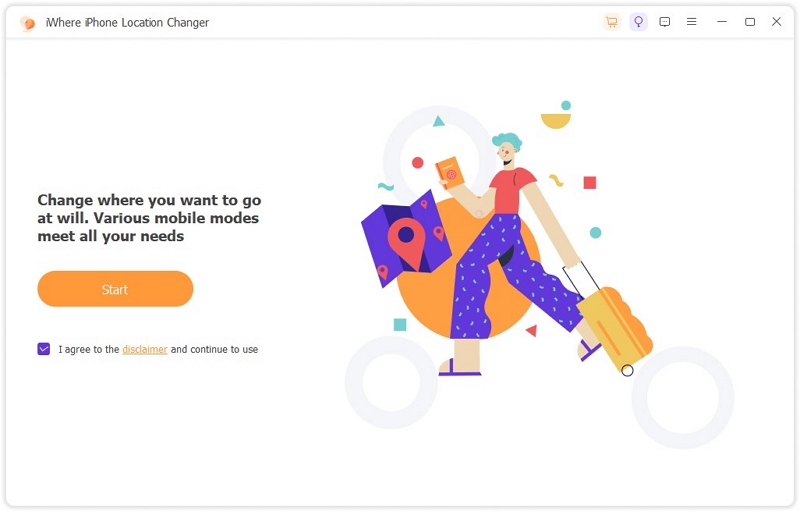
Step 1: Launch iWhere, and check the terms and conditions box on the main interface. Once done, click on Start, then move to the next stage of the guide.
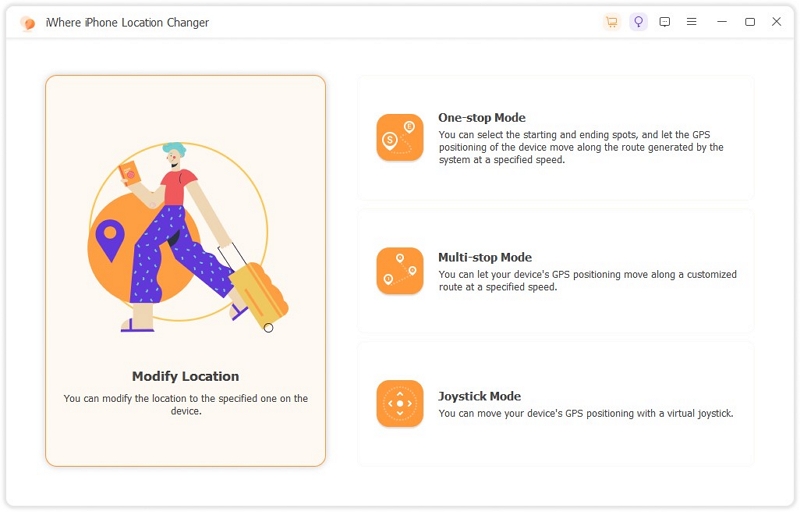
Step 2: Next you have to link your iPhone to the computer to create a connection with the software. To do this, grab the appropriate USB cord and connect to the right ports on your phone and computer. Once completed, select Modify Location when the screen below appears:
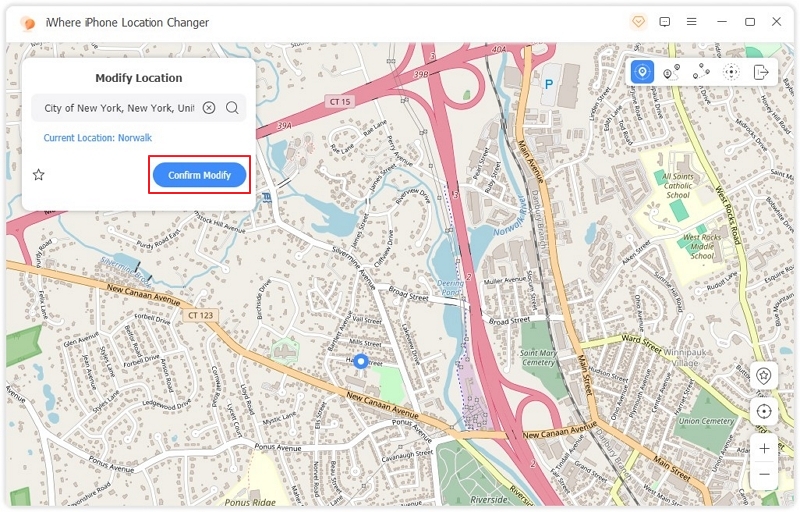
Step 3: You should see a map interface showing your current GPS displayed on your screen. Go to where you have the search tab and enter your desired destination there. After that, hit the blue Confirm Modify button. Without hesitation, iWhere will update your iPhone GPS location to the chosen region.
Fix 2: Update iOS
Installing the most recent version of iOS on your iPhone has proven to be an effective way to fix location services not working issues. When you implement this solution, all bugs and errors present on the current version of iOS you are using are automatically wiped from your iPhone.
This solution can be completed directly from your iPhone settings panel. Here’s the stepwise guide you can follow to update your iOS:
- Launch the Settings panel on your phone.
- Swipe down and hit the General button.
- Tap on Software Update on the subsequent screen.
- Wait until your iPhone displays whether or not there’s an update available for you to install.
- If you have an update, a Download and Install icon will come up. Click on the icon to commence the update installation.
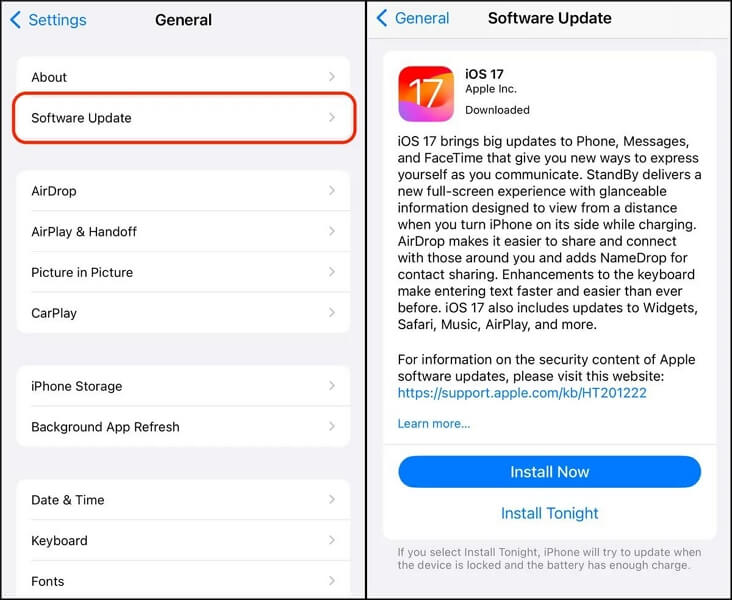
Note: Make sure you have a stable internet connection so the update can be downloaded and installed without interruption. We suggest using a WiFi router since calls can disrupt your internet connection on your cellular network.
Fix 3: Reset Location & Privacy Settings
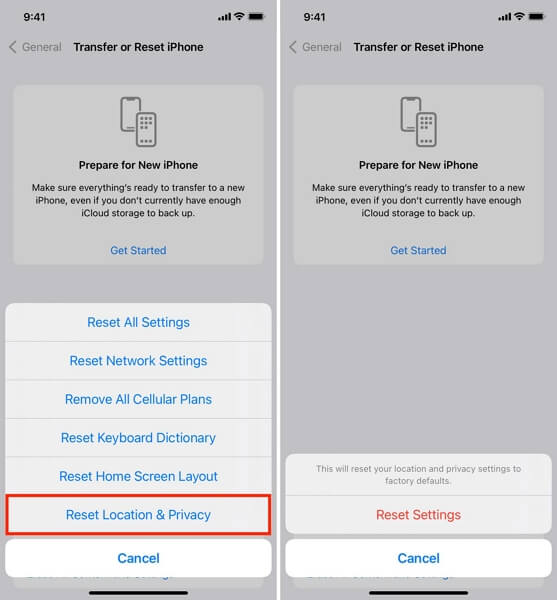
Another way to resolve the underlying issue is to reset the location and privacy settings on your iPhone. When you implement this solution, all wrong location and privacy configurations are automatically removed and the default settings are restored.
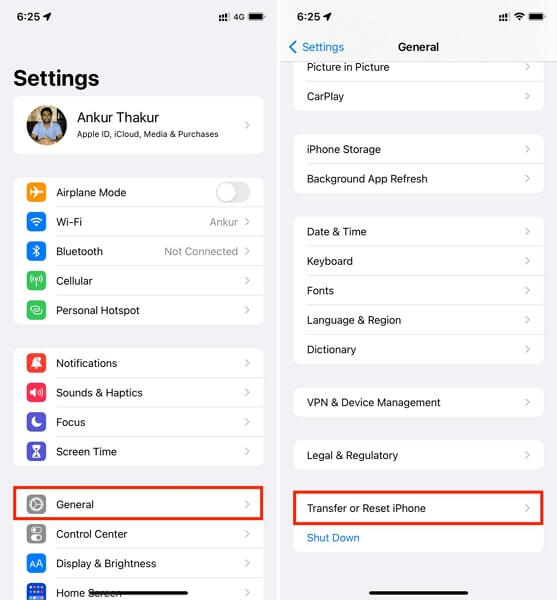
Here’s how to reset the location and privacy settings on your iPhone:
- Start with initiating the Settings panel.
- Scroll down the subsequent interface and select General.
- Next, tap on Transfer or Reset iPhone.
- Click Reset and select Reset Location & Privacy from the options that pop up.
- Confirm your selection by clicking the corresponding button. Once done, the settings will be reset to default mode.
Fix 4: Reinstall Apps
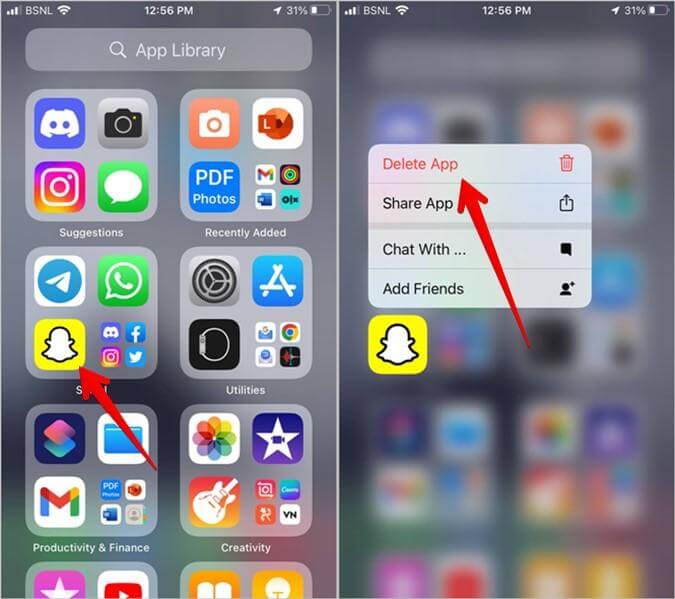
If the underlying issue persists, it could be a problem with the app you are using. We suggest reinstalling the app on your device to clear the errors or bugs present on the former. To employ this solution, follow the steps down here:
- Locate the app with the issue, and hold down on it until your screen starts to wiggle.
- Next, click on the – icon beside the app.
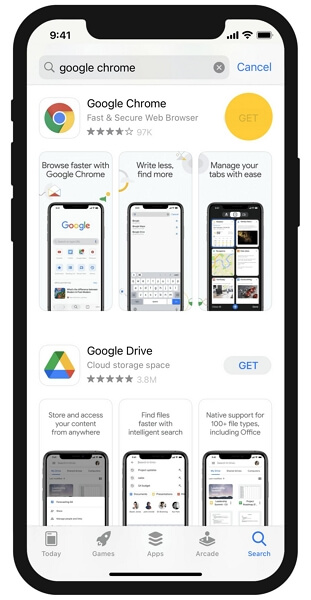
- Now, hit the App Store icon on your iPhone home screen.
- Enter the app name in the search bar and click on the corresponding icon.
- Afterwards, hit the Get icon, provide your Apple ID details and the app reinstallation will commence immediately.
Fix 5: Contact Apple Support for Help
In case location services still don’t work with your iPhone, contact the Apple support team to help you resolve it. The problem could be hardware related and the team is in the best position to help you fix it.
Conclusion
Now, you have our complete guide about iPhone location services not working. We did discuss the reasons why you may encounter the underlying issue and the solutions to fix it. Select and apply one or more of the solutions, and location services should start functioning well.
