Updated on 2024-06-21
2449 views
5min read
“Hi,
My iPhone is not allowing me to share my location with my friends through iMessage. Instead, iMessage map is displaying the prompt “Location Not Available”. Why does it say this? And how can I fix it?”
Gone are the days when you had to send texts or host a call to inform your families and friends about your location. With the recent innovation in technology, mobile devices like the iPhone now let you share your location. You can do this using any of the location-based apps you have on your iPhone, including iMessage. iMessage shares your location with selected families and friends with high precision in real time.
However, things may go south for some reason and your iMessage app may fail to share your location details. If you are in a similar mess and need a solution, this is the right place to be. In this post, we will look at why your iPhone iMessage showed “Location Not Available” and the appropriate solution to fix it. Without delay, let’s get started.
Part 1. Reasons Why My iPhone Says Location Not Available on iMessage?
Generally, your iMessage app should share your location with your selected contacts. However, if it fails to and displays “Location Not Available”, then it’s for the following reasons:
You Have A Poor Internet Connection
A poor internet connection slows down the operations of all location-based apps, including iMessage. So you may experience “Location Not Available” when your internet is down.
Your iOS Version is Outdated
Outdated iOS version causes a device to malfunction and a typical example of an error that could be displayed is “No Location Available” on iMessage.
Someone Else is Using Your Apple ID
When two or more people use an Apple ID on different devices, the GPS is susceptible to errors and that can cause the iMessage app to display “Location Not Available”.
Low Power Mode is Activated on Your iPhone
Low power mode feature is designed to slow down the operations of your device while preserving the battery life. This can cause iMessage not to display your location.
Privacy Settings
If you’ve disabled iMessage from using location services on your iPhone, you shouldn’t expect it to share your location with anyone.
Part 2. How to Fix Not Available on iMessage
One of the following troubleshooting steps should fix “why does it say location not available on iMessage”:
Check Apple Server Status
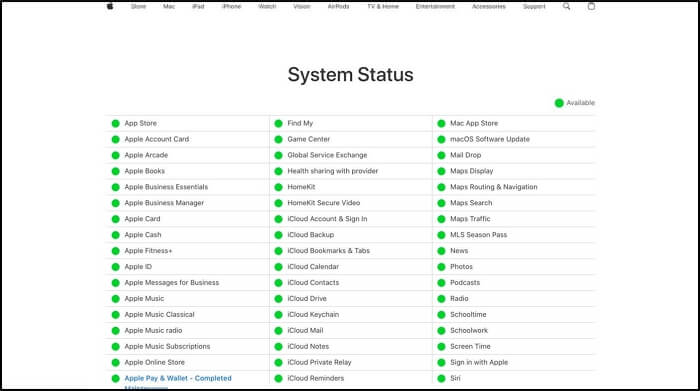
First, you need to check the Apple server to verify the status of iMessage before trying to fix your device. If the status is down, a red dot will be displayed next to the iMessage icon, which means the location service is not operational. Thus iMessage can’t share your location.
However, if you find a green dot, then iMessage is active and the error displayed is caused by something else and should be fixed by another solution. For confirmation, here is how to check Apple server status:
- Open a web browser and visit the official website for Apple System Status(www.apple.com/support/systemstatus/).
- Next, you will see a screen like below:
- Check and confirm the status of iMessage.
Enable Location Permission on iMessage
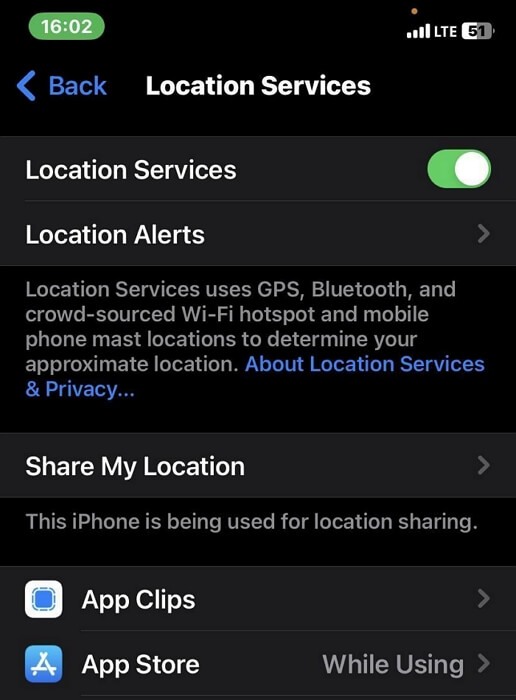
Since your GPS details are private data, you need to grant the necessary permission for any app to share your location. A quick way to do this is by enabling location permission on iMessage. Here’s a simple guide to follow for you to do this:
- Navigate to the Settings panel on your iPhone.
- Swipe down the screen displayed and click on Privacy & Security.
- Next, tap on Location Services and then toggle the slider beside Location Services to turn green.
- On the same screen, swipe down to where you have iMessage and Find My, and enable location permission.
Remove Apple ID from Other Devices
When multiple iOS devices are using the same Apple ID, the GPS service may malfunction and display the “Location Not Available” error on iMessage. Signing out your Apple ID from other devices is the appropriate solution to implement if you are looking to fix this.
Find below, the guide to removing the Apple ID from other devices:
- Tap on the Settings icon and then click on your Apple ID.
- Swipe down and you will find all the devices linked to your account.
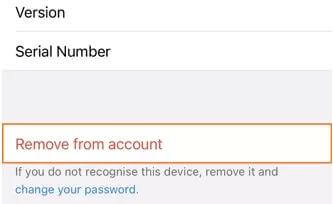
- Click on each one of the devices and select Remove from Account to unlink your Apple ID from it.
Reset Network Settings
Another simple yet effective solution to resolve the “Location Not Available” error displayed on your iPhone is to reset your network settings. By doing this, the internet connection disrupting the operations of iMessage is automatically refreshed and now you can share your location without hassles.
The procedure given below shows how to reset your network settings:
- Head to the Settings panel.
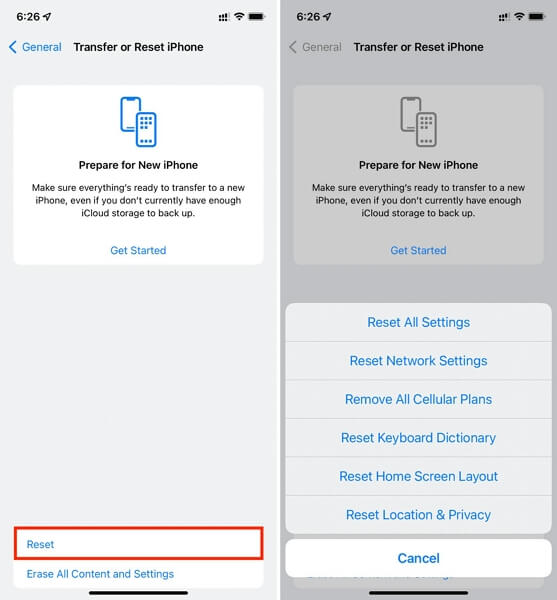
- Tap on General > Transfer or Reset iPhone.
- Select Reset Network Settings.
- After that, you have to confirm your action by entering your iPhone screen passcode. Do that, and your network settings will reset immediately.
Adjust Date and Time Settings
Date, time, and location are interwoven. Your date and time must be correct for the GPS of your iPhone to work. However, if your device reads the incorrect date and time, then the GPS will malfunction, thereby causing iMessage to show “Location Not Available”.
You can fix this by adjusting your date and time settings. Here’s how it’s done:
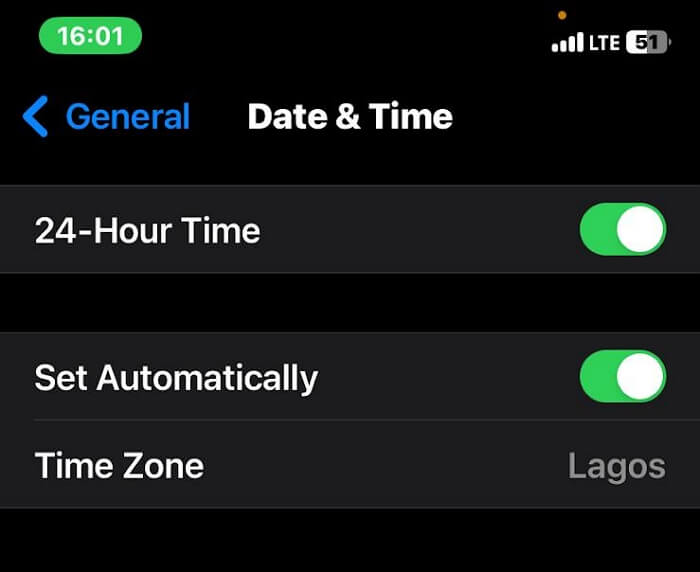
- Click on the Settings button and select General.
- Next, scroll down and select Date & Time.
- After that, toggle the icon beside Set Automatically to display green. Your iPhone date and time will automatically update itself to that of your current location.
Turn Off Airplane Mode
Have you tampered with the Airplane mode tab in the past? If so, then iMessage will surely display the “Location Not Available” error. A quick solution to fix this is turning off Airplane mode. You can do this by following the steps below:
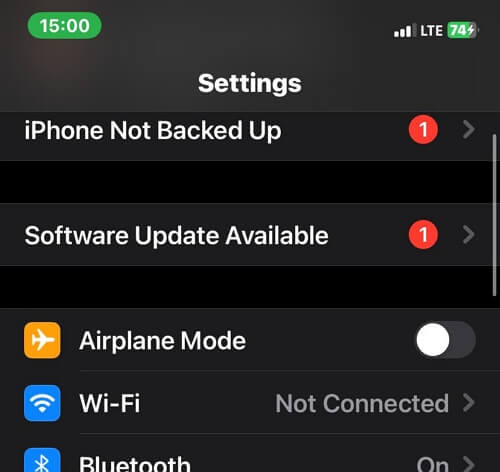
- Open the Settings menu.
- Locate and toggle the slider beside Airplane Mode to show white. Once done, Airplane mode will be deactivated.
Restart Your iPhone
Lastly, if you want to resolve the underlying issue that you are faced with on your iMessage app, a quick system restart will be helpful. System restart offers a quick way to refresh your device and get rid of those bugs and temporary glitches disrupting its operations.
To restart your iPhone, follow and apply the procedure that matches your model from the guide below:
iPhone X and Later Models
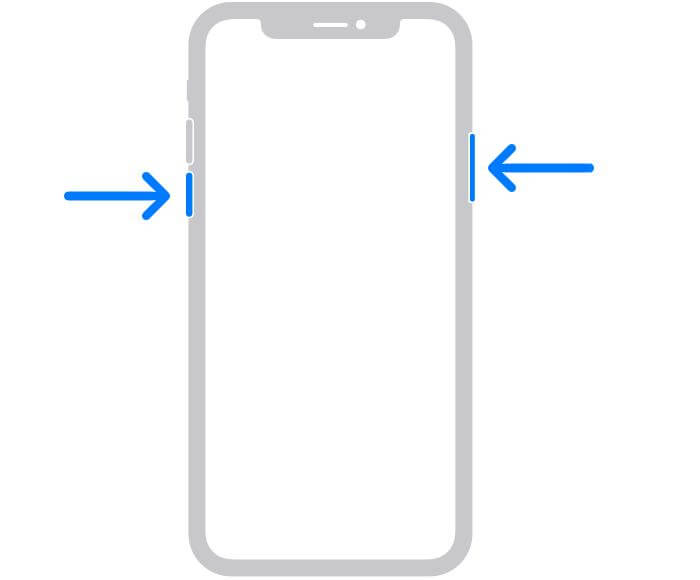
- Press down the Volume Up or Volume Down button together with the Side button till the power slider appears.
- Drag the slider to switch off your iPhone.
- After a while, press down both buttons simultaneously till the Apple logo comes up.
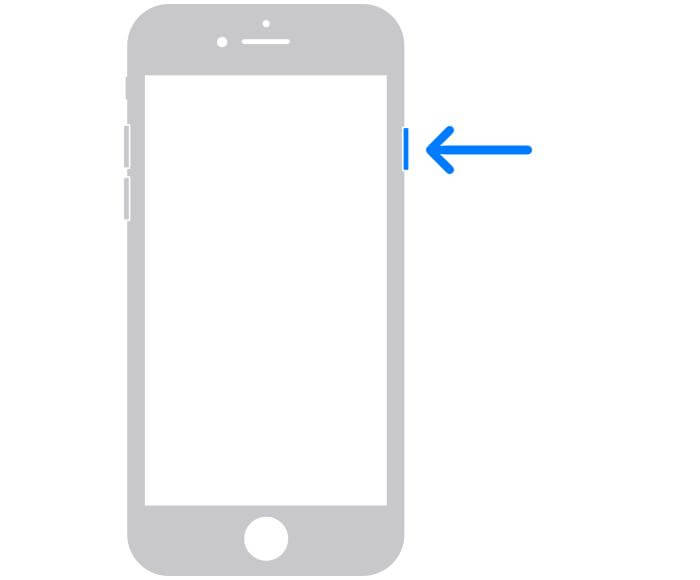
iPhone 6/7/8/ SE (2nd and 3rd Generation)
- Hold down the Side button until you find the power slider on your screen.
- Move the slider in the right path to turn off your iPhone.
- Holding down the same button, you can turn on your iPhone.
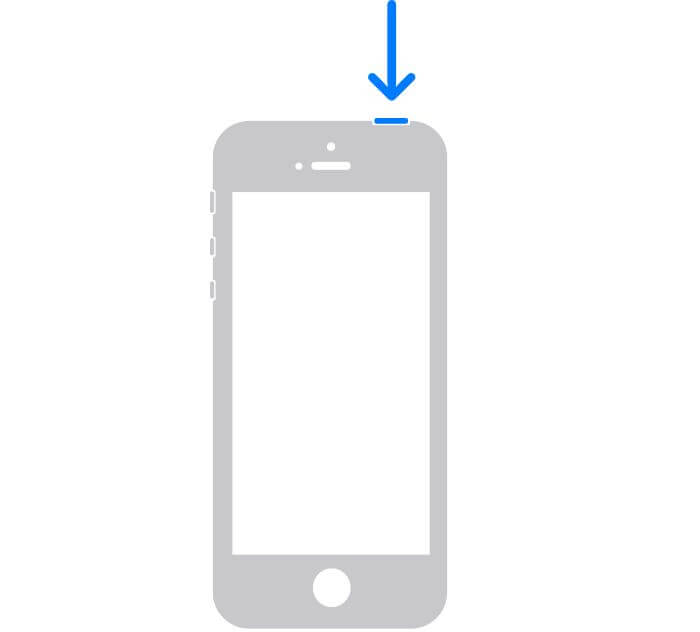
iPhone SE(1st Generation)/5 and Older Models
- Press the Top button till your iPhone shows the power slider.
- Drag the slider to turn off your device.
- After a while, hold the Top button again till the Apple logo pops up.
Bonus: How to Fake My Location on iMessage without Others Knowing
While location sharing offers a quick way to update your families, friends, or colleagues about your whereabouts so they can connect or track you if the need arises, it also has its fair share of dark sides. Privacy breach is a popular one many folks are complaining about.
To stop that, you should consider manipulating your GPS to display fake locations. This way, when anyone tracks you via iMessage, he or she gets the wrong info. But, mind you, you need a third-party spoofing tool like iWhere iPhone Location Changer to achieve this. iWhere is a five-star spoofing tool committed to manipulating the GPS of an iOS device. It helps you teleport to any region around the globe with minimal hassles, thereby giving the wrong location details to anyone you are sharing your GPS with via iMessage. This software fakes the GPS details for all location-based apps on your iPhone, whether installed or not.
Key Features
- Easily fake your location on an iDevice without notifying anyone of your action.
- Fully compatible with Windows OS and macOS.
- iWhere connects with all location-based software and apps. Some of them include; VR games, Instagram, Facebook, and more.
Stepwise Guide to Fake Location on iMessage without Others Knowing Using iWhere
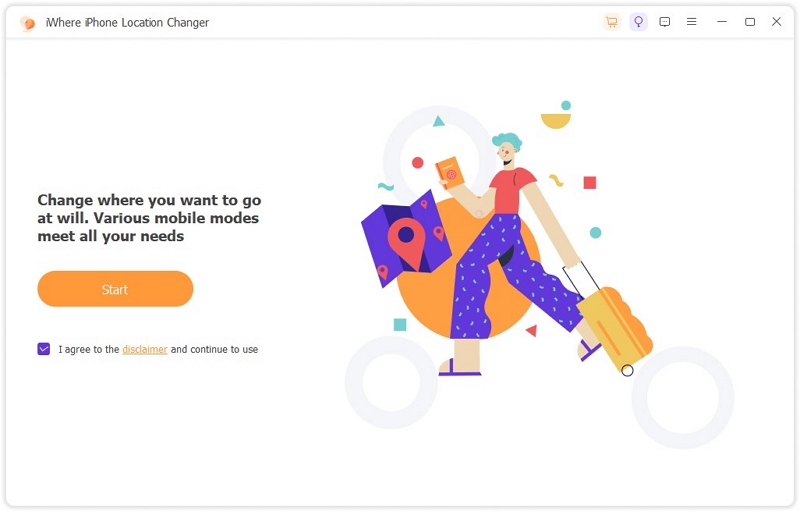
Step 1: Install iWhere iPhone Location Changer on your PC/Mac via the official source. Launch it and connect your iPhone to the computer using a reliable USB cord. Next, click Start to move on.
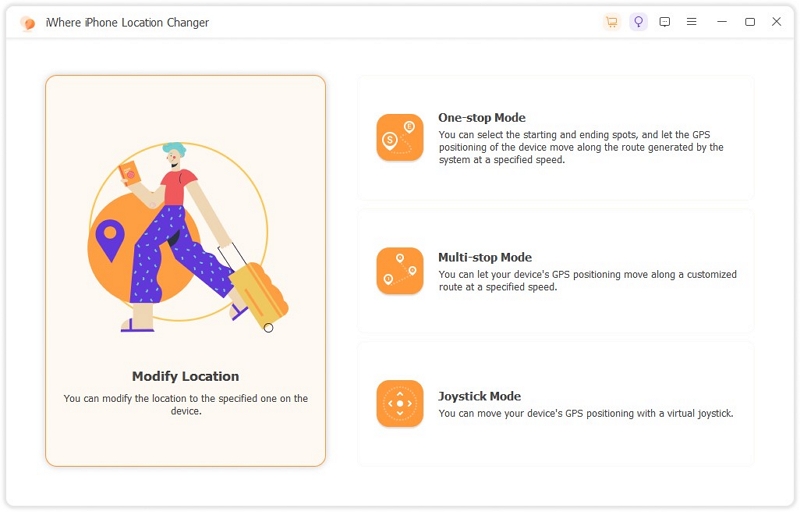
Step 2: Select Modify Location to change your GPS.
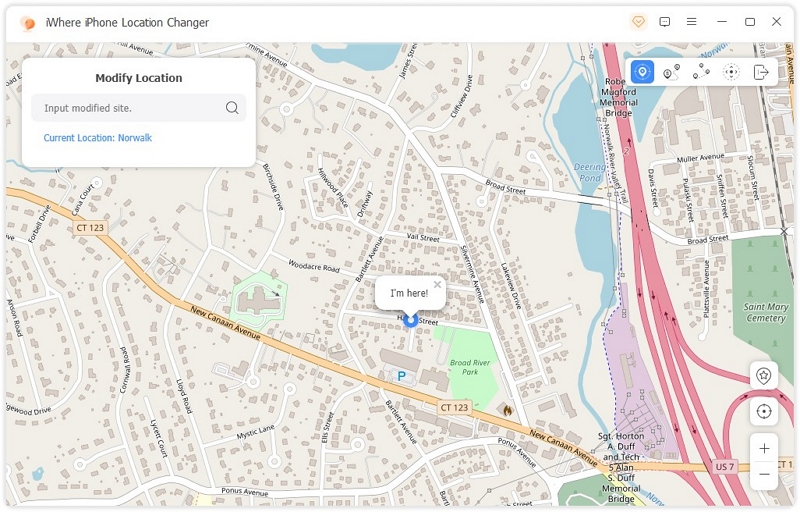
Step 3: Next, iWhere will direct you to a screen showing your current GPS location. Type your preferred location in the search field on the left-hand side of your screen.
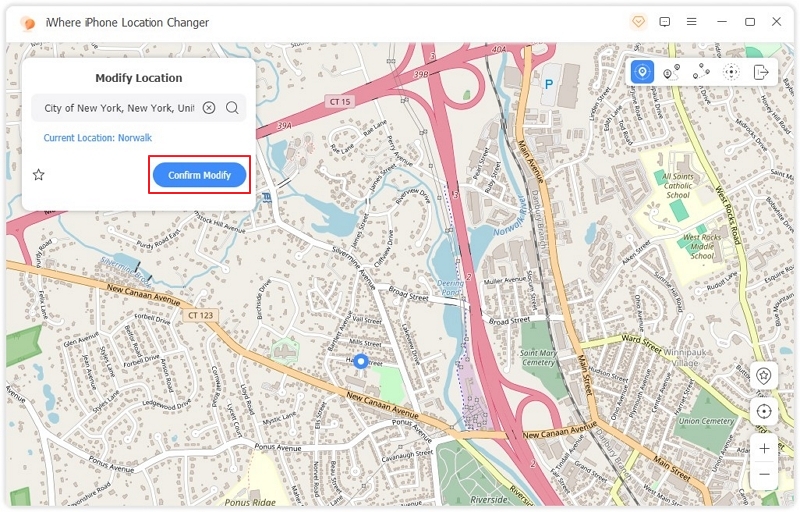
Step 4: Click Confirm Modify and your iPhone GPS location will switch to that which you selected.
Tip: You can change your location by importing a GPX file.
FAQs
How can I share my location with someone on Find My App?
With the stepwise guide below, you can share your location with anyone via Find My App:
- Run the Find My app on your iPhone.
- Select the People icon from the options displayed at the bottom of your screen.
- Next, click on Share My Location.
- Scroll and select the contact you want to share your location with.
- Now choose a duration for which you want to share your location, and click Send. A notification will be sent to the selected contact to alert him or her about your action.
How do I confirm when someone has stopped sharing their location on Find My?
Confirming if someone has stopped sharing his or her location on Find My isn’t a challenge. Here are some tips you can follow to do this:
- Via notification from Find My, as you will be updated when someone makes changes to their location settings.
- Check the People tab on Find My to see whether the person’s name still appears there.
- Use third-party tools to confirm if someone hides his or her location from you.
Conclusion
Ultimately, fixing the error “Location Not Available” displayed on your iMessage app is easier than ever with the solutions provided in this post. And if you wish to hide your location to keep private, then iWhere iPhone Location Changer is what you need.
