Updated on 2024-06-21
4220 views
5min read
With the App Store being a region-specific program with unique versions for the different states and countries, you may likely experience difficulty trying to install an app that’s not yet available in your region. To fix this, you have to change your App Store location.
There are several ways to change your location on the App Store which is simple to implement. But sometimes it could be challenging especially when you are being asked to provide your credit card details. Many folks feel uncomfortable with such a request. If this is the same for you too and you need an alternative to change your App Store location without a credit card then stick around as we walk you through our comprehensive guide.
Part 1. Why Is Credit Card Required for Changing App Store Location?
Before changing your location on the App Store, there are certain verifications you must fulfill and one of them is the provision of your credit card details. When you input your credit card details as required, some basic information revealing your identity will be provided to Apple. This way, you can be down in case of any theft or any malicious activity.
Part 2. Change App Store Location without Credit Card via a New Apple ID
By linking a new Apple ID to your iPhone or iPad, you get the “None” payment option available for clicking when changing the location registered on your App Store. This way, you don’t need a credit card to change your App Store location.
However, for you to do this, you have to fake your GPS to display another location. This way, you can create a new Apple ID directly from the device, and link the details with it. A quick way to do that is described below:
1. Change iPhone Location to Wanted Apple Store Location
The first step to changing the location of your Apple Store is faking the GPS using an iOS spoofing tool like iWhere iPhone Location Changer. This versatile software is committed to manipulating the GPS algorithm of an iPhone to read the preferred location of its end-user. iWhere lets you fake the location on your iPhone, which in turn facilitates the successful creation of a new Apple ID on the corresponding device.
iWhere’s Key Features
- Give you full control over the GPS algorithm of any iOS device without hassles.
- Support customizing routes with One-stop mode, Multi-stop mode, Joystick mode and your own GPX file.
- Simulate the GPS movement on any AR game with just a few clicks using the Joystick mode feature.
- It’s fully compatible with all iOS versions, including the most recent iOS 17.
Steps to Change iPhone Location Using iWhere
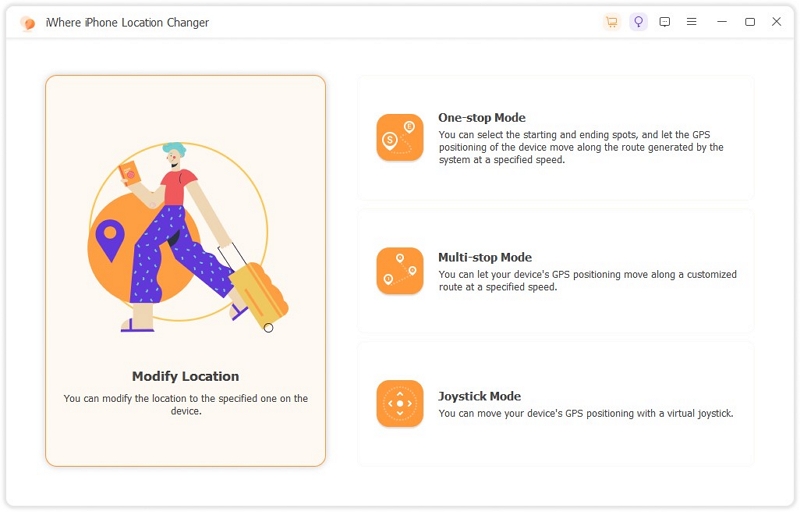
Step 1: Download, install and run the iWhere software on your computer. Connect your iPhone or iPad to the computer with the help of a USB cable and hit Start to move on. After that, select the Modify Location function on the main feed displayed.
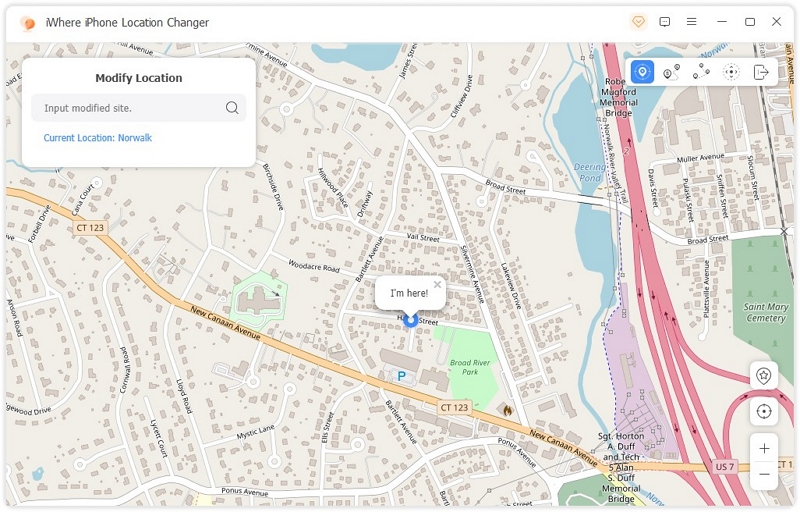
Step 2: Next, the software will direct you to a map interface with your current GPS. Navigate your cursor to the left sidebar and input your target destination in the search bar.
Step 3: Now, Confirm Modify to proceed.
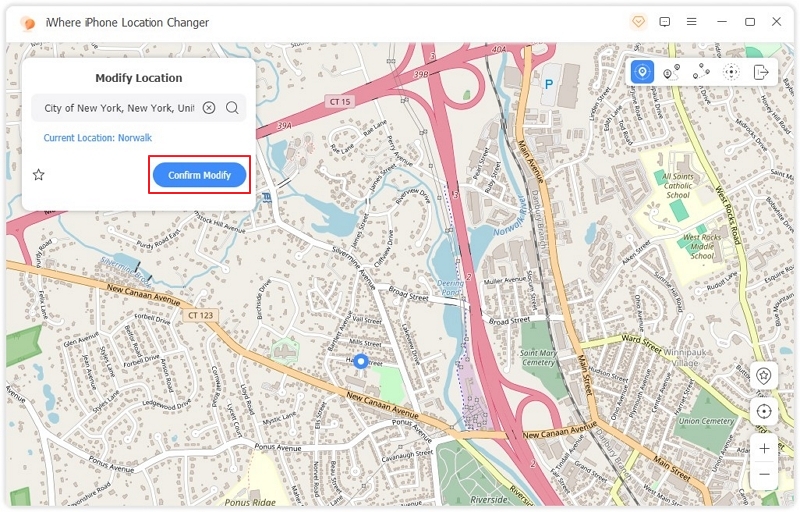
iWhere will change your location to the newly selected region.
2. Create a New Apple ID
After changing the GPS on your iPhone to your preferred location, you can proceed to create the new Apple ID. But before that, please make sure that you have an email address that hasn’t been registered with Apple ID. If this is available, follow the steps below:
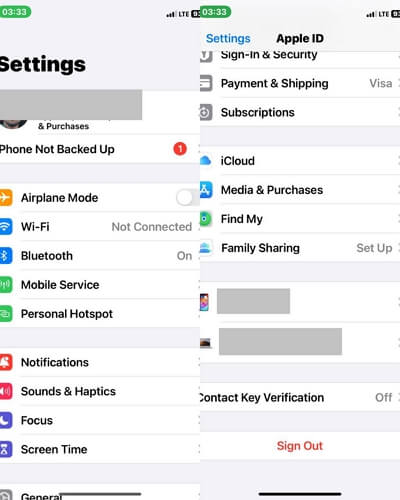
- Go to the Settings panel on your device and click on the profile picture tab.
- Swipe down and click on Sign Out to remove the current Apple ID linked to the iPhone.
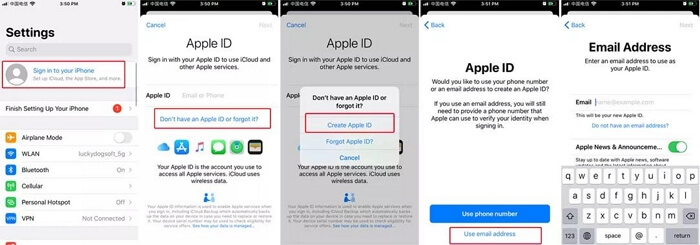
- Head back to the Settings menu again and click on Sign in to your iPhone.
- Next, click on Don’t have an Apple ID or forgot it?
- Select Create Apple ID and fill in your details in the fields provided on the subsequent screens.
- Since you’ve set your device to read your desired location using iWhere, enter the corresponding location of your choice in the Country tab.
- Now, tick the terms and conditions box and click on Next.
- A verification message should be sent to your email from Apple. Check and click on it to the newly created Apple ID.
3. Sign in to New Apple ID
Having created a new Apple ID, you can now link the account to your iPhone. Here’s how to do that:
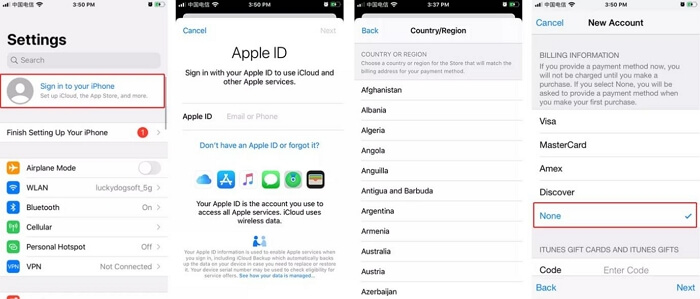
- Open Settings and hit the profile picture icon labeled Sign in to your iPhone.
- Enter the new Apple ID and password in the appropriate field and click on the sign in icon.
- Next, a prompt requesting you to review your Apple ID will come up since you are signing in for the first time. Click Review to proceed.
- Choose your preferred country and hit the Next button.
- Now, agree to the terms and conditions of Apple on the next screen by clicking on Agree.
- After that, another screen requesting you to enter your billing information will come up. Choose None and select Next.
- Finally, a congratulatory page will pop up. Click Done to confirm and save your changes.
Part 3. Change App Store Location without Credit Card Using Apple Prepaid Card
With the Apple Prepaid Card, you can make changes to the location registered on your App Store without a credit card conveniently. This is possible because the Apple Prepaid Card is also a payment system you can use to make purchases of different products and services that are available on the Apple ecosystem.
Unlike Credit Cards, Apple Prepaid Cards don’t reveal your personal details. Here is the detailed illustration to follow if you are looking to change your App Store location with the Apple Prepaid Card:
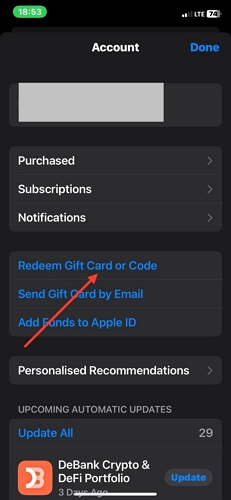
- Launch the App Store app on your iDevice and ensure you are signed in to your Apple account.
- Tap on your profile picture at the upper right corner of your screen.
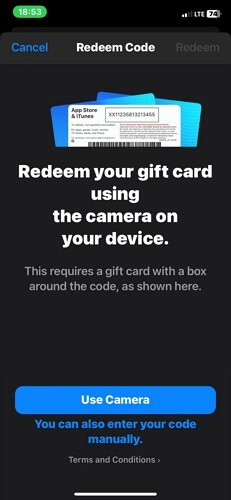
- Next, select the Redeem Gift Card or Code button.
- A screen with the option for you to scan the QR code on the Apple Prepaid Card or enter the voucher manually will come up. Select any of the options to proceed.
- Once the code is accepted, follow the on-screen guide to complete this process.

Part 4. Change App Store Location without Credit Card with Apple Help
Lastly, we suggest that you contact the Apple Support team to help you change the location registered on the App Store on your phone. The team is in a great position to assist end-users with this type of challenge. However, you must have some basic information at hand as it will be requested in order to verify you are the true owner of the device.
Bonus: Why I Can’t See “None” Under My Apple ID Payment Method?
There are a number of reasons why you can find the “None” option underneath your Apple ID payment method. Some of them include:
- You have some payments due on your account.
- You’ve subscribed to an auto-renew service.
- It’s your first time using iTunes or the App Store.
- You aren’t located in the country where you want the App Store to display.
- You are on the Family Sharing iCloud plan.
FAQs
Why can’t I change my location on App Store?
You cannot change the location registered on your App Store if you are one of the members of the Family Sharing plan. You need to leave the Family Sharing plan before changing the Apple Store location.
Is it possible to download an app that’s available in my region from App Store?
Yes, it’s possible to download apps that are not available in your region. You can implement any of the procedures introduced in the post above to get this done.
Conclusion
You can now change your App Store location without a credit card using the methods described in the guide above. We’ve discussed the 3 simple procedures you could use to change the location on your App Store. However, for these solutions to work effectively, you must ensure your Apple ID isn’t tied to any subscription.
