Updated on 2024-12-09
4101 views
5min read
Safari is Apple Inc.’s native web browser, and it is supported across all iOS, iPadOS, and macOS devices. This browser is known for its speed, efficiency, and user-friendly interface. And just like any other browser app, it relies on your device’s Location Services to provide the best user experience.
With that said, if you’re looking to change location on Safari on your Apple device, this post will walk you through the best method to get the job done on your iPhone, iPad, and Mac computer.
Part 1: How Does Safari Determine Your Location?
The tech used in Safari can extract and combine data from the following sources to pinpoint your location with a significant degree of accuracy. These sources include:
- GPS: This is particularly relevant for Safari on mobile devices and provides precise location data.
- IP Address: Your IP address can reveal the location of your network.
- Wi-Fi Data: Information from local Wi-Fi networks can be used to determine your approximate location and Mac’s Safari generally determines your location via it.
- Cellular Data: This is particularly useful when GPS or Wi-Fi signals are not available or less accurate. By accessing Cellular towers, Safari can triangulate the your position based on the strength and proximity of nearby cell towers.
Part 2: When Should You Change Location On Safari?
There are different scenarios where changing location on Safari might be important. We’ve shared some of them below;
- Accessing Region-Restricted Content: If you’re trying to access websites or content that is only available in certain regions, changing your location can help bypass these restrictions.
- Privacy Concerns: For users who are concerned about their online privacy, changing location can help obscure your actual location, making it more difficult for websites to track and target you with region-specific advertising or content.
- Avoiding Censorship: If you live in a country where internet censorship is prevalent, changing your location can provide you access to a free and open internet.
- Refine Local Search Results and Services: If you’re planning to travel or move to a new location, you might want to get local search results or news from that area. Changing your location can help you get a better understanding of local services and businesses before you arrive.
Part 3: How To Change Location On Safari iPhone/iPad With High Accuracy
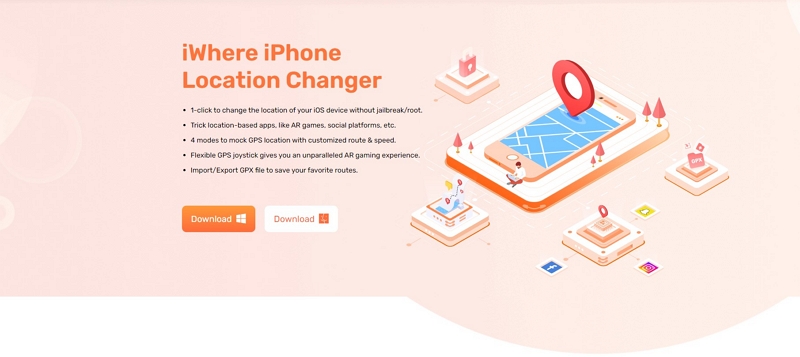
For iPhone and iPad users, the best way you can change location on Safari with high accuracy is by using iWhere iPhone Location Changer. This is a guaranteed location-faking solution that allows you to change your location on all iPhone/iPad apps including Safari without having to move from your current location. Furthermore, iWhere supports changing location down to the street.
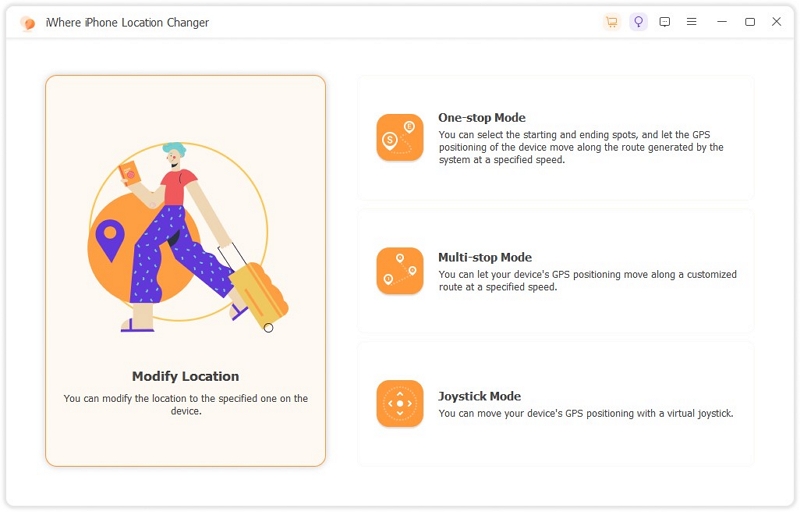
iWhere supports features like Modify Location, One-stop mode, Multi-stop mode, Joystick mode, adjustable moving speed, etc. Plus, it allows you to save the location of different spots you’ve visited by importing and exporting them as GPX files.
Key Features
- Offers helpful smart features like location history, which automatically saves location you’ve visited on the map.
- Boasts advanced security system that guarantees user protection while faking location.
- Easily customize your moving speed within the range of 1 m/s to 50 m/s while faking iPhone location.
- Easily bypass geo-restricted on streaming platforms, websites, apps, and lots more.
Here are the steps to change location on Safari with iWhere
Step 1: Visit iWhere official website and download the iPhone Location Changer app. Then, install it on your computer.
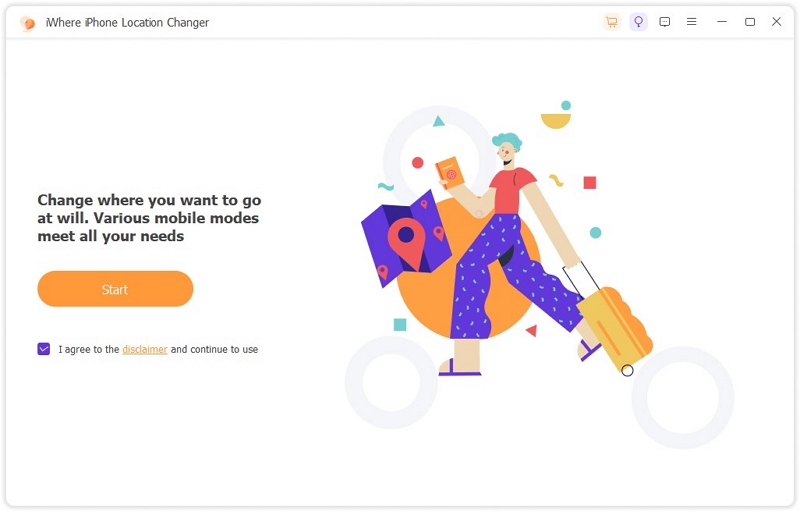
Step 2: Open the installed app and click on the “Start” button to begin the process.
Step 3: Connect your iPhone to the computer and select “Modify Location” to proceed.
Step 4: Now, iWhere will load a map showing your current location on your computer screen. Scroll the map with your cursor to explore the available regions that you can use to change your Safari location.
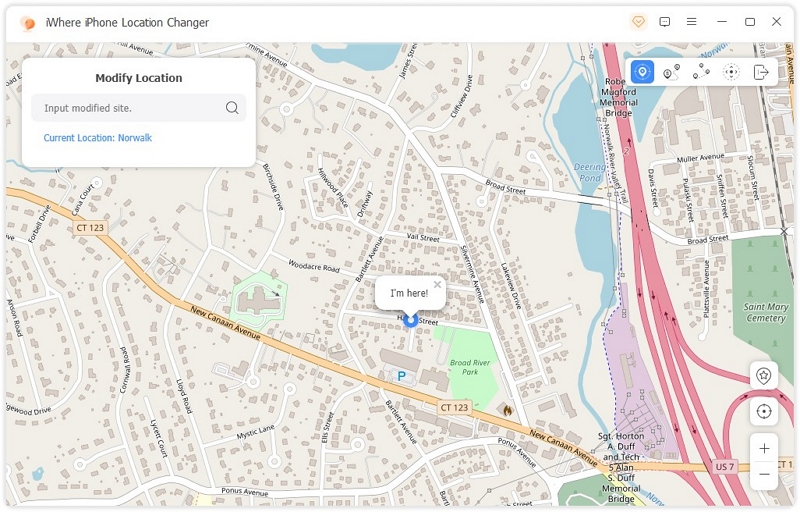
Step 5: After you find a “target location”, enter the address into the “Search Bar” at the top-left corner and click on “Confirm Modify”.
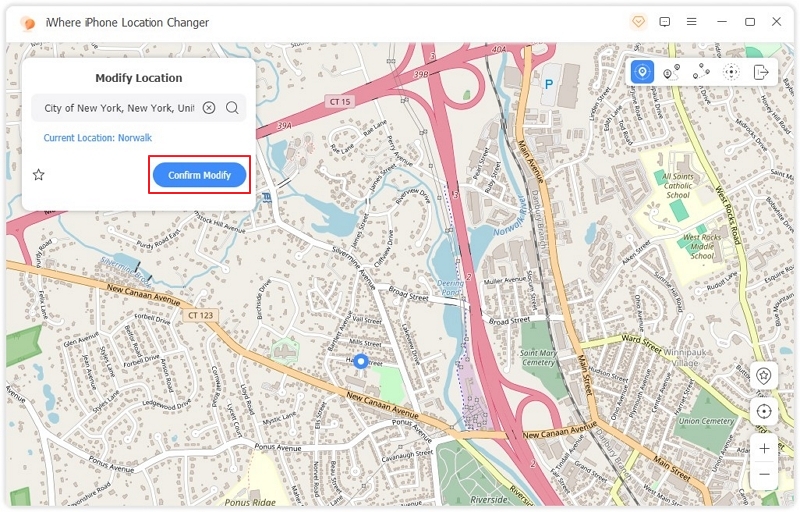
The iWhere iPhone Location Changer app will change your iPhone location and you’ll be able to access restricted websites on Safari without limitations.
Part 4: How To Change Location On Safari iPhone/iPad/Mac Using VPN
Another way you can change location on Safari is by using a VPN, and this works for iOS, iPadOS, and macOS devices. With a reliable VPN app, you can easily route your internet connection through servers located around the world, enabling you to change your location and IP address in Safari. We’ve introduced some of the most efficient VPN apps that can be used to change location on Safari on iPhone, iPad, and Mac below:
1. Express VPN

One of the best VPN tools that has proven to be a reliable option for many users is ExpressVPN. This VPN app offers thousands of location services in many regions around the world, and you can use it on your iPhone, iPad, and Mac. It also works for torrenting and blocking online trackers efficiently.
Pros
- It can be used on up to 8 devices simultaneously.
- Enables you to unlock restrictions on many popular streaming services.
- It’s easy to operate.
Cons
- Expensive subscription plans.
2. Nord VPN

NordVPN is also a popular choice among many users around the world. This VPN app offers more than 6000 servers that you can use to change your location on Safari. And in terms of privacy, it supports a powerful 256-bit AES encryption system that ensures 100% user protection.
Pros
- You can connect up to 6 devices simultaneously.
- Blazing fast connection speed.
- It has a sleek user interface.
Cons
- The tormenting feature is not efficient.
3. Total VPN

TotalVPN offers some of the most reliable location servers for changing location on Safari. Although its slow connection speed is a big drawback, this VPN allows you to change your device location within a few clicks. And it offers decent security features that you can use to protect your privacy while using the app.
Pros
- Strong encryption system.
- Supports up to three simultaneous connections.
- Simple and intuitive user interface.
Cons
- Slow connection speed.
How to use VPN to Change Location On Safari
Step 1: Go to “App Store” and search for any of the VPN apps that we recommended above or the one you found and install it.
Step 2: Set up the VPN app on your iPhone. Then, navigate to it’s “Location Servers” and select a server in the country you want to use.
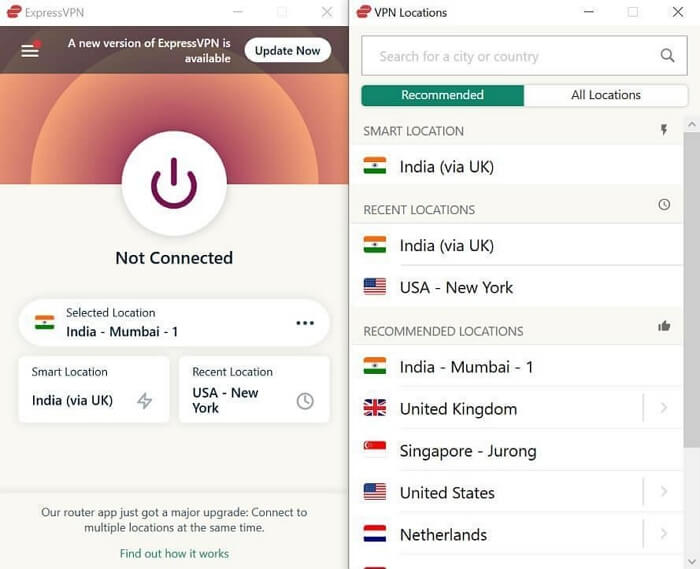
Step 3: Tap on the “Connect” button to change your iPhone location and start browsing Safari from that region.
Limitations:
- VPN apps are not always accurate.
- Subscription plans are usually expensive.
- Slow down the network speed.
Bonus: How To Enable, Disable and Change Safari Location Settings On Apple Devices
Do you wish to change Safari location settings on your Apple device? Worry less. There are several tricks you can utilize to get this done. Read on to find out more.
Method 1: Enable/Disable Safari Location
One of the things you can do to change Safari location settings on your Apple device is to enable or disable Safari location. Here is how:
Steps on iPhone/iPad
Step 1: Head to your iPhone “Settings” and locate “Privacy & Security”.
Step 2: Tap on “Location Services”.
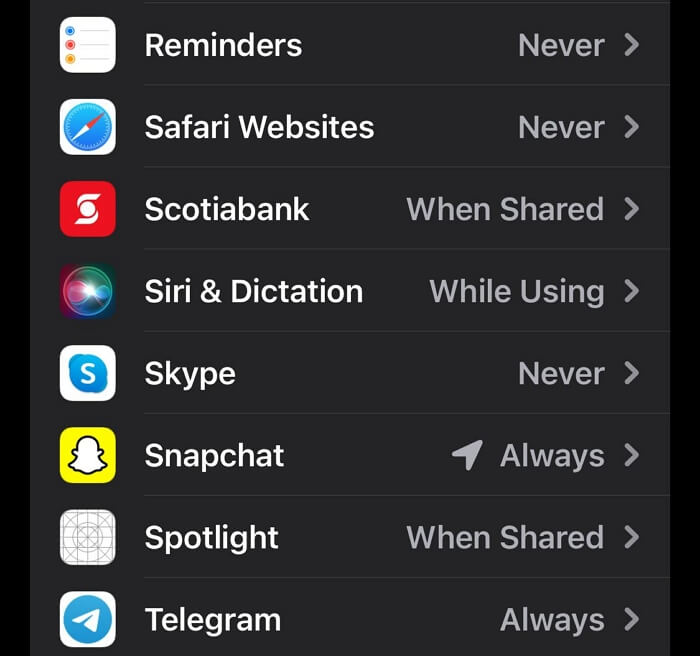
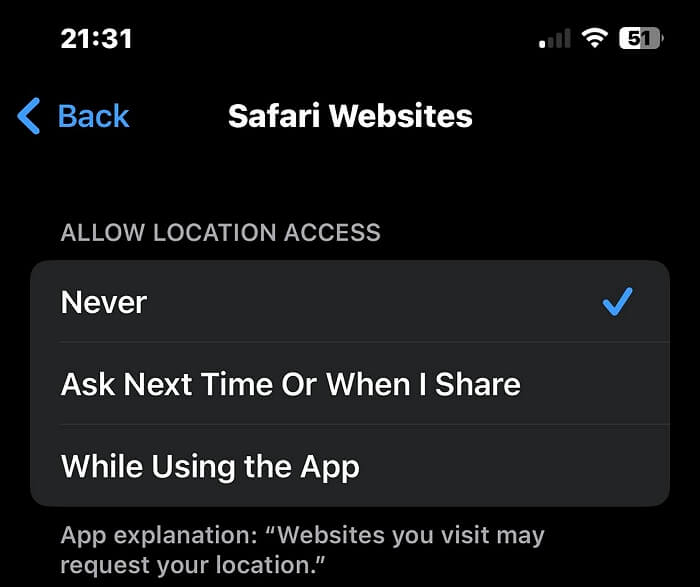
Step 3: Scroll down and select “Safari Websites” from the list of apps. Then, select the option that suits your requirements.
Note:
- Always: This means Safari will be able to turn on location services when Safari is running foreground or background.
- While Using the App: This allows Safari to access your location when you open the app.
Steps of Mac
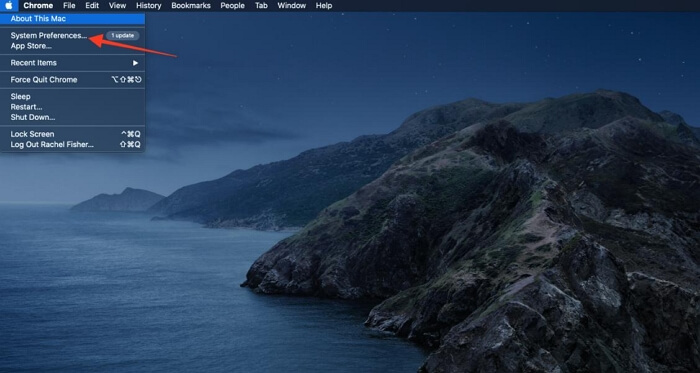
Step 1: Click on the “Apple Menu” icon at the top-left corner of your home screen and select “System Preferences”.
Step 2: Select “Security & Privacy” and click on the “Privacy” tab.
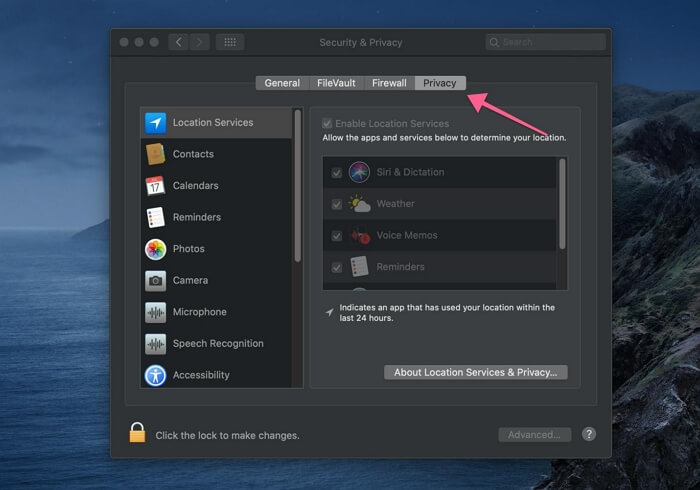
Step 3: Click on the “Padlock” icon at the bottom left corner of the window and enter your computer “ID/Password” when prompted.
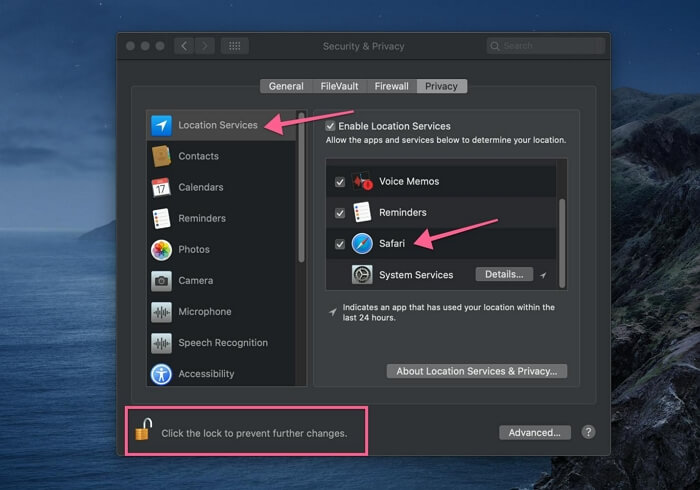
Step 4: Click on “Location Services” and tick the checkbox next to “Safari”. Then, click on the “Padlock” icon again to complete the operation.
Method 2: Allow Specific Safari Websites To Access Your Location
You can also take control of the websites that can access your location while browsing on Safari. See the steps below and learn how to allow specific Safari websites to access your location.
Steps for iPhone
Step 1: Open “Safari” app and visit the “Website” you want to grant access to your location.
Step 2: Tap on the letter icon “AA” at the bottom left corner. Then, select “Website Settings” from the menu list.
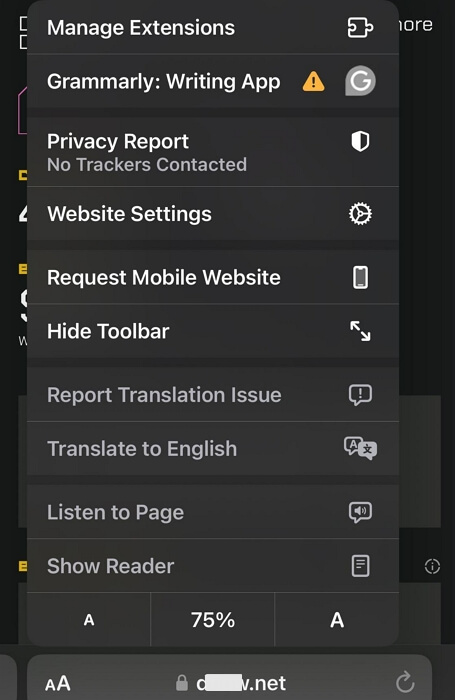
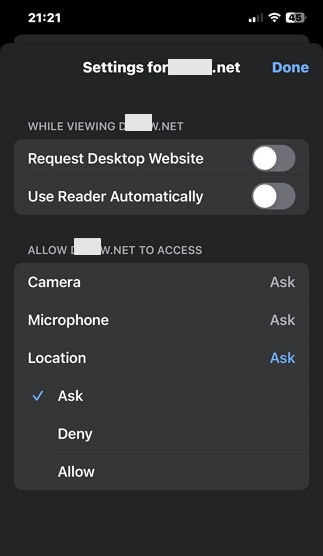
Step 3: Choose “Location” and select “Allow”.
Steps for Mac
Step 1: Open “Safari Browser” and click on the “Safari” tab at the top left-hand side. Then, select “Preferences” from the menu.
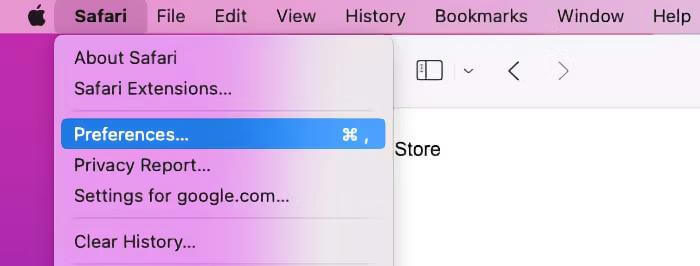
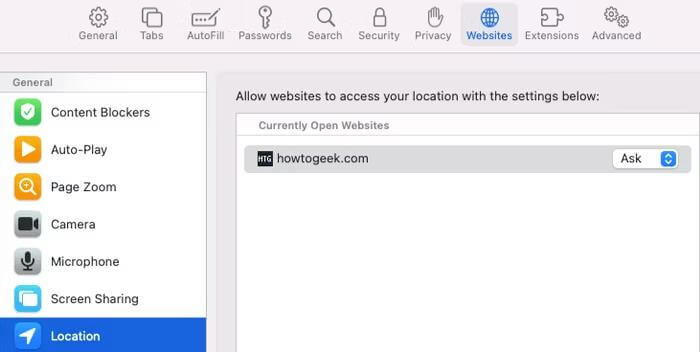
Step 2: Click on the “Websites” tab and select “Location” from the menu on the left-hand side. Then, click the “Drop-down” icon next to the website you want to give access to your location and click on the relevant settings.
Conclusion
This page can always come to your rescue whenever you need to how to change your location on iphone Safari. As you can see, the steps are pretty simple, and you don’t need any technical skills to be able to execute the operation. If you want to change your location on Safari with high accuracy, make sure you use iWhere iPhone Location Changer.
